Search
Salesforce is one of the world’s leading CRM platforms, helping businesses manage customer relationships, sales, and support with ease. With the SurveySparrow app , you can seamlessly connect the two platforms to make your feedback workflows more efficient. The app lets you set up survey triggers directly within Salesforce and map responses back into your Salesforce environment, so your teams always have the latest customer insights at their fingertips.
You might find this especially helpful when:
In this article, we’ll outline the steps to set up and utilize the Salesforce app, from start to finish. We’ll primarily cover:
1. Inside the Setup section in your Salesforce account, find the Apps section from the left-hand panel menu. Then click on AppExchange Marketplace from the drop-down options.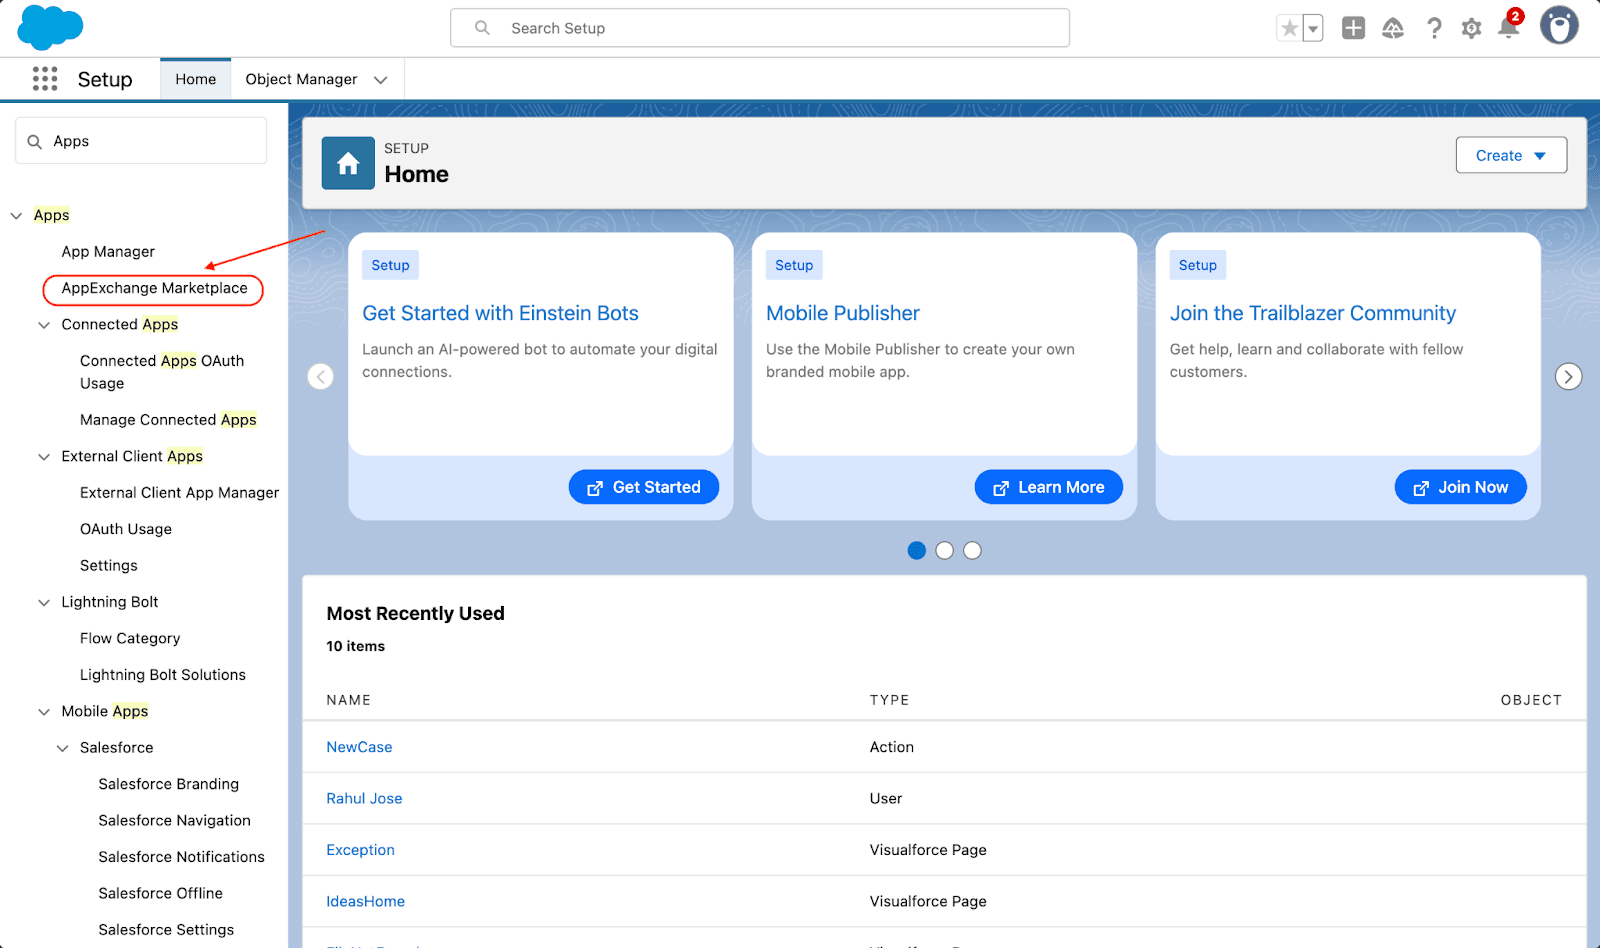
2. A pop-up appears to redirect you to the marketplace. Click on Go To AppExchange.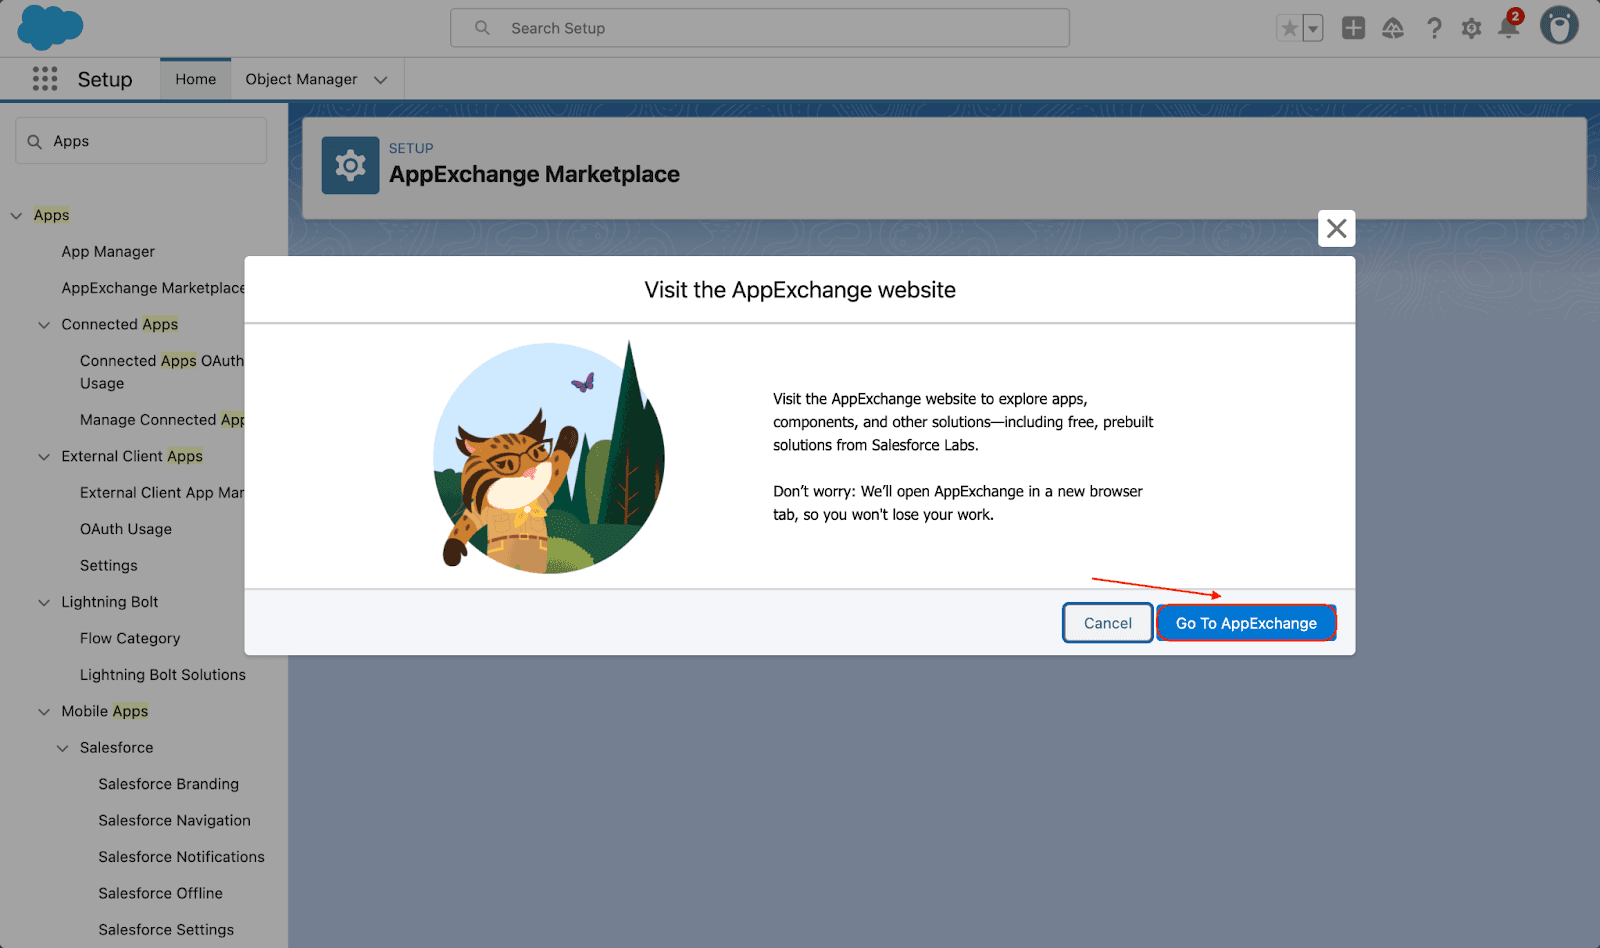
3. The marketplace opens up in a new tab. Use the search bar to find the SurveySparrow app, then open it when it appears in the results.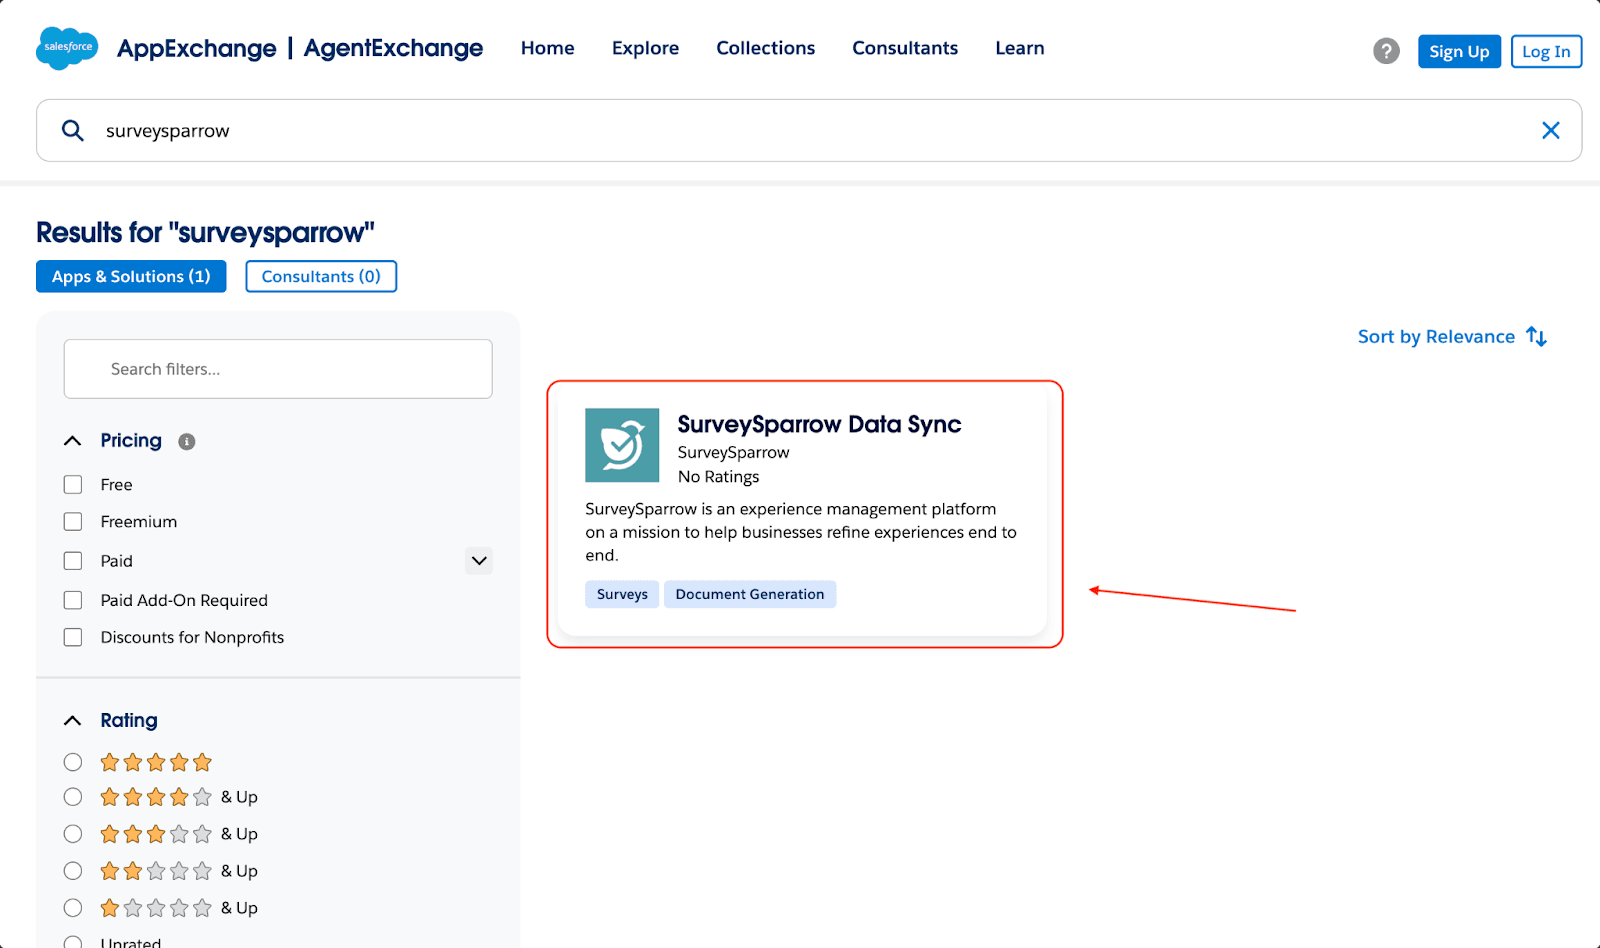
4. Inside the app listing page, click on Get It Now.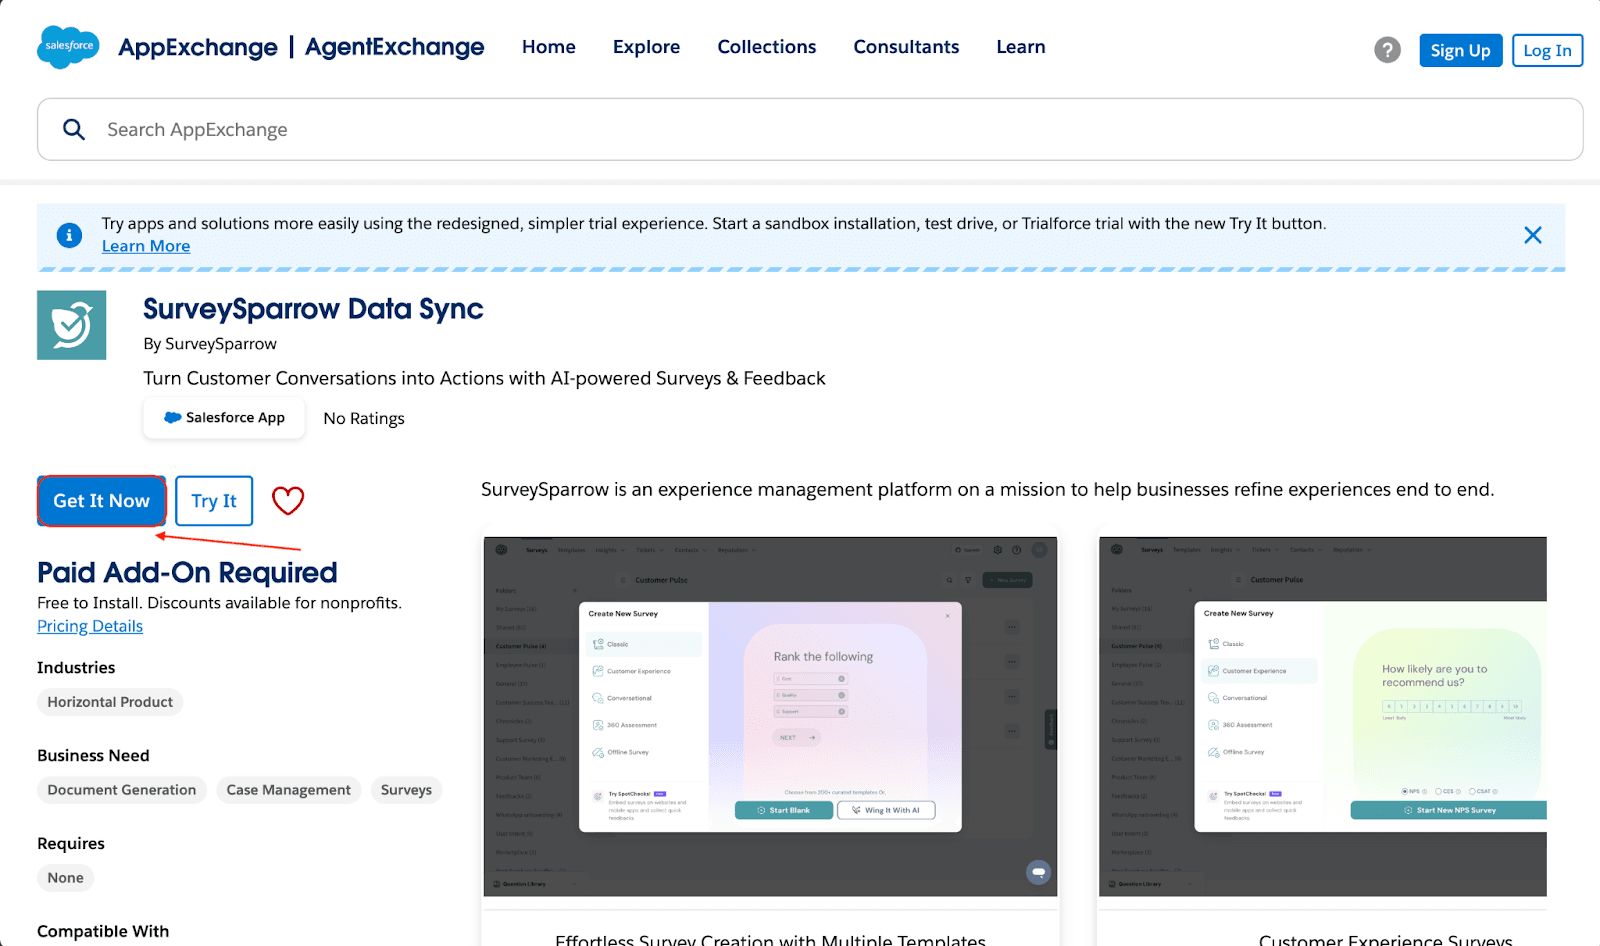
5. A pop-up appears, directing you to connect your Trailblazer account to complete the installation. Click Log In.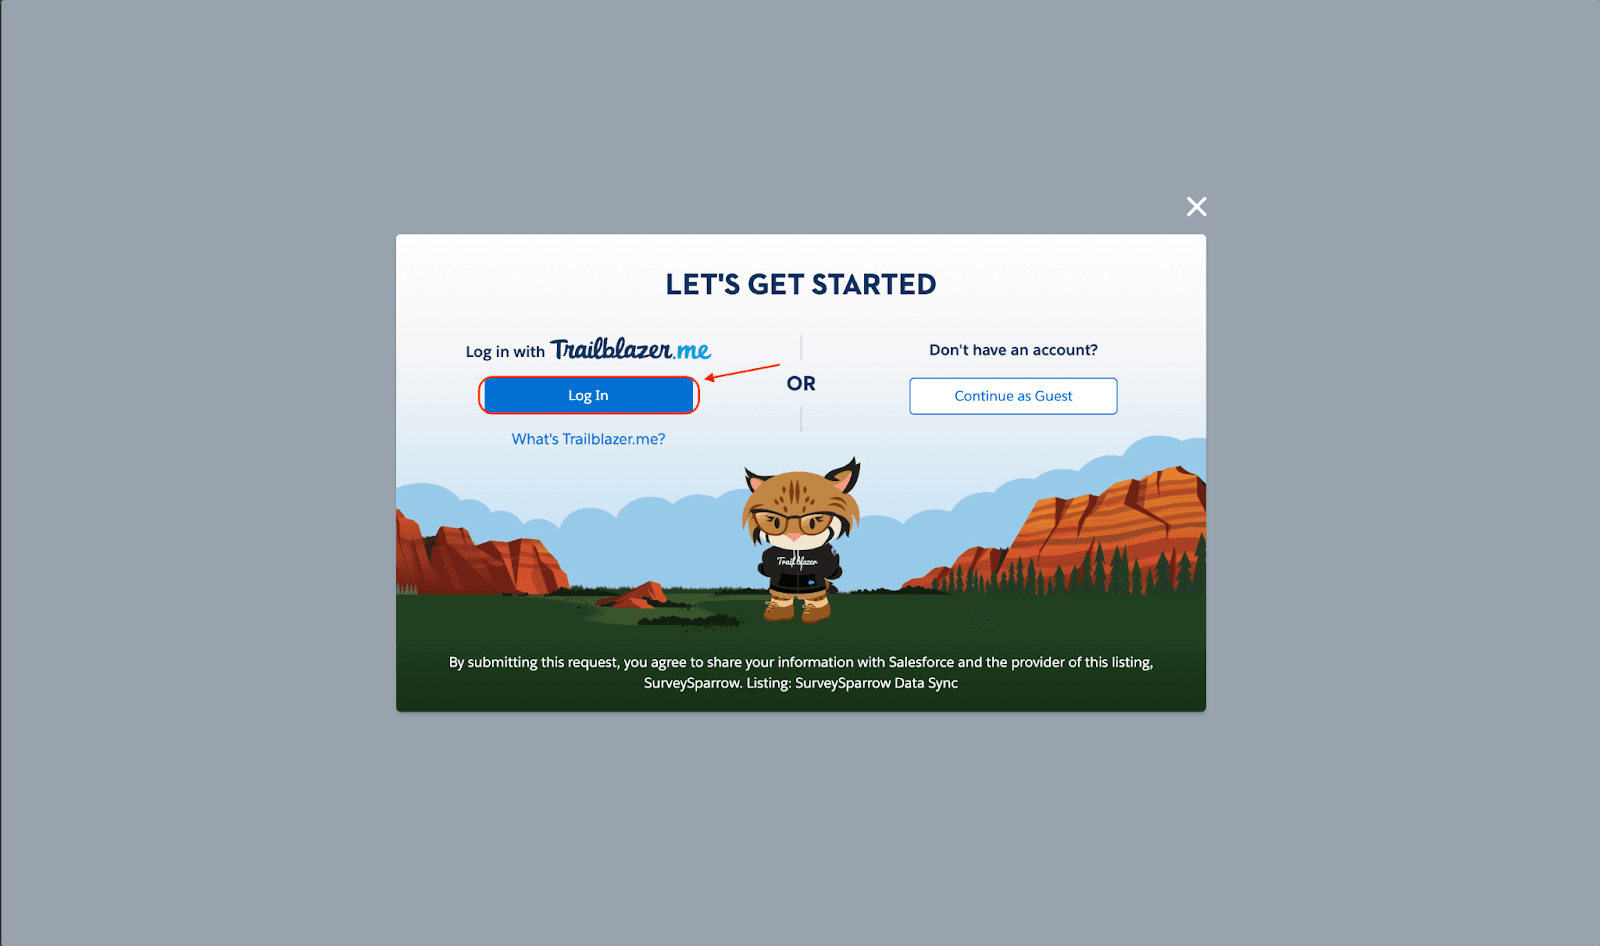
6. Inside the login screen, you can use your associated email or login with other accounts.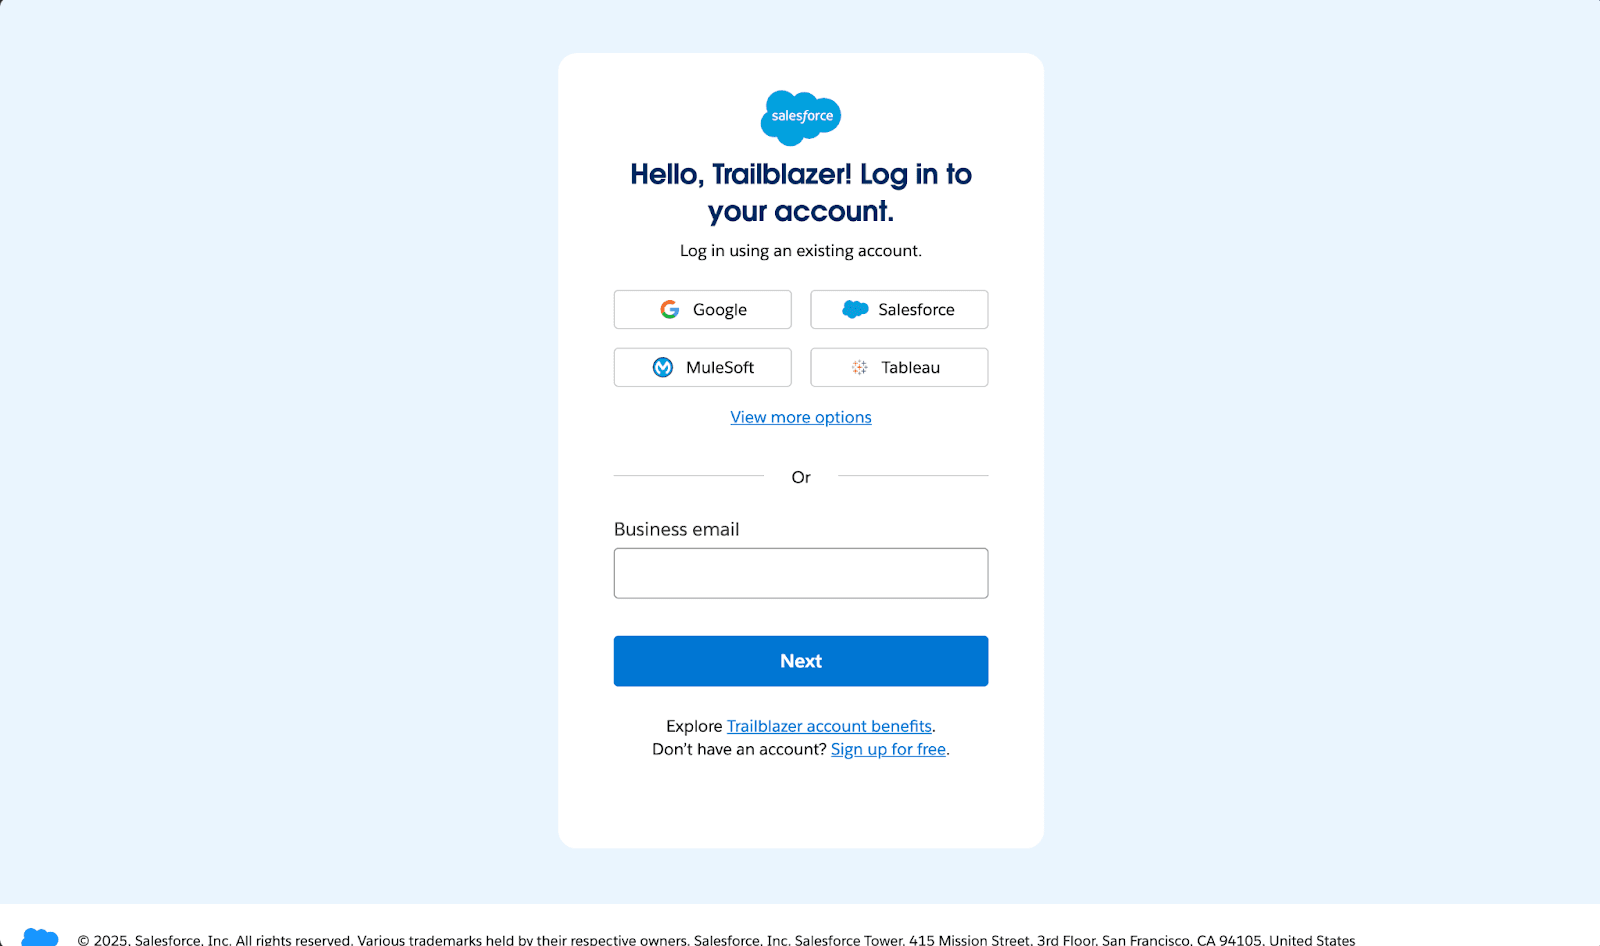
7. After logging in, you need to choose a Salesforce org to install the app. You can choose an org via a connected Salesforce account. Click on the drop-down to choose an account. Then click on Install in Production.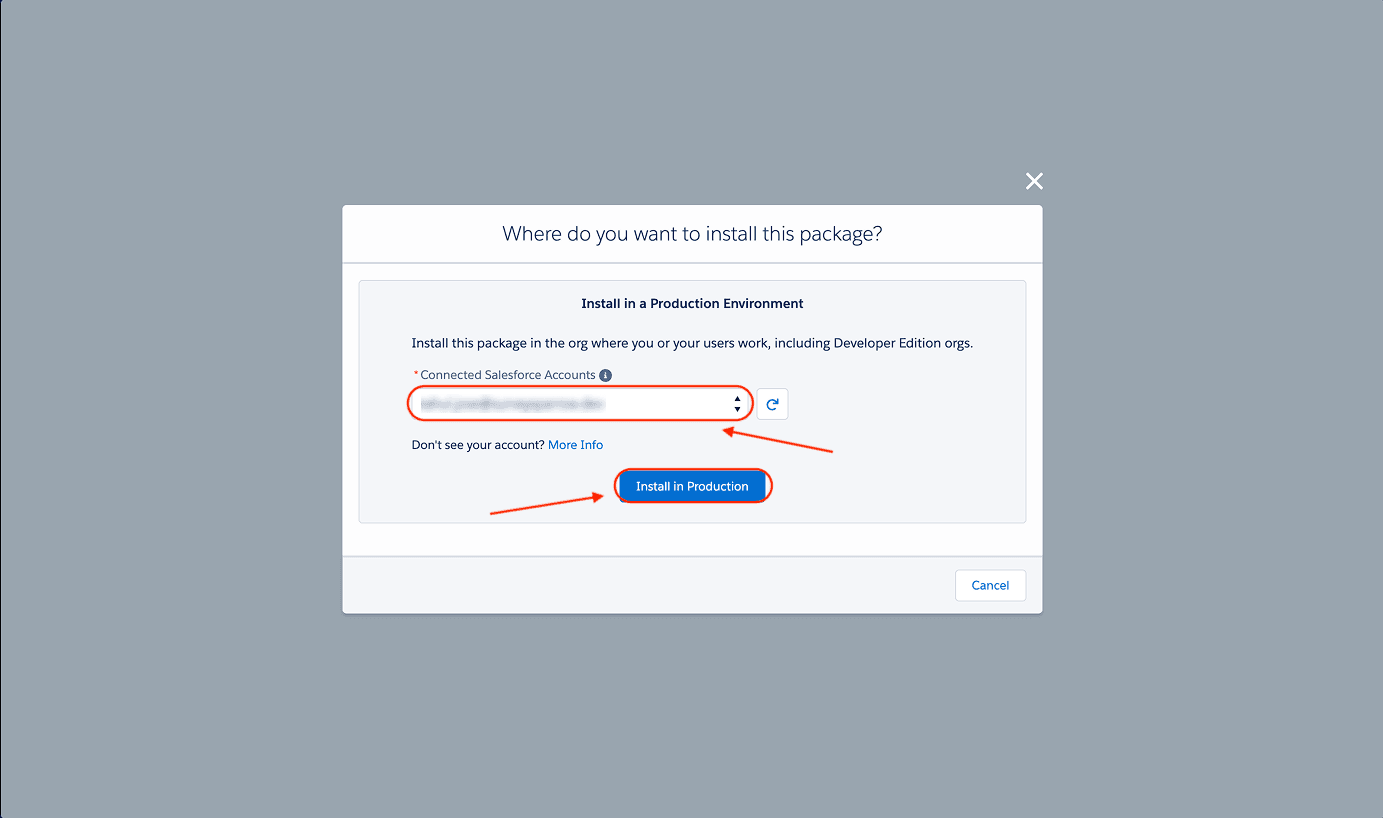
8. A final installation screen opens. If you’re satisfied, click on the terms and conditions checkbox, then click on Confirm and Install.
9. You are now taken to a Salesforce login screen. Type in your credentials and click Log In.
10. Now you must choose the installation configuration. The default option is Install for Admins, which provides access to Salesforce system administrators only. We recommend that you use it because the other two options have a limited success rate. Next, click Install.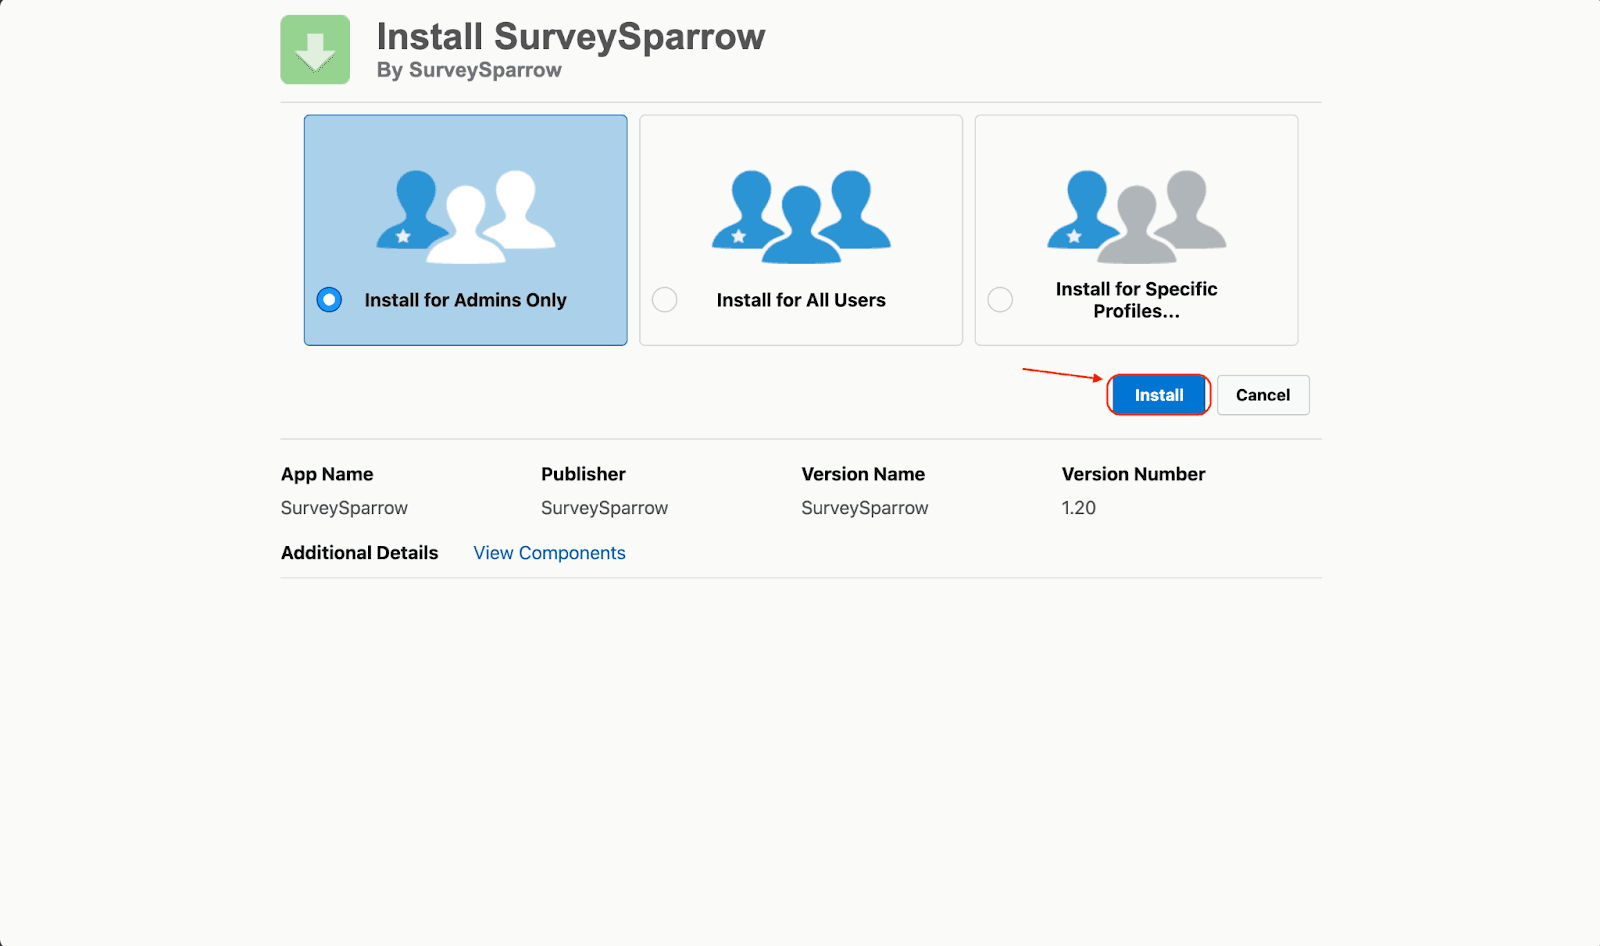
11. A pop-up appears, asking for third-party access. Click on the check-box and then click Continue.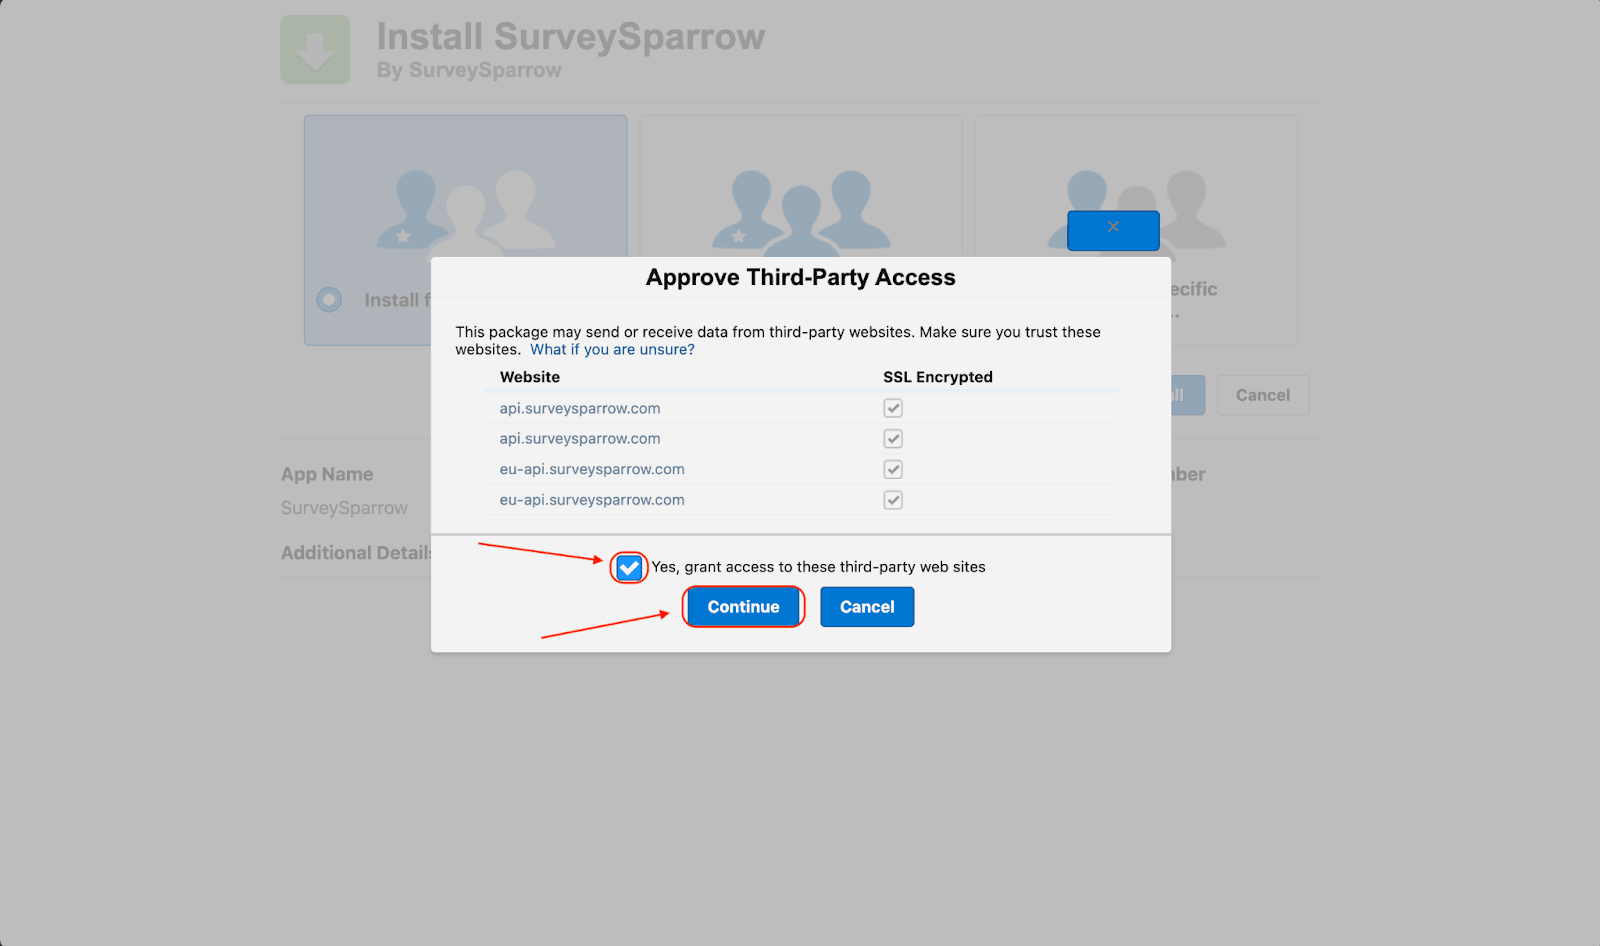
12. When the installation is complete, click Done.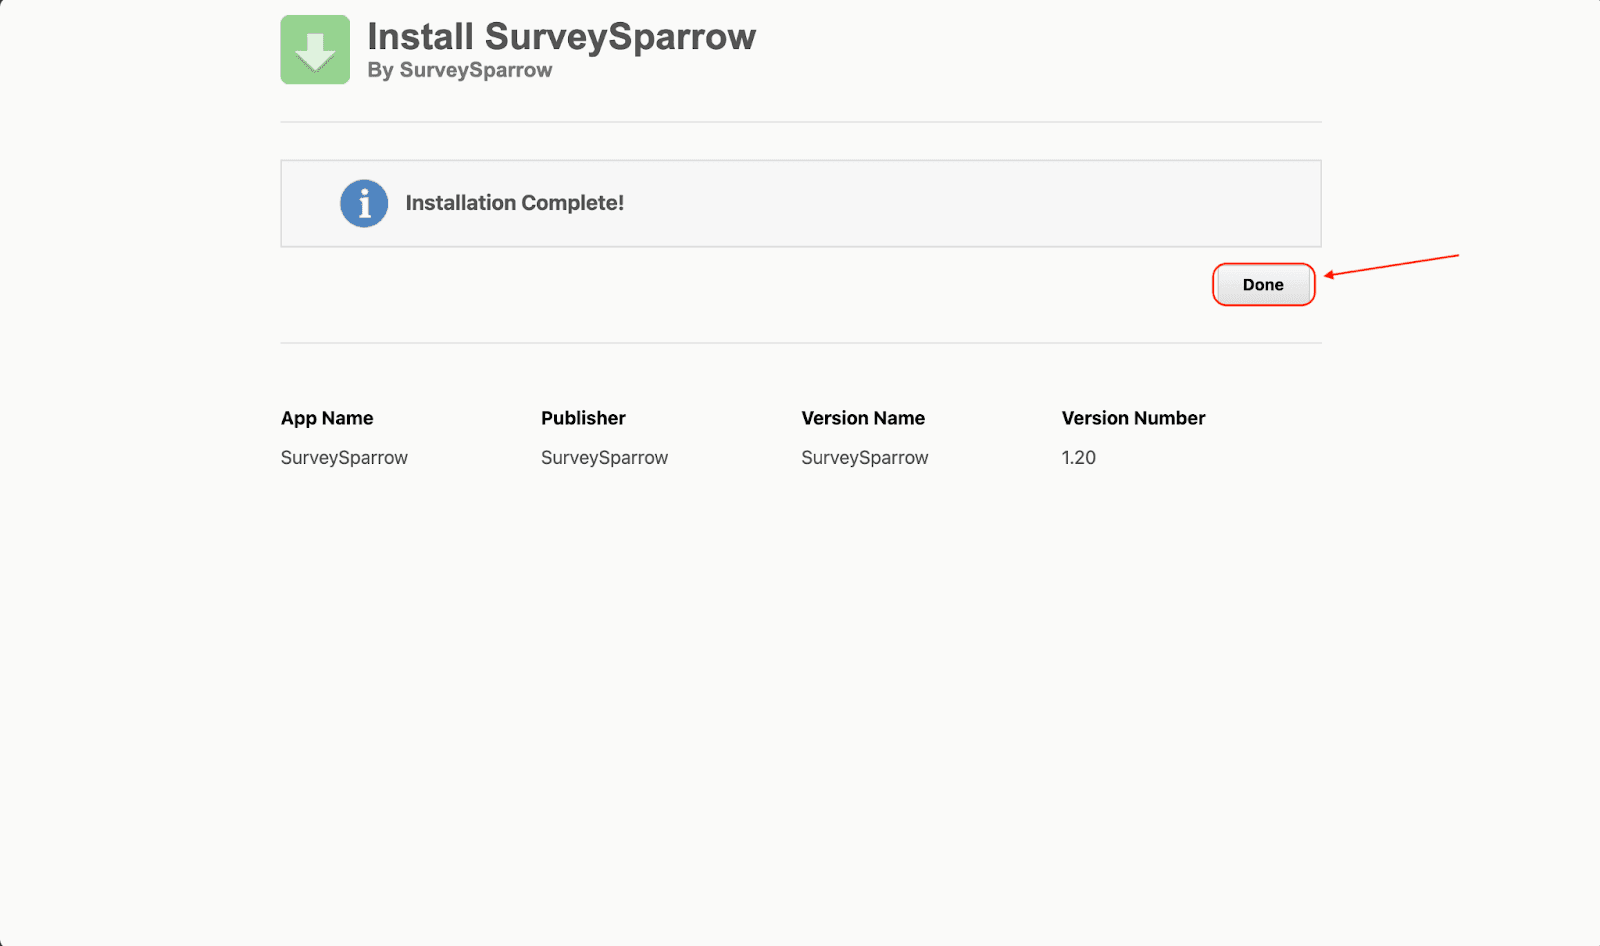
13. Now, head back to the original tab. Click on the grid icon next to Setup to open the App Launcher.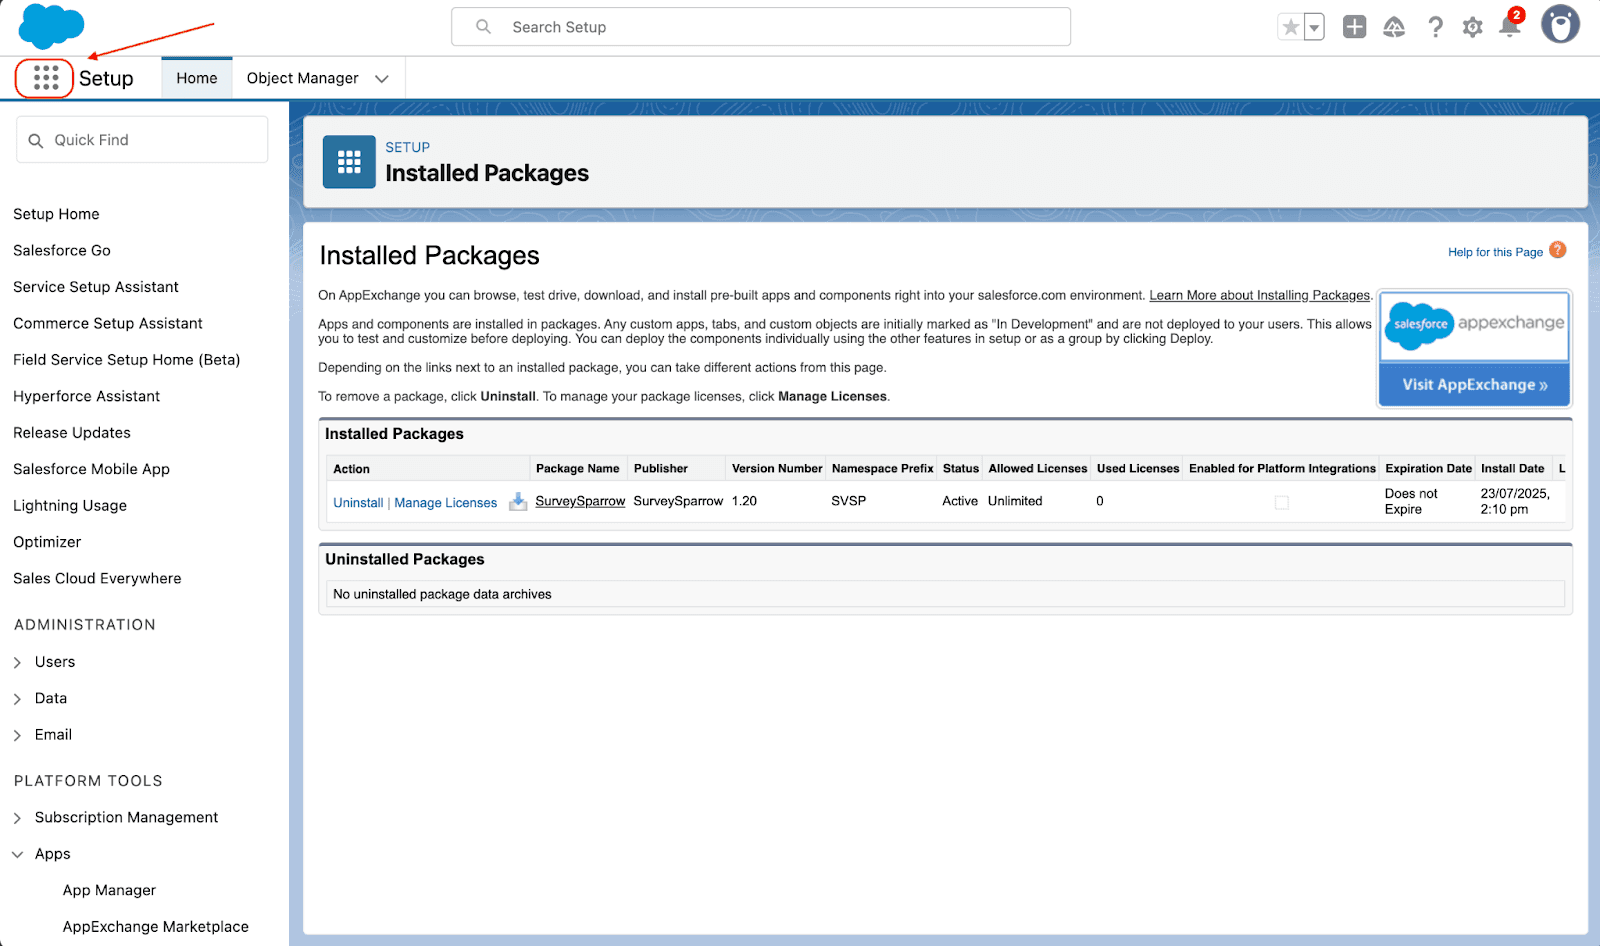
14. Use the search box to find SurveySparrow, then click on it.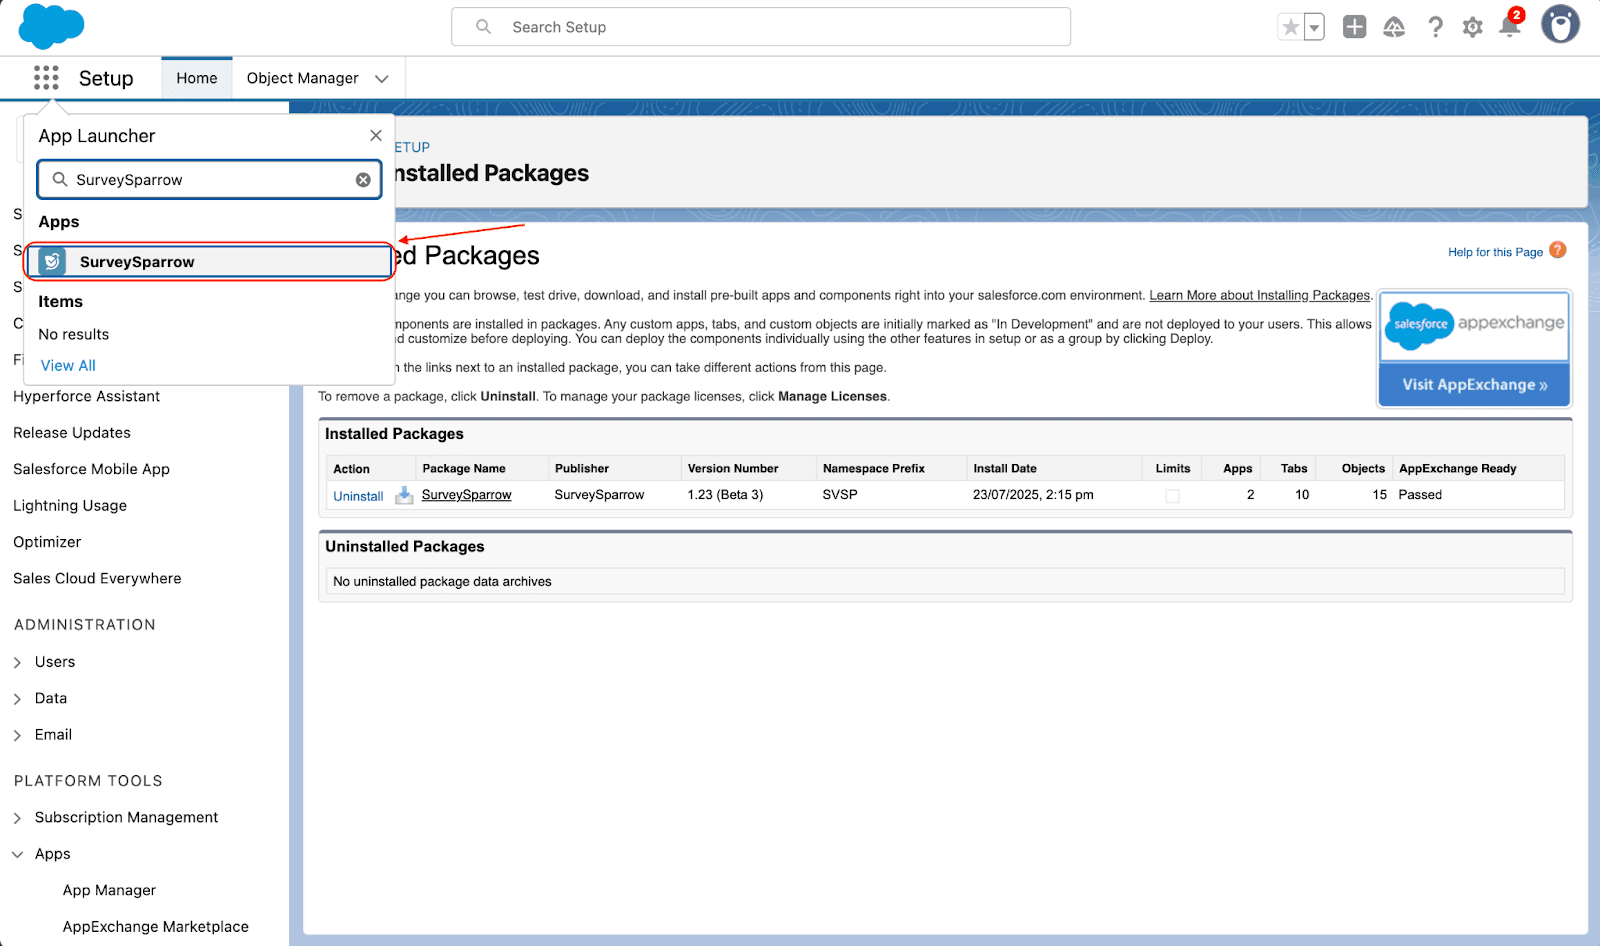
15. While the app is now present in your environment, you need to connect your SurveySparrow account. So click on Connect Now.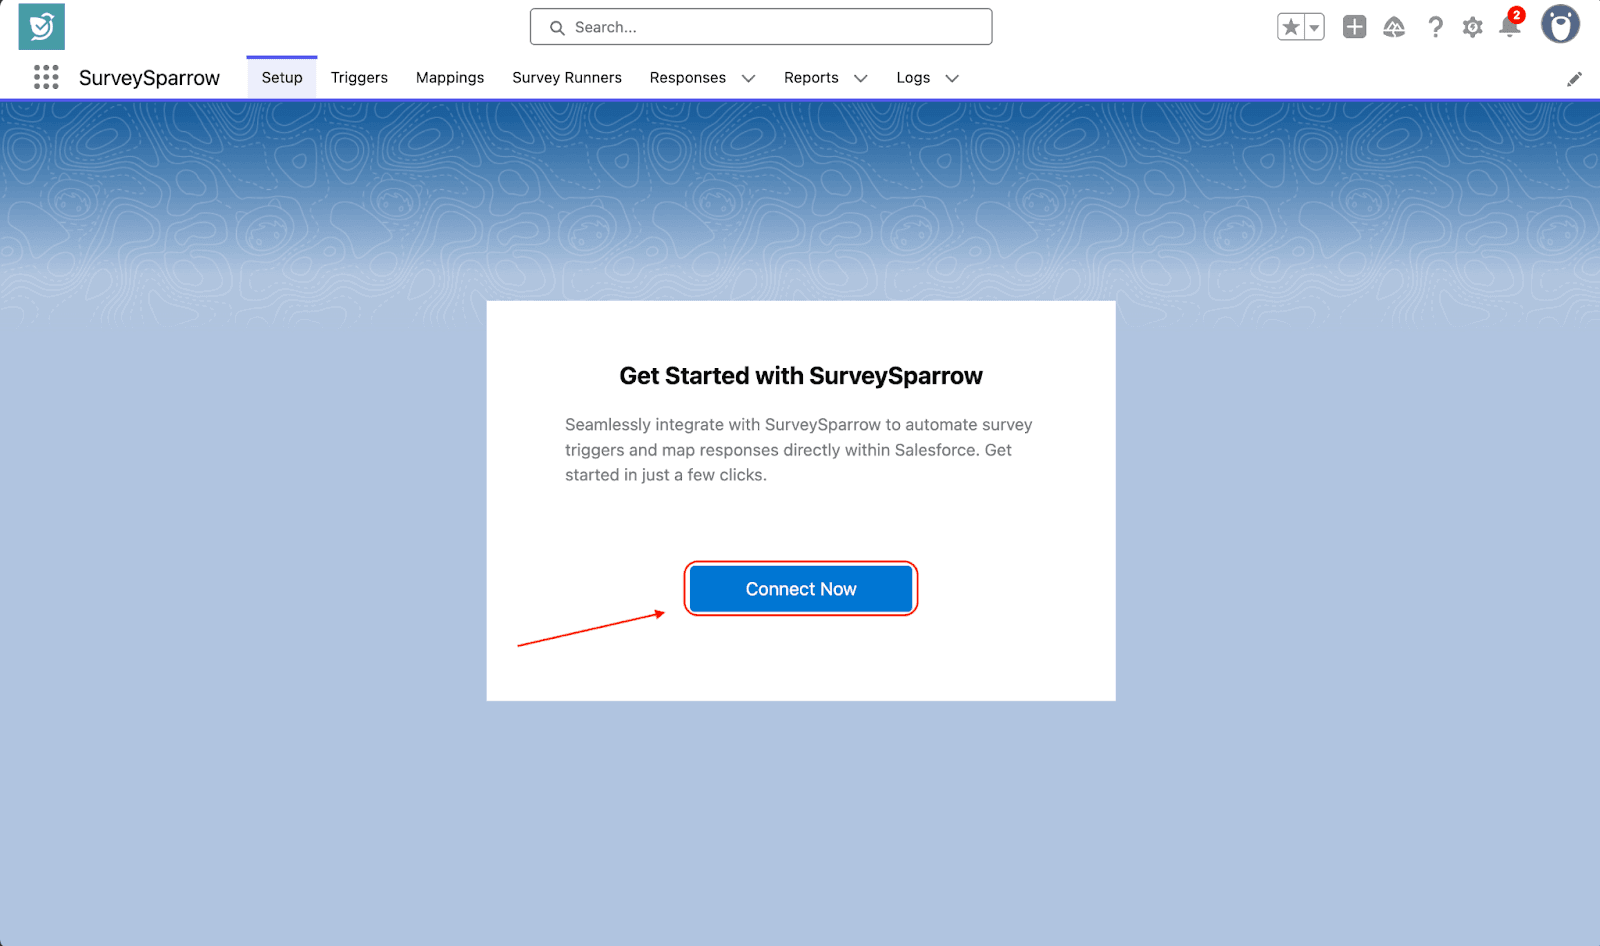
16. Type in your SurveySparrow account’s email address, then click Next.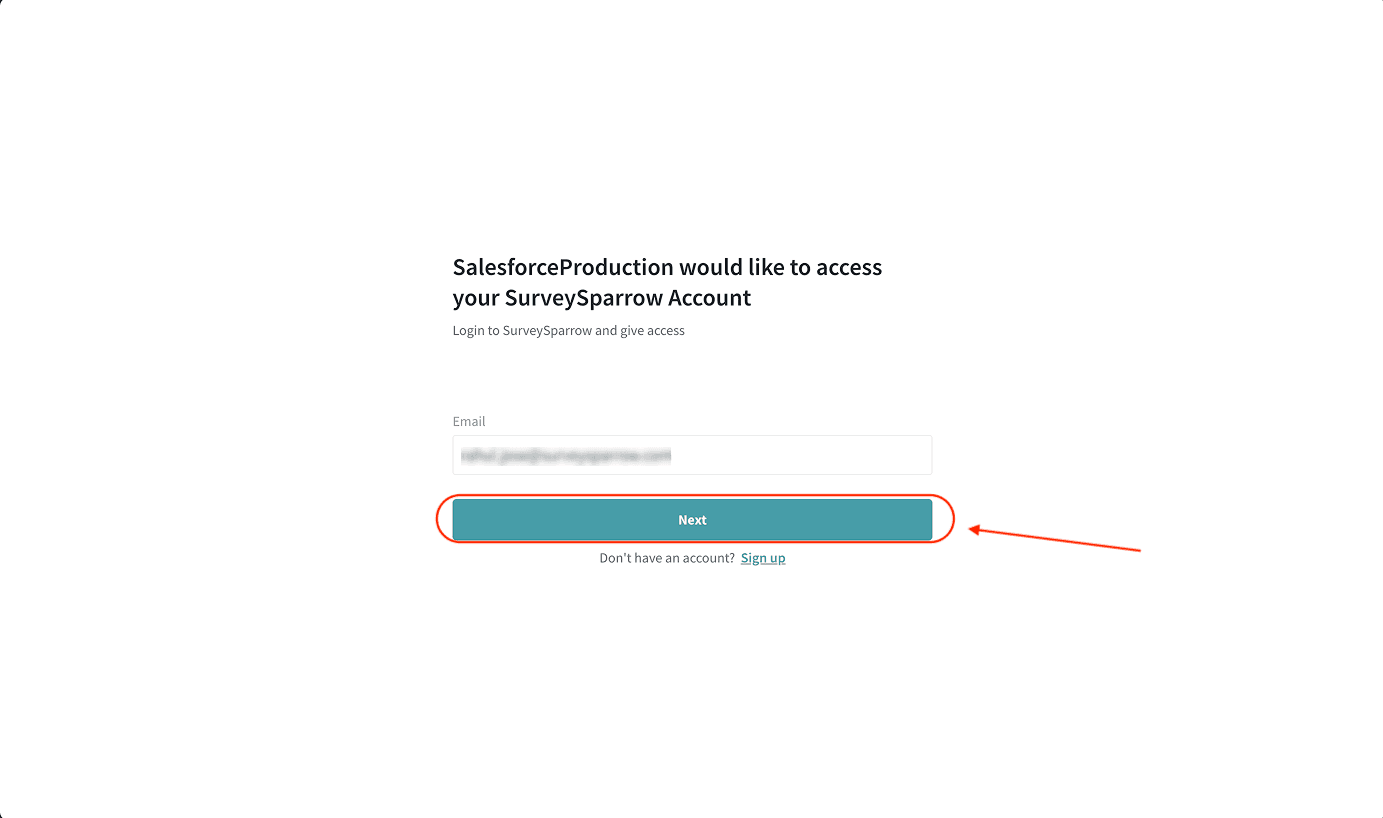
Note: If you have multiple SurveySparrow accounts tied to the same email, you will need to select one.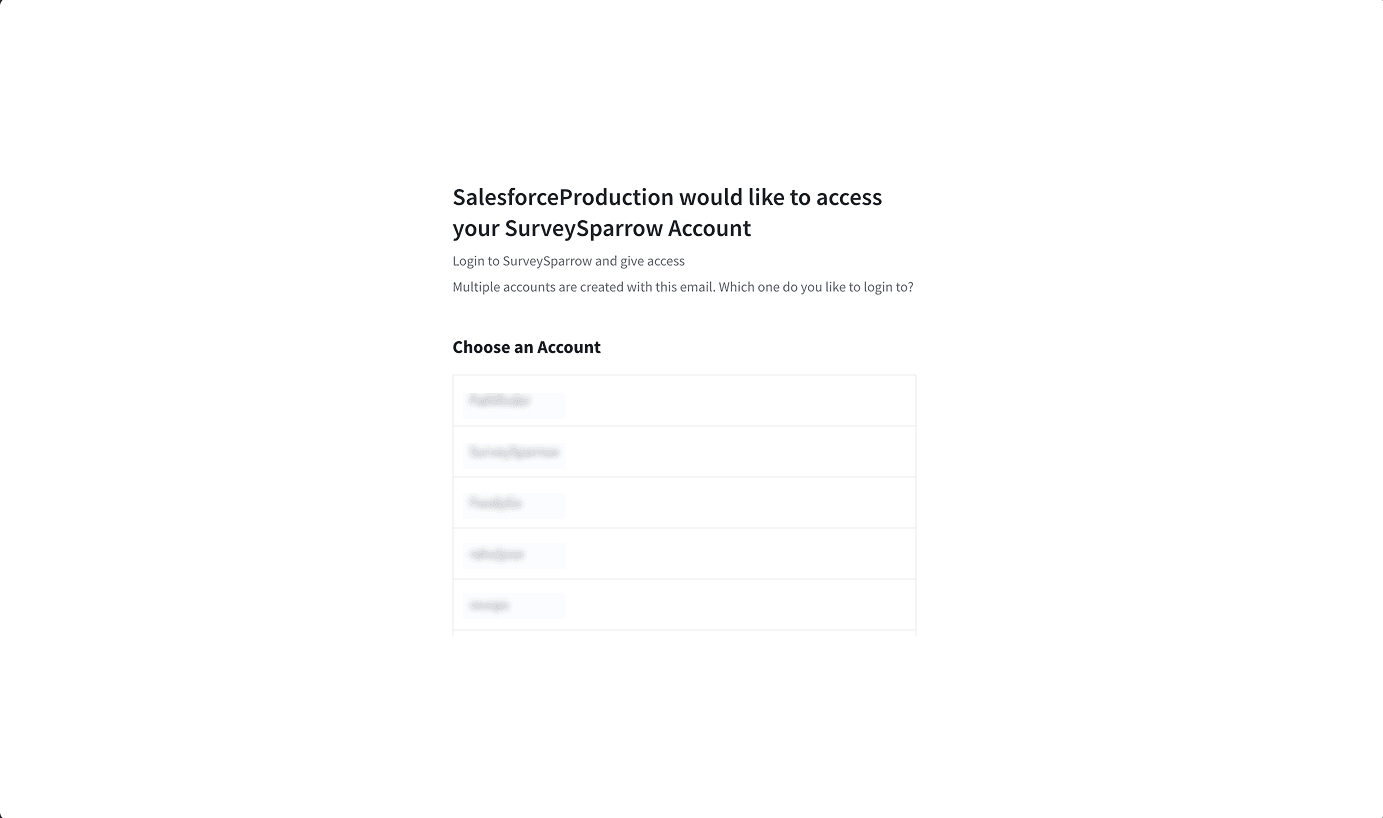
17. Enter your password and click Log In.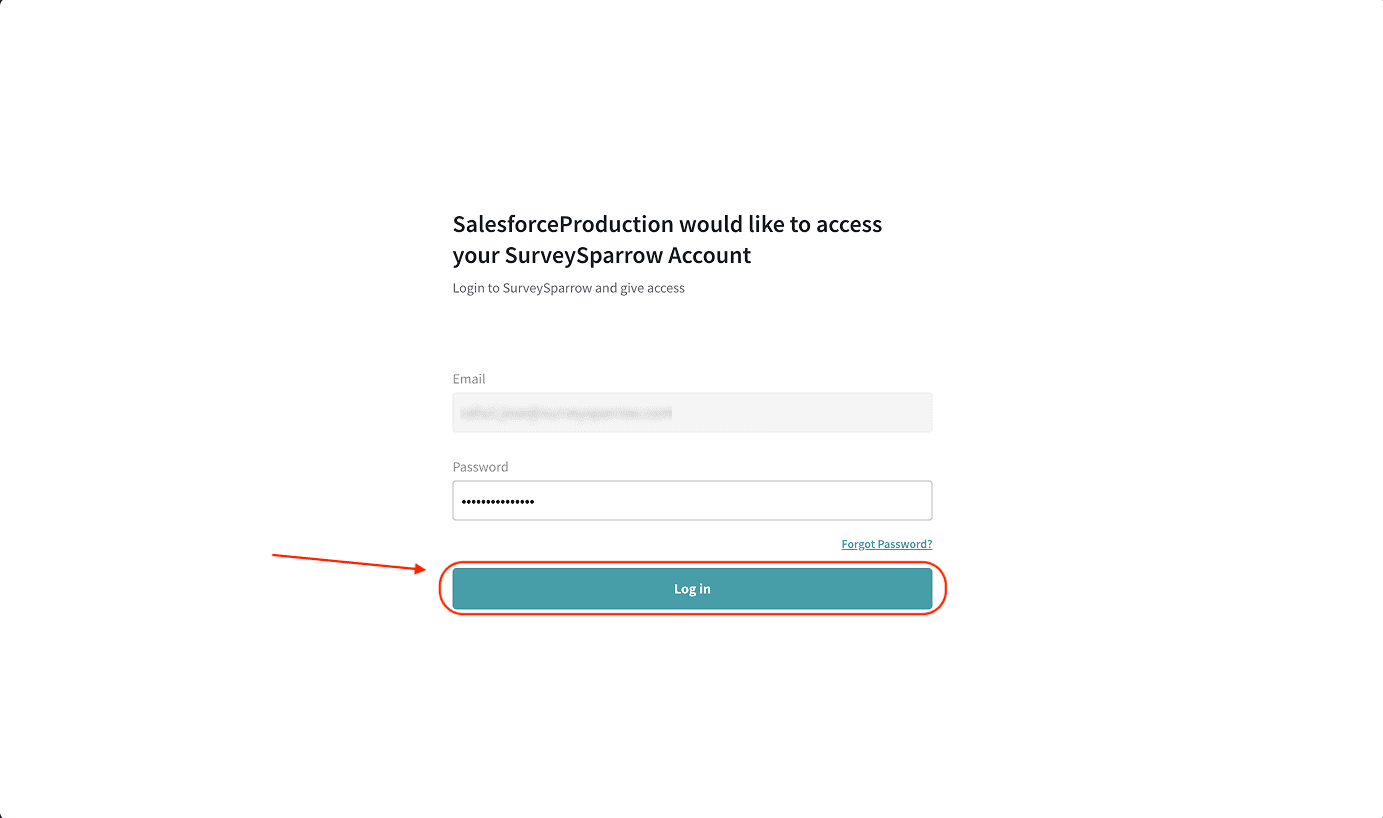
18. An authorization screen appears. Click Authorize.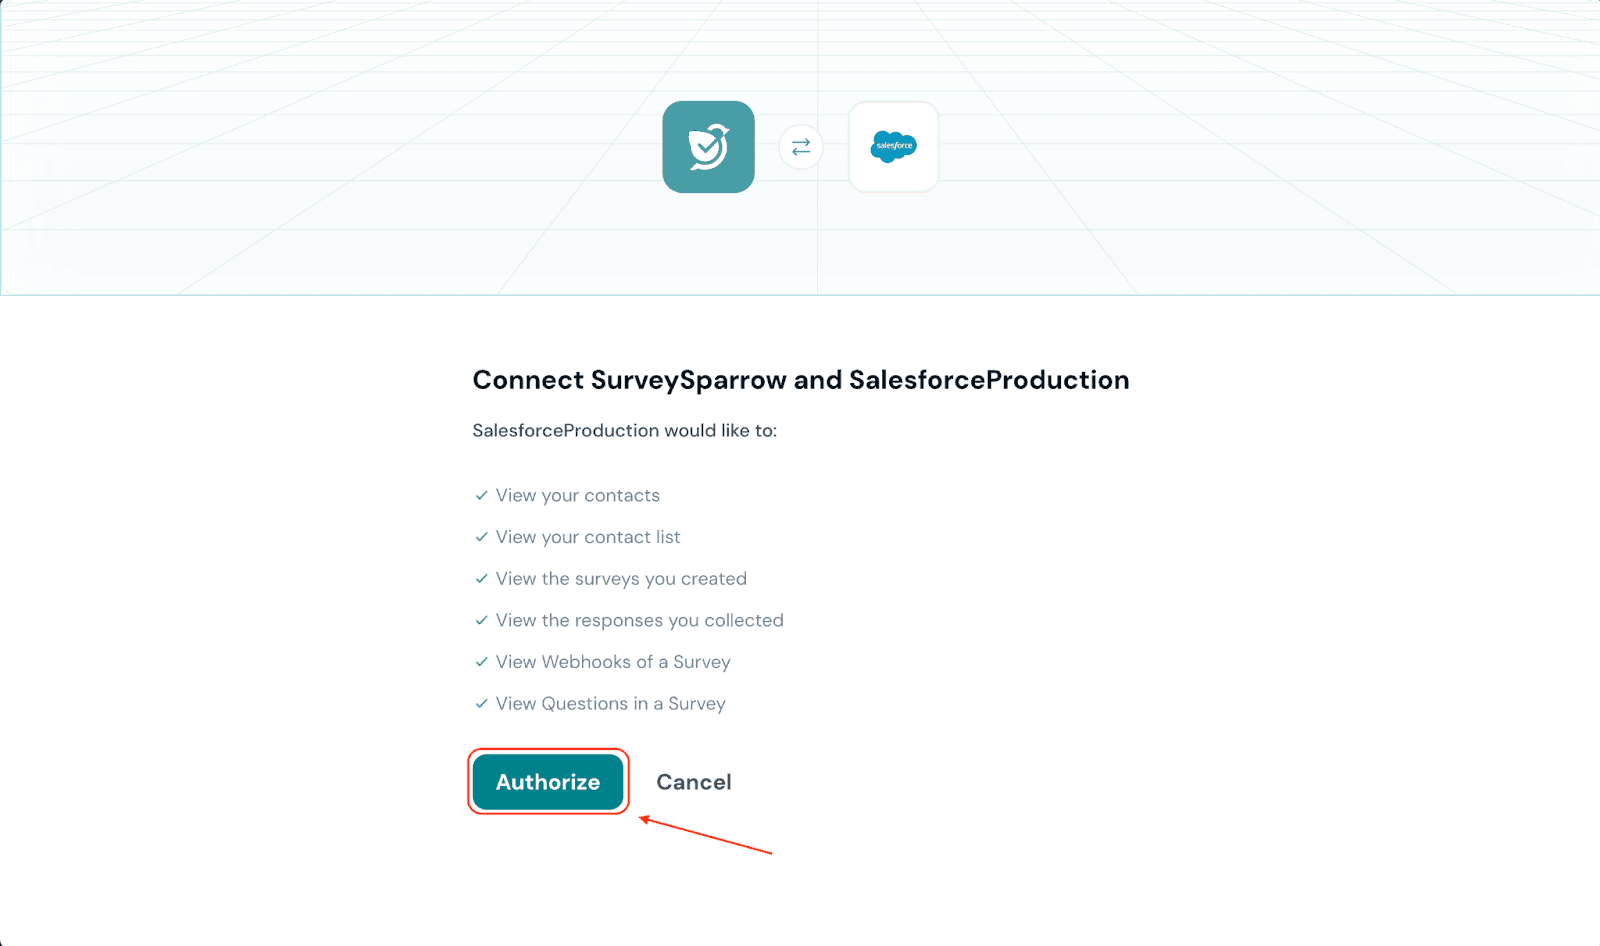
19. You are directed to another Salesforce login screen. Enter your credentials and click Log In.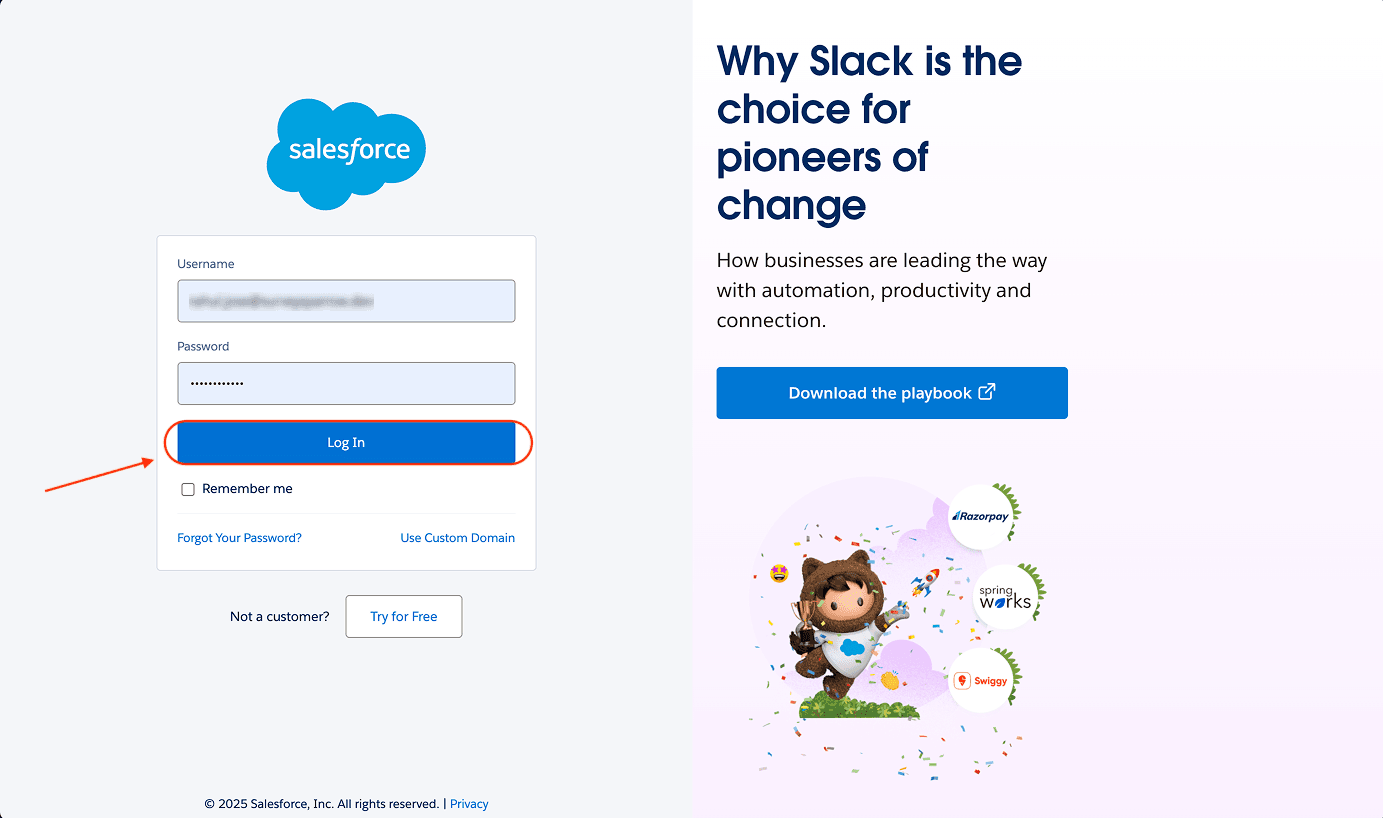
20. Now your SurveySparrow app is ready to use.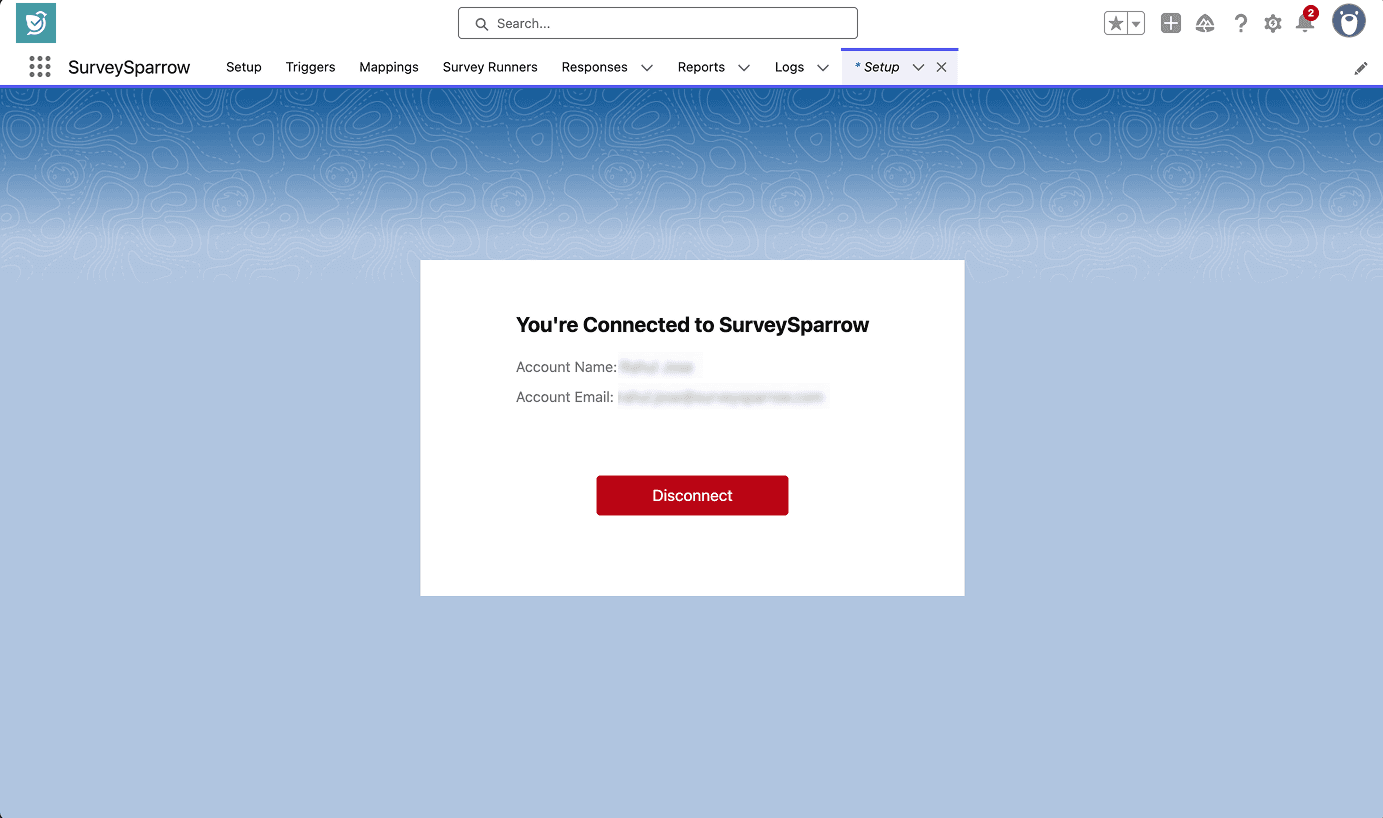
The SurveySparrow app has two kinds of user permissions:
Let’s understand this with an example: an organization that uses Salesforce as their CRM. The revenue operations team gets SurveySparrow Admin permissions. They create a trigger to send surveys to new customers if the corresponding Opportunity in Salesforce is marked as a Deal. The field sales team gets SurveySparrow User permissions - whenever they close a deal and mark it on Salesforce, the customer receives a survey.
When the app is installed as described earlier, only system administrators get SurveySparrow Admin permissions. But if you would like to give other users this permission (or SurveySparrow User permissions), follow the steps below:
1. From the Salesforce Setup Menu, search for Permission Sets under the Users section in the left hand panel.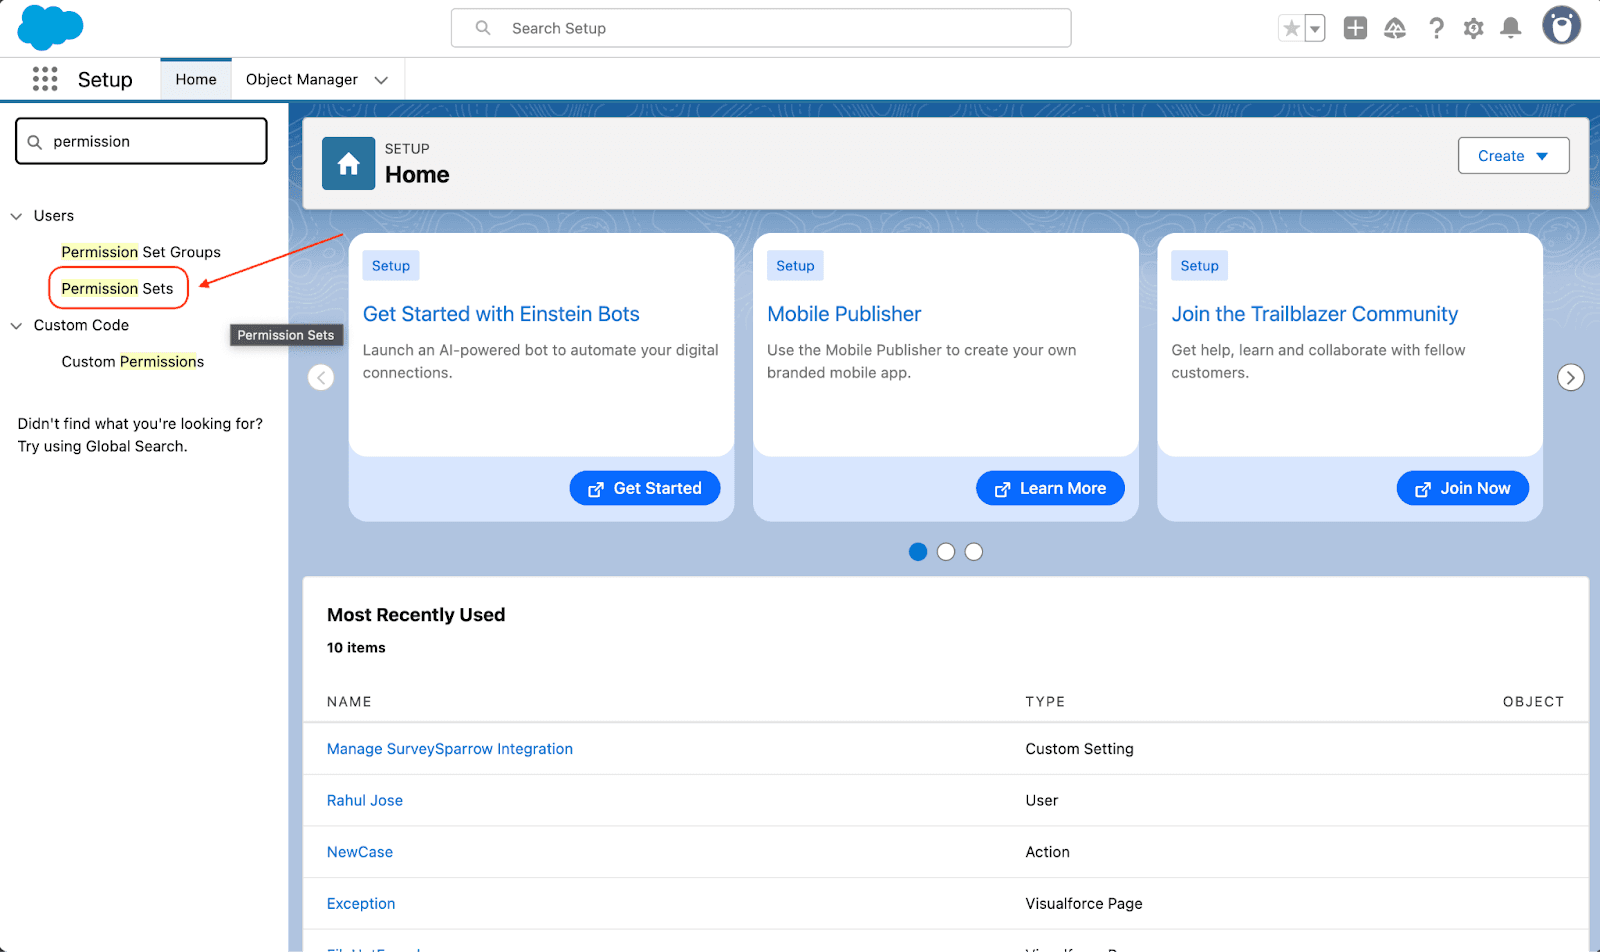
2. The entire list of permission sets opens up. Click on S in the alphabet gallery.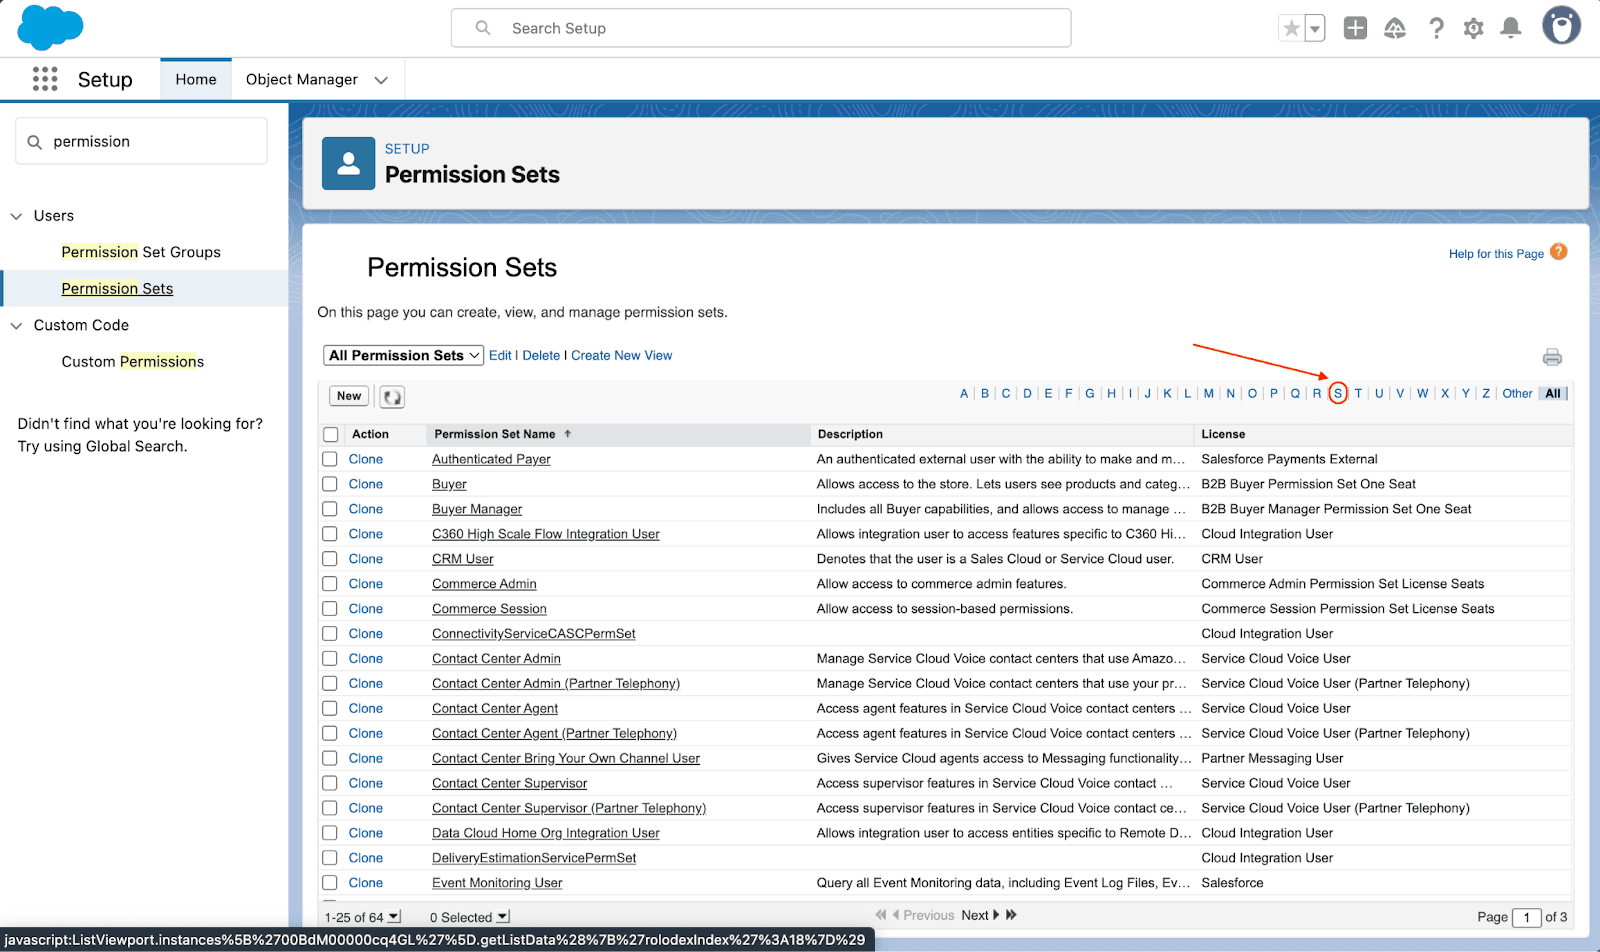
3. From the list of S-lettered permissions, click on SurveySparrow Admin or SurveySparrow User. For this article, we’ll click on SurveySparrow Admin (however the next steps are identical for both permissions).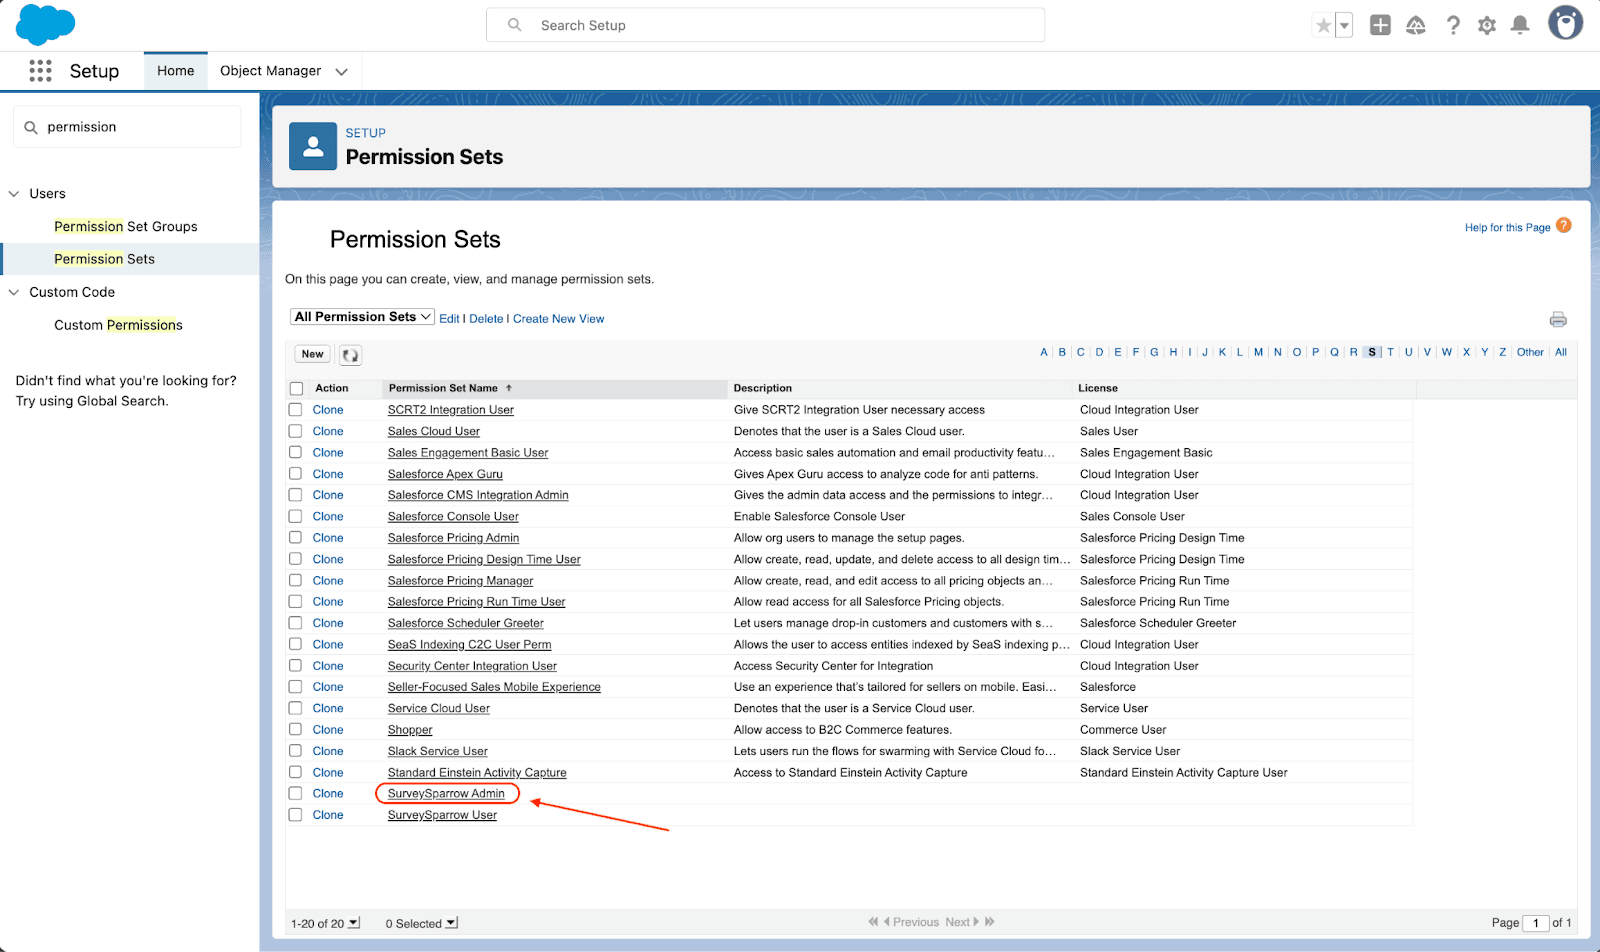
4. Click on Manage Assignments.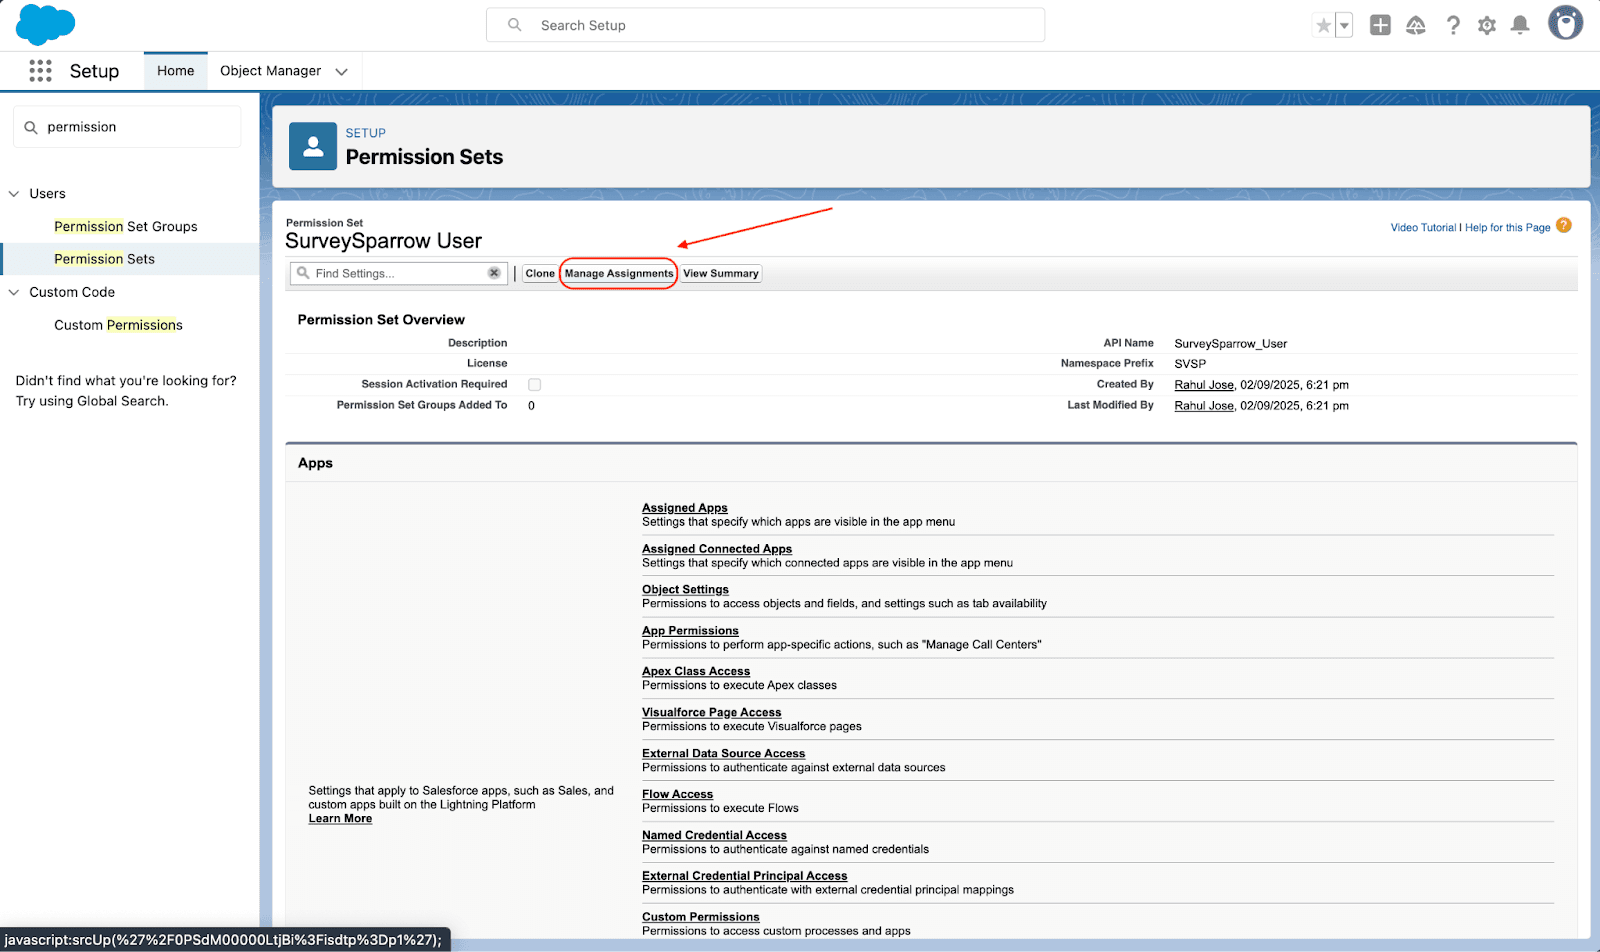
5. Next, click Add Assignment.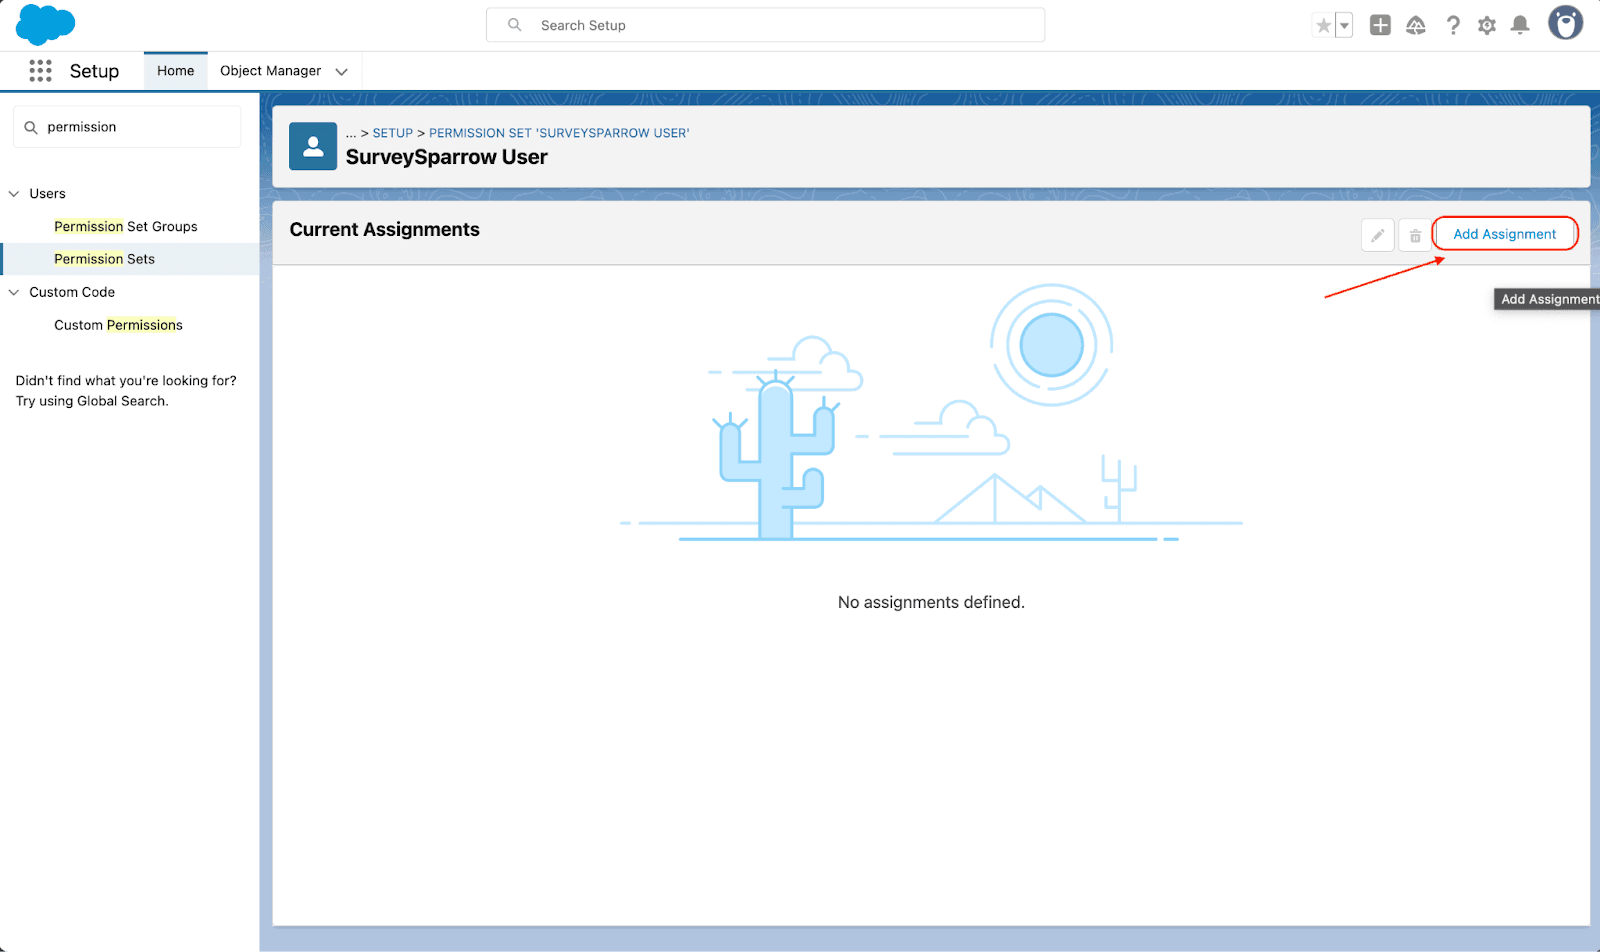
6. A full list of users appears. If you wish to select a user, click on the checkbox to the left of their name. Once you’ve selected all the users you want to provide permissions to, click Next.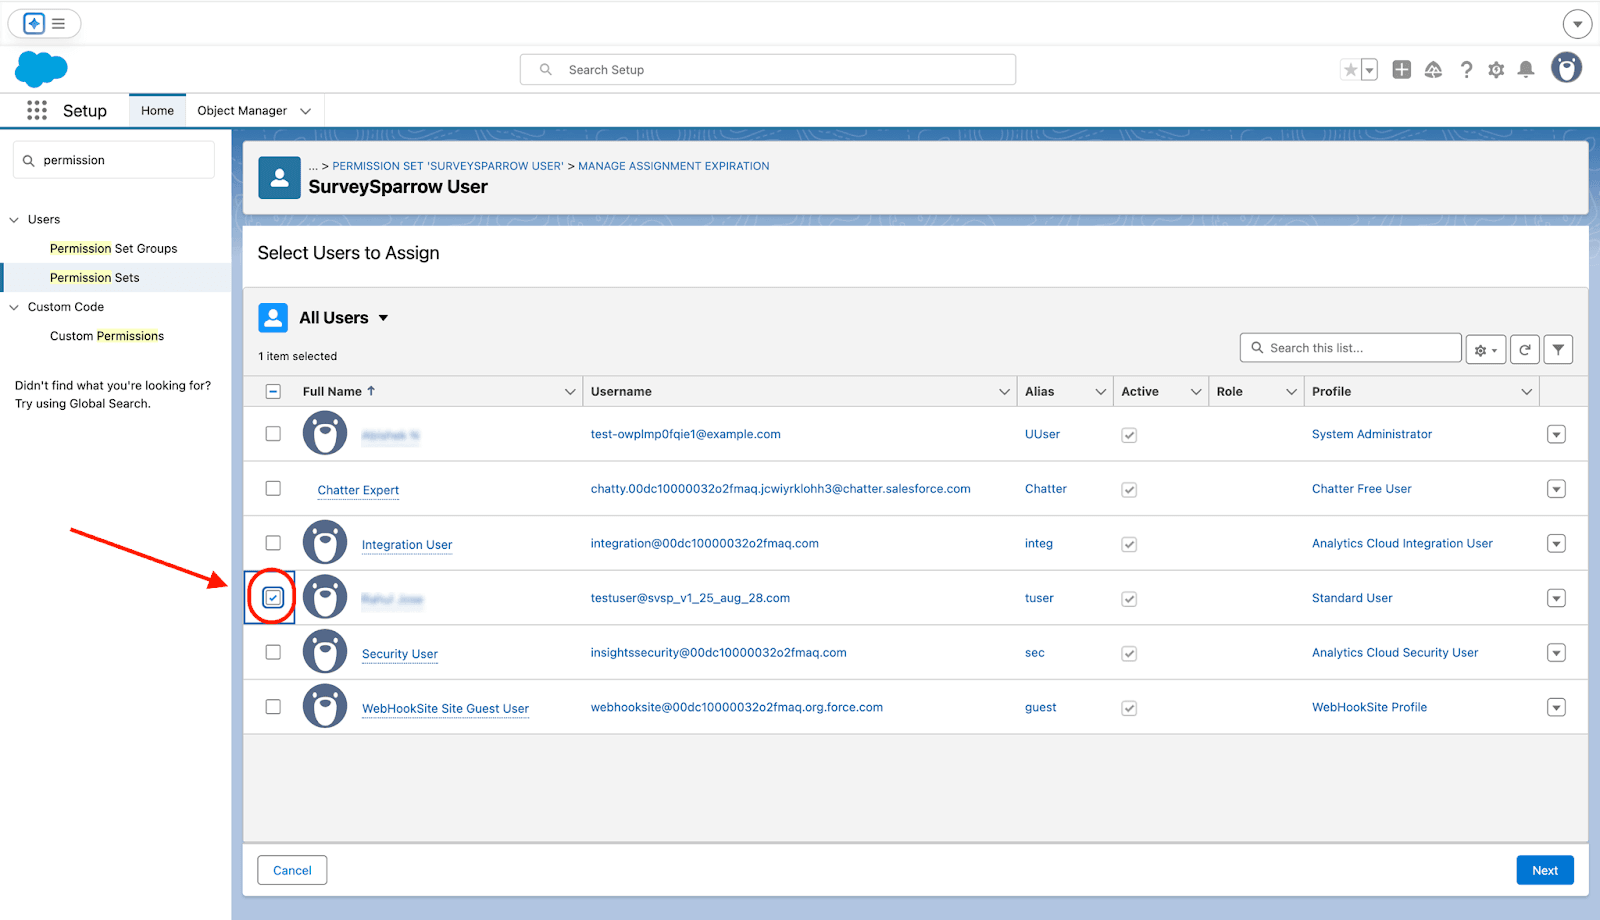
7. Finally, click Assign.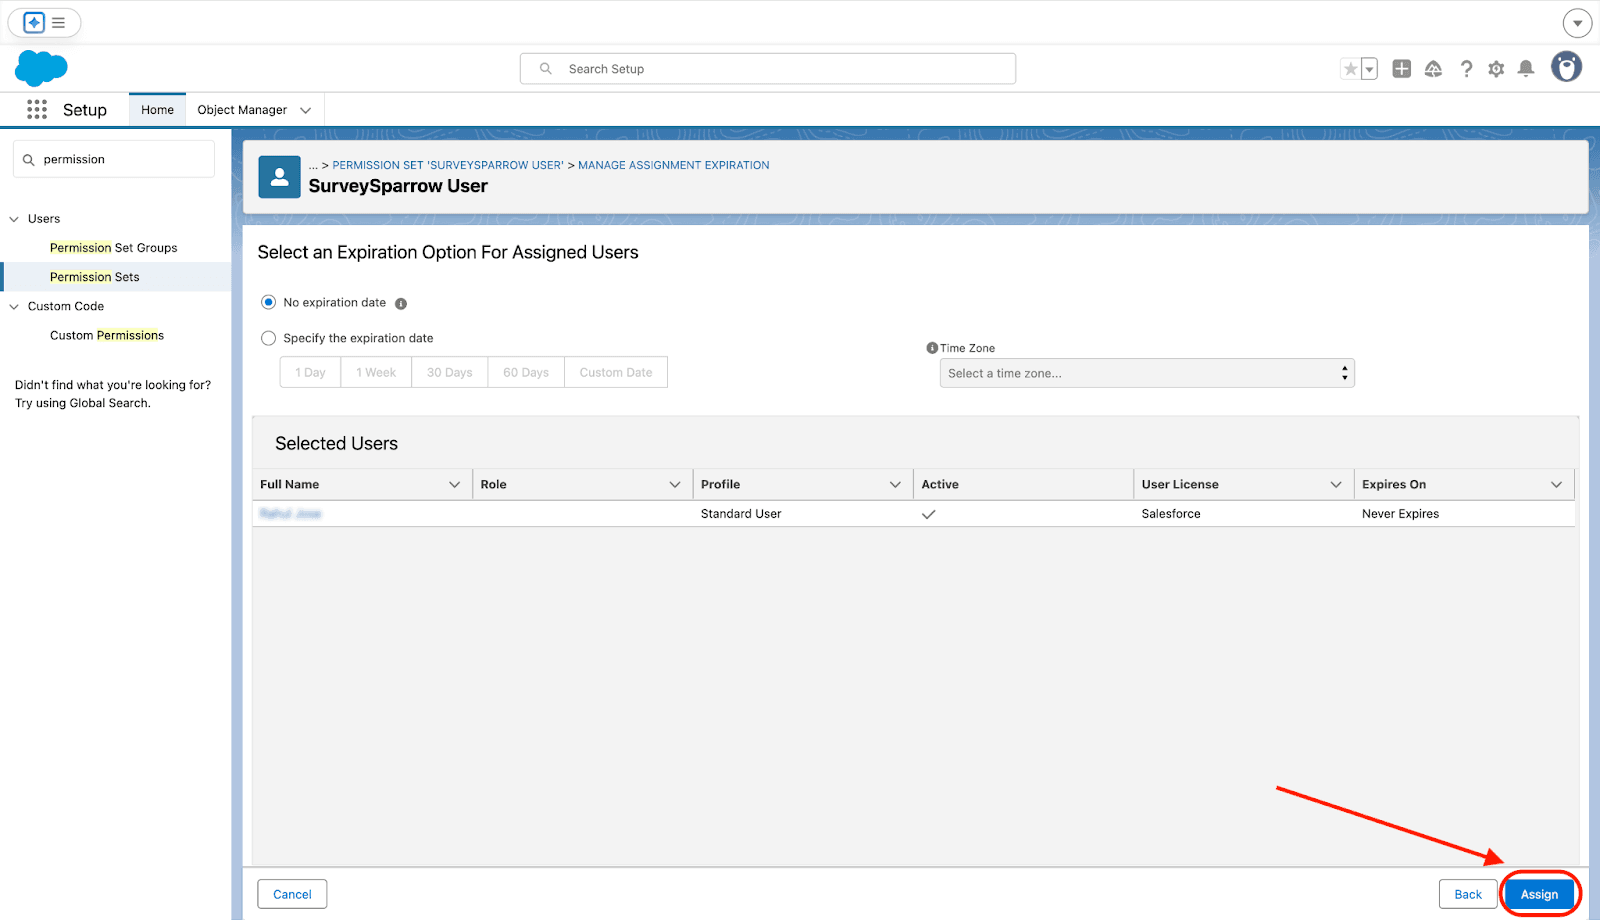
Salesforce allows you to create automations in its Flow Builder. You can create different types of survey triggers. For the purpose of this article, we will only focus on record-triggered flows, which act when the records tied to an object undergo some type of modification (new, updated or deleted).
1. Head to the Triggers section inside the SurveySparrow app and click Create New.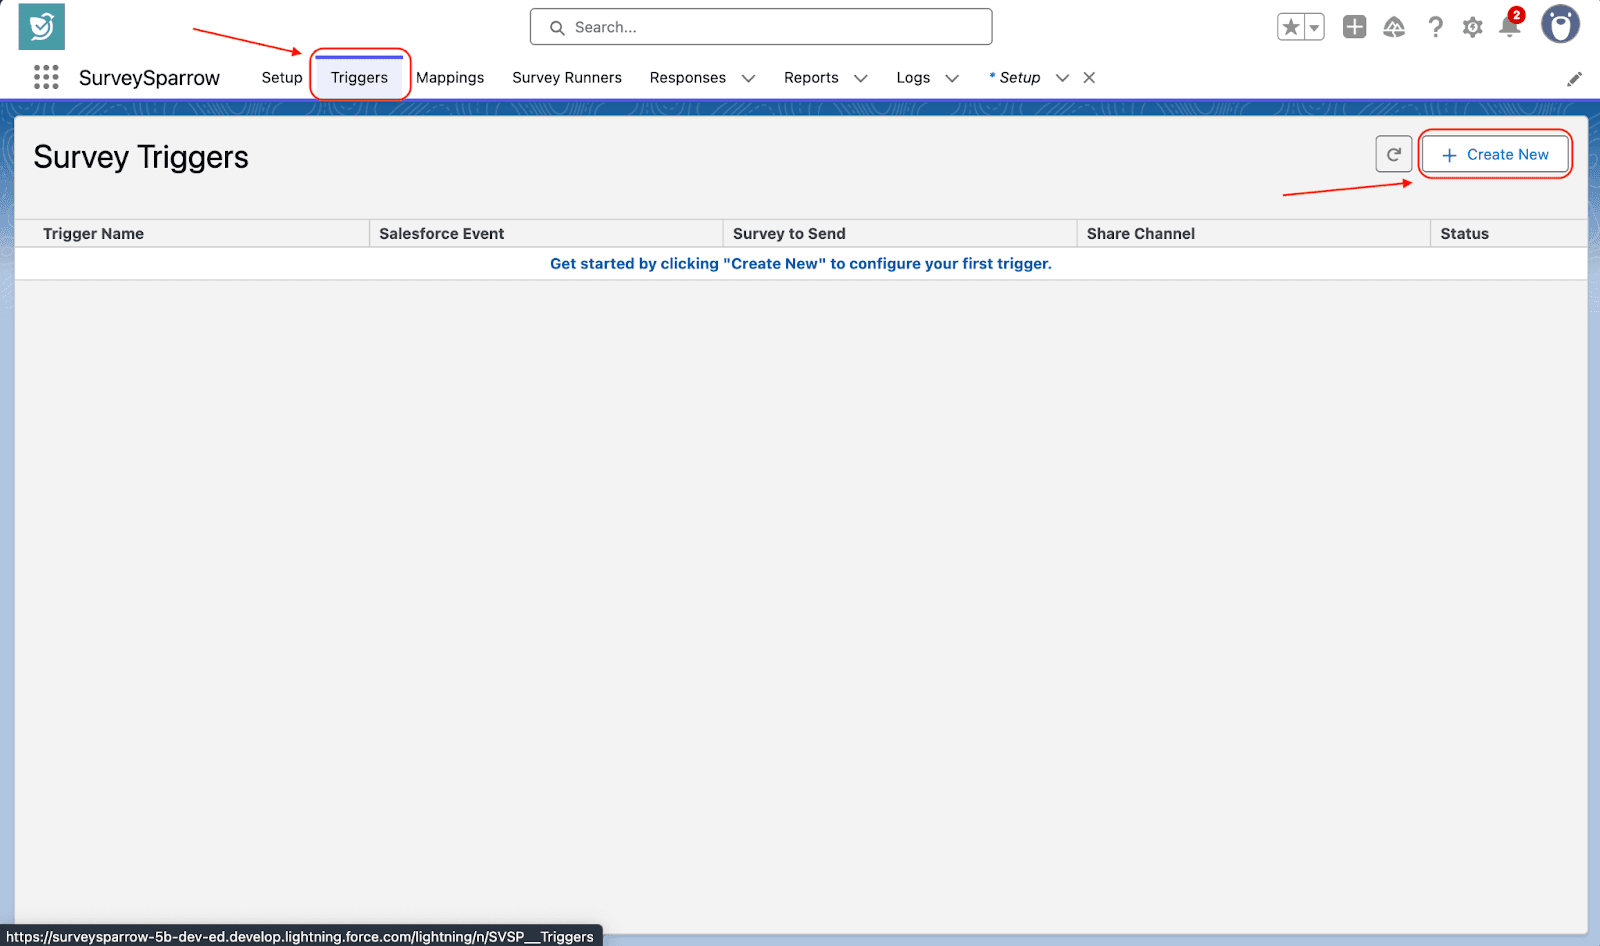
Note: Previously users could also use the Survey Runners section to create triggers. However, this functionality is deprecated and will be removed soon. Currently, users can still use the existing survey runners, but cannot add new survey runners. Therefore, it is recommended that users migrate to the Triggers section.
2. Click on the tile for Record-Triggered Flow.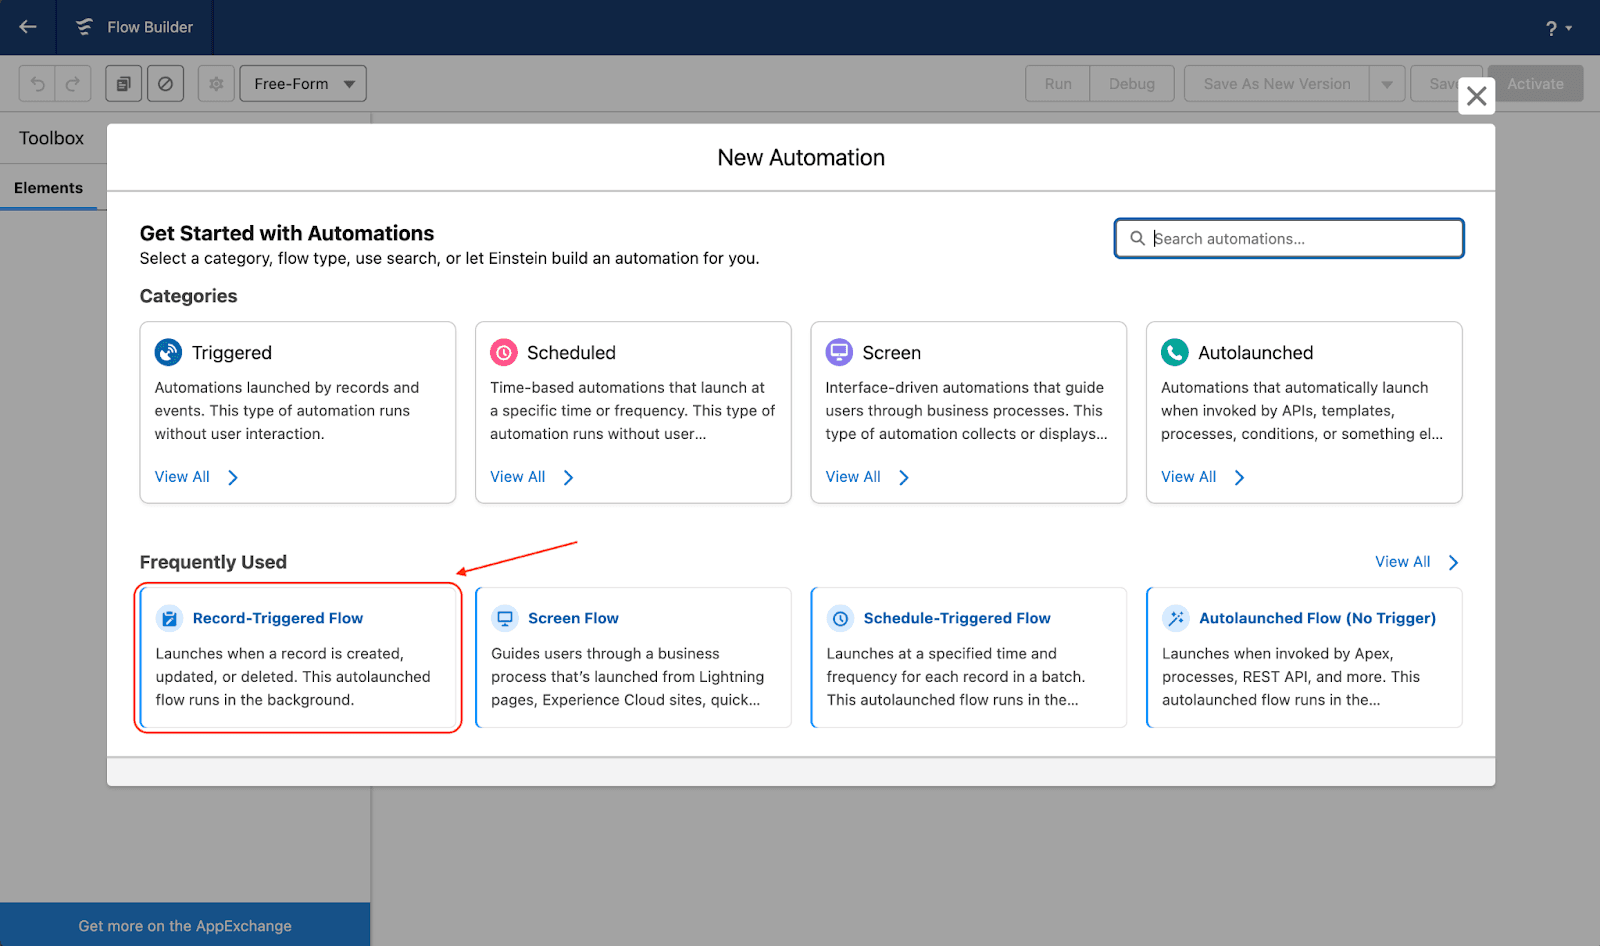
3. Salesforce’s Flow Builder opens up. You need to first define the trigger object. Use the search field under Object to choose one.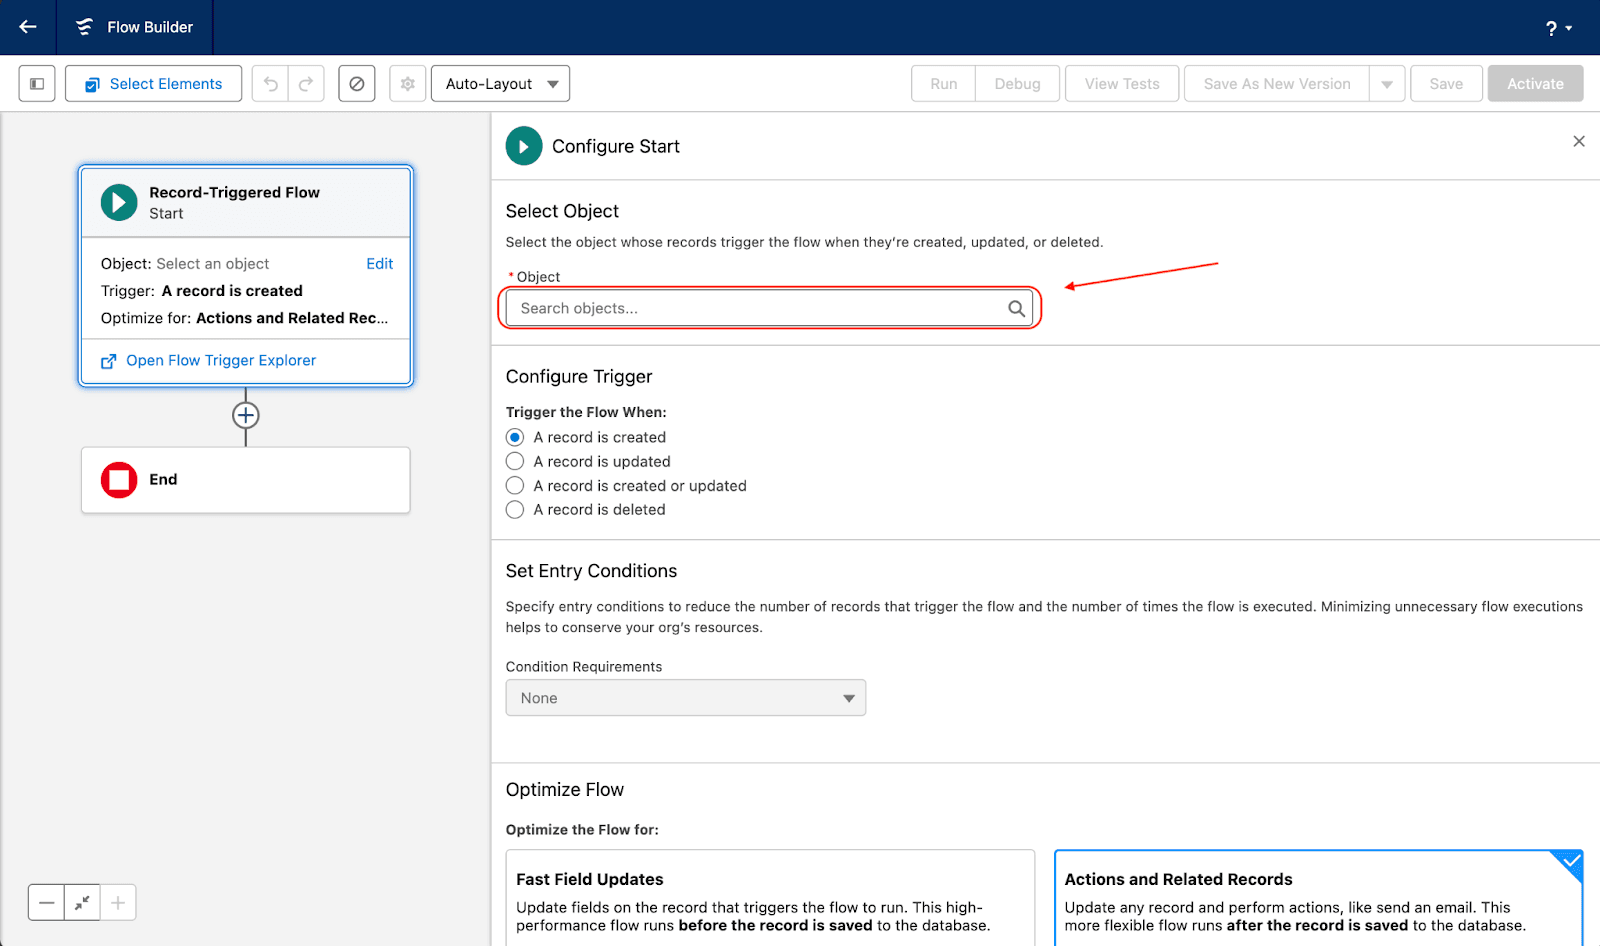
4. Next, choose the exact nature of the trigger under the Configure Trigger section.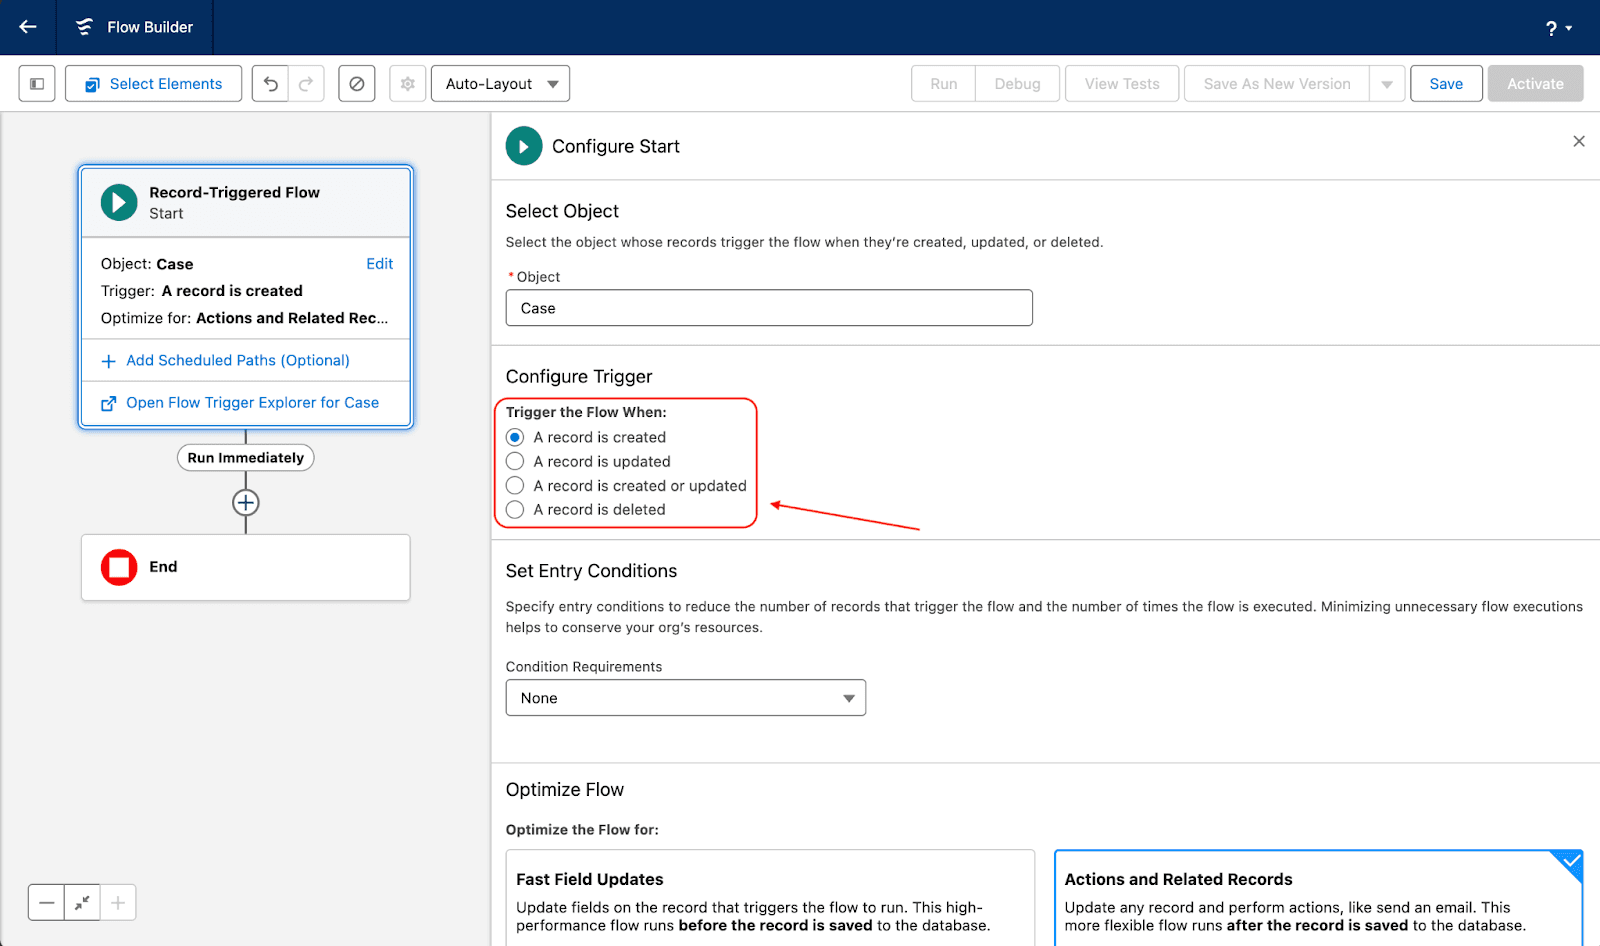
5. After that, you need to set specific entry conditions for the trigger. Click on the drop-down menu under Condition Requirements and choose a setting.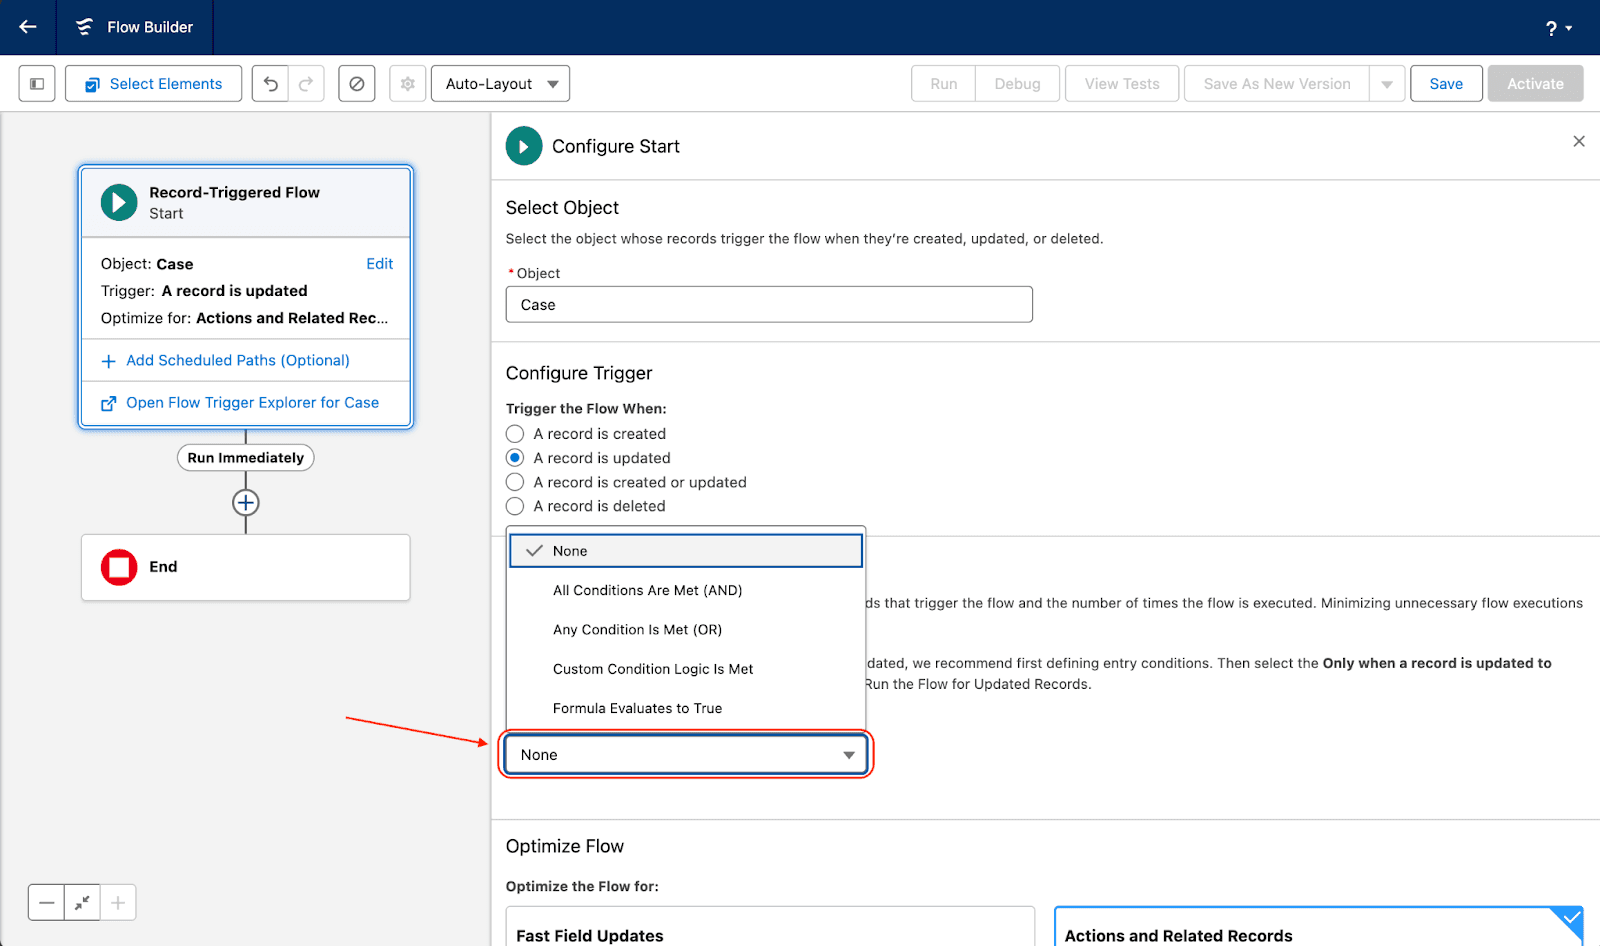
6. Following this, you need to define the condition. The fields to fill will differ based on the setting chosen. In this case, we need to set the field, operator and value.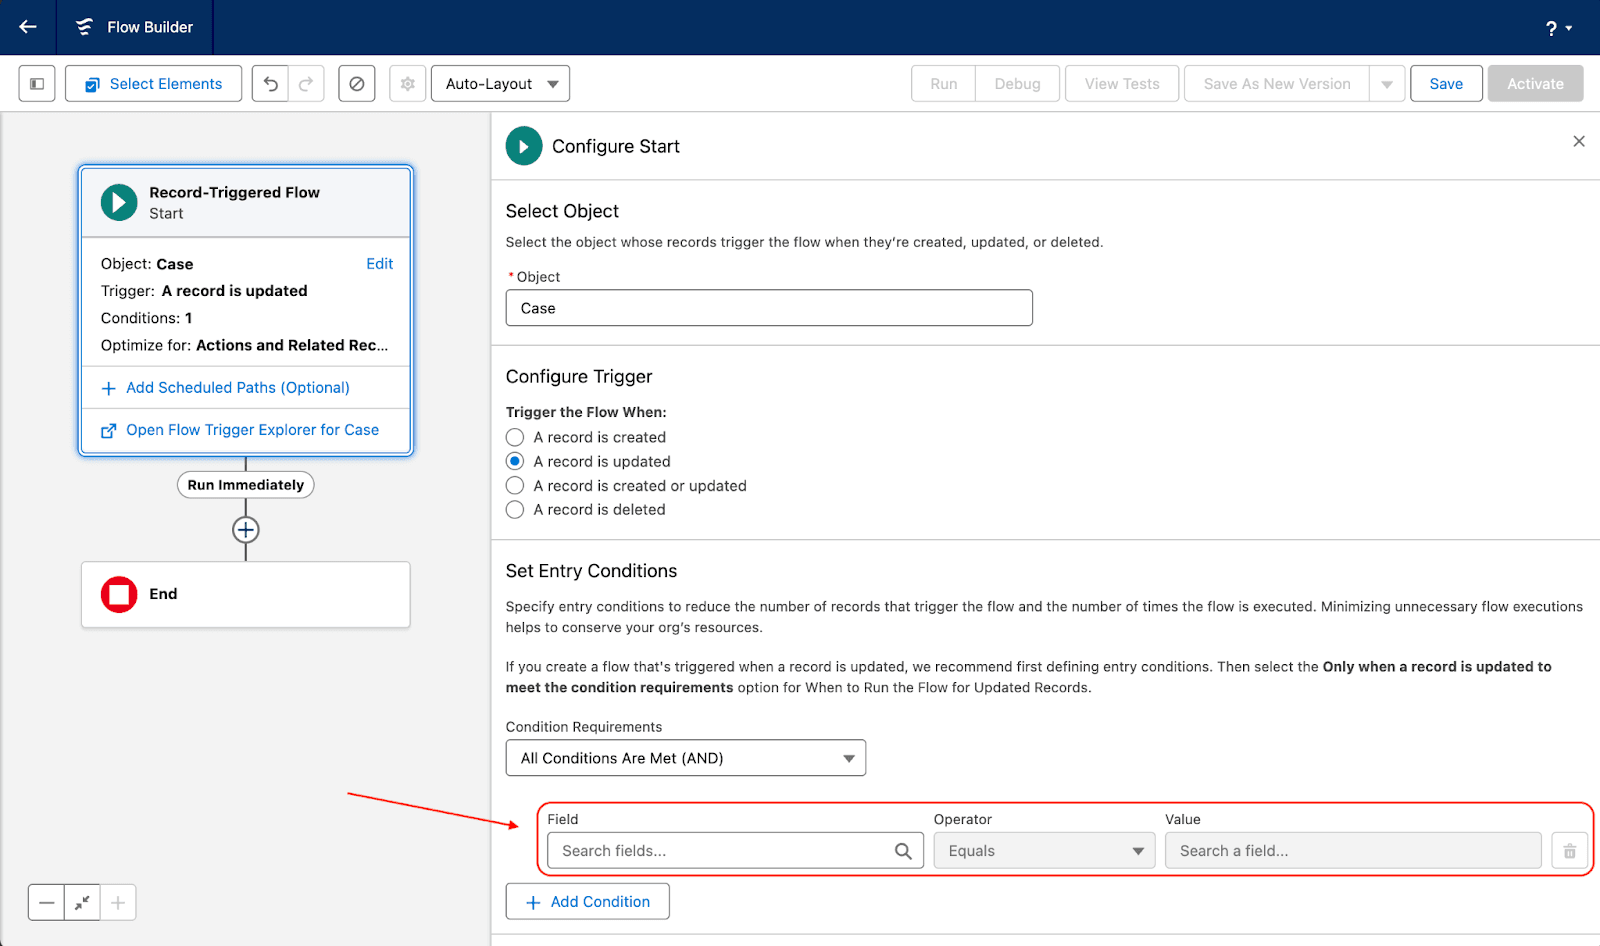
Note: If you’ve chosen to trigger surveys when a record is updated, there is an additional setting to clarify the flow. You can choose to trigger surveys every time a record meeting the requirements is updated, or only when the record is updated to meet the requirements.
7. If you are satisfied with the trigger conditions, click on the plus icon in the visual layout to define the action.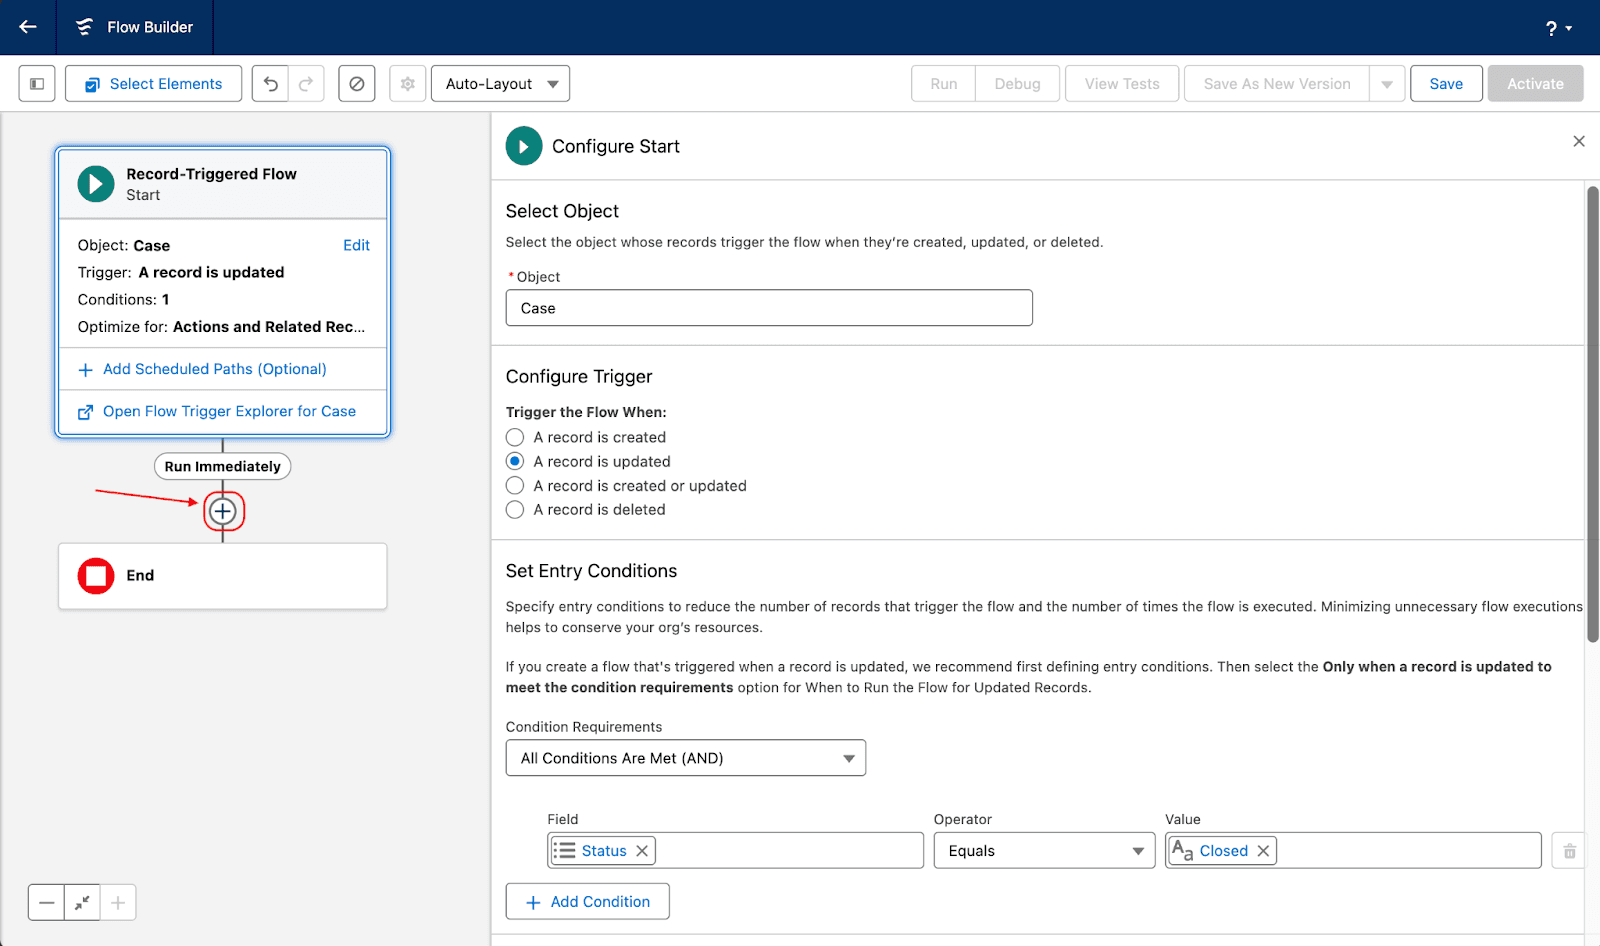
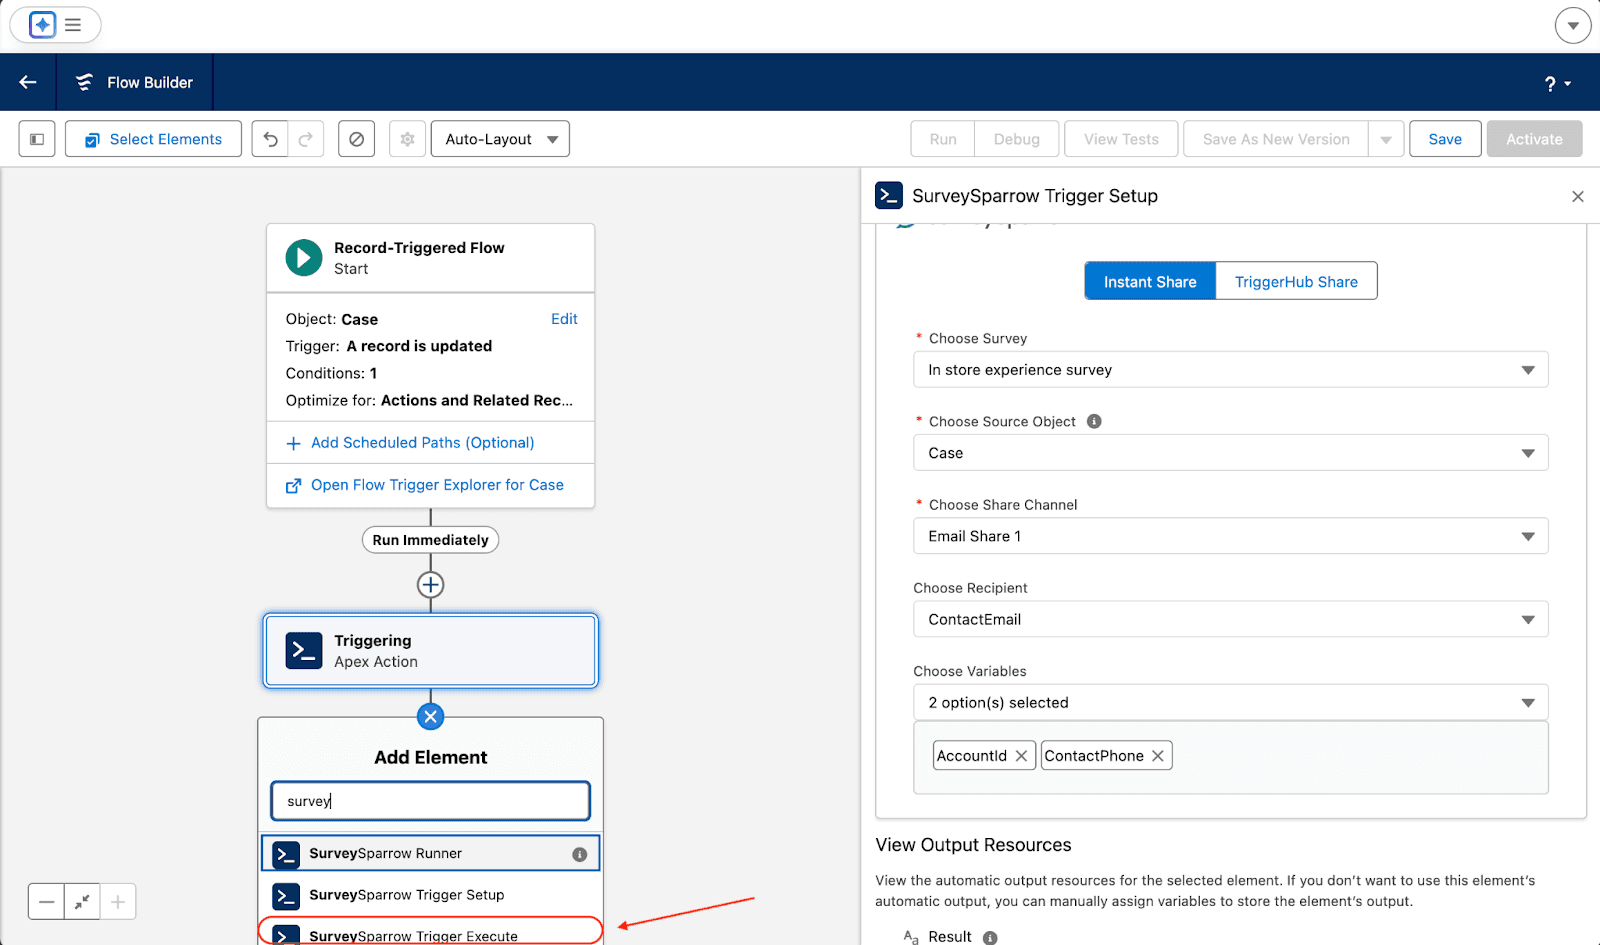
8. Here, you must search and select the SurveySparrow Trigger Setup element.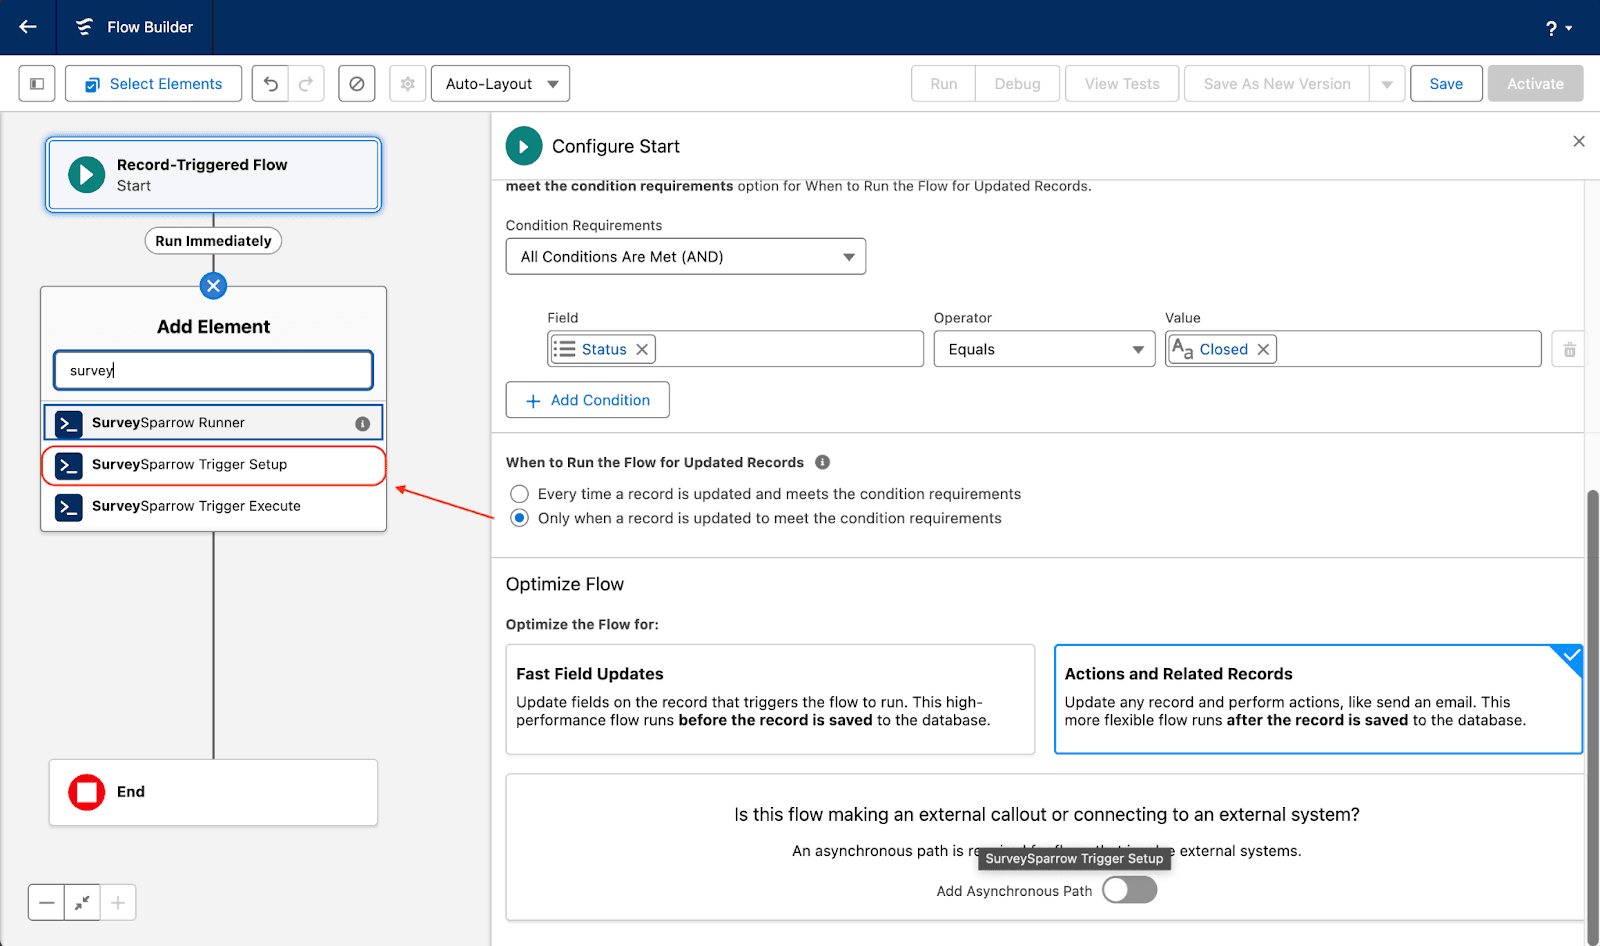
9. Now, you need to configure the element. Start with the Label and API names, and then proceed to the survey share setup.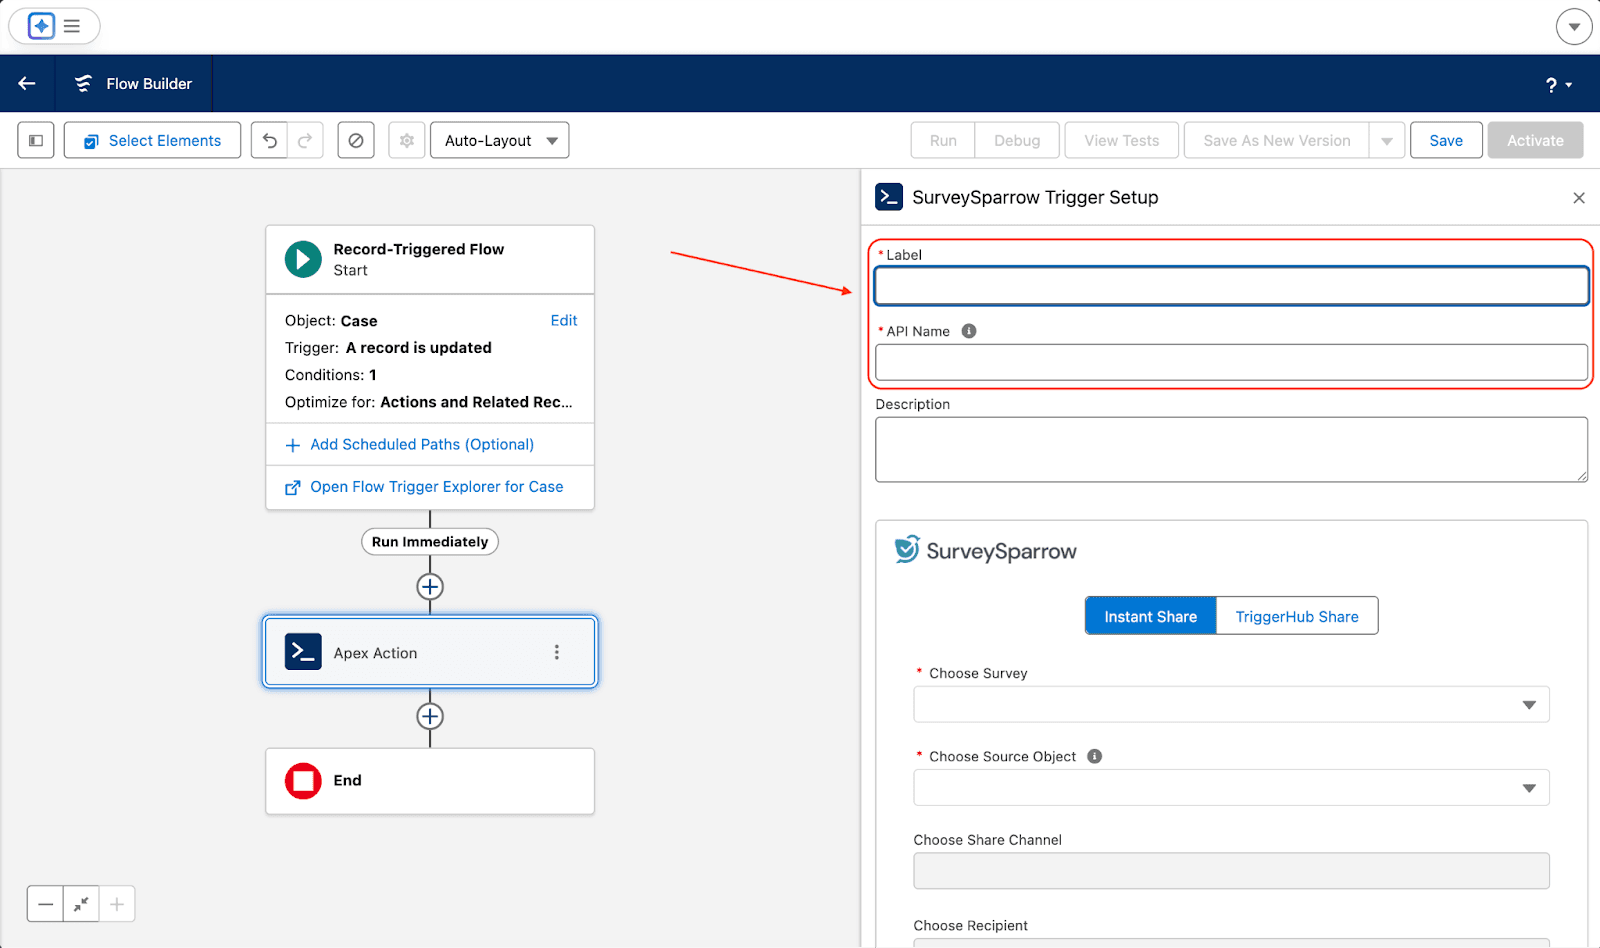
Note: The default share mode in the app is Instant Share. If you wish to try the TriggerHub Share mode, reach out to customer support.
10. First select the survey that you want to share from the drop-down menu under Choose Survey.
11. Then set an object - it should be the same object that was used to define the trigger conditions. Click on the drop-down menu under Choose Source Object to select it.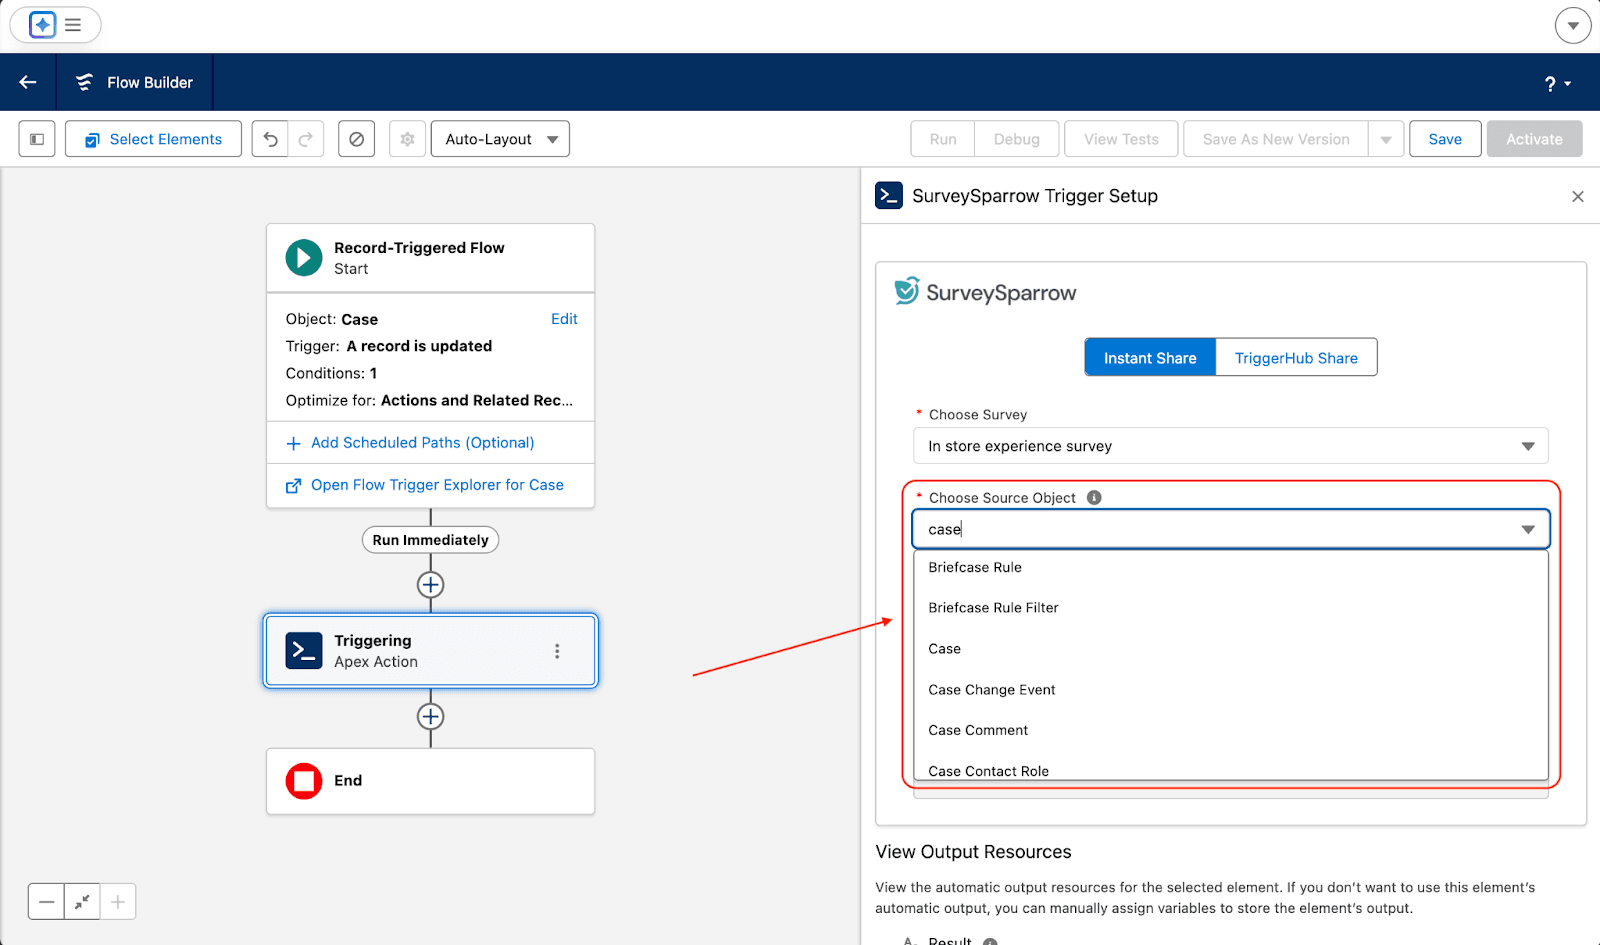
12. Select a share channel for the survey, by clicking on the drop-down menu under Choose Share Channel. A list of existing shares appears.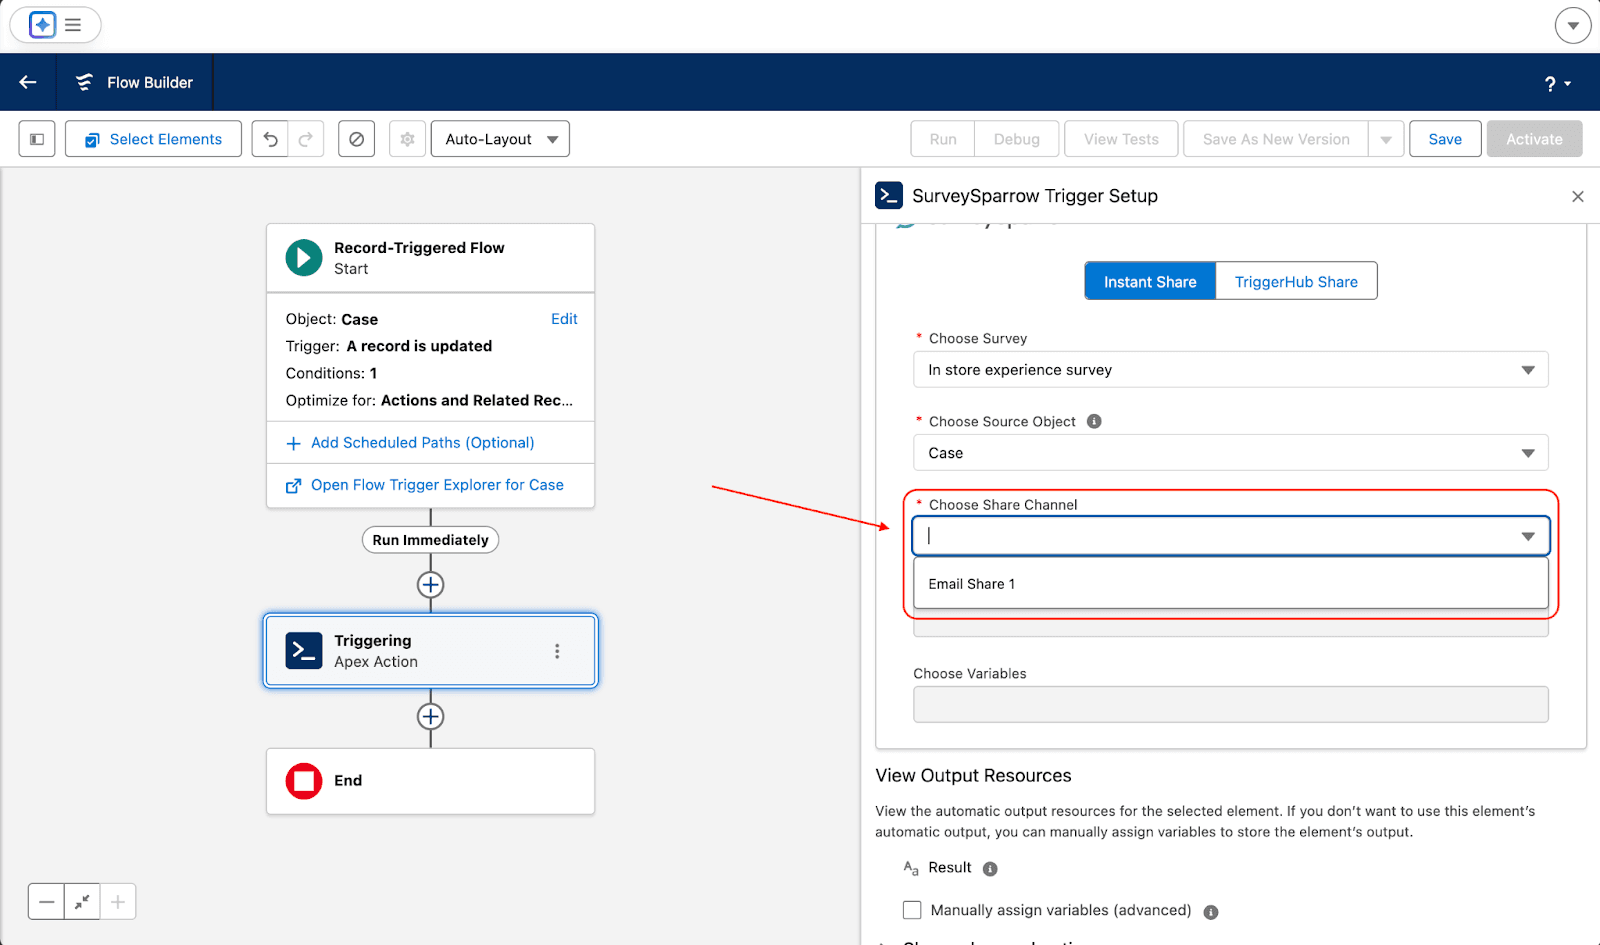
Note: The app supports SMS, Email and WhatsApp shares.
13. Choose the recipient data type from the drop-down menu under Choose Recipient.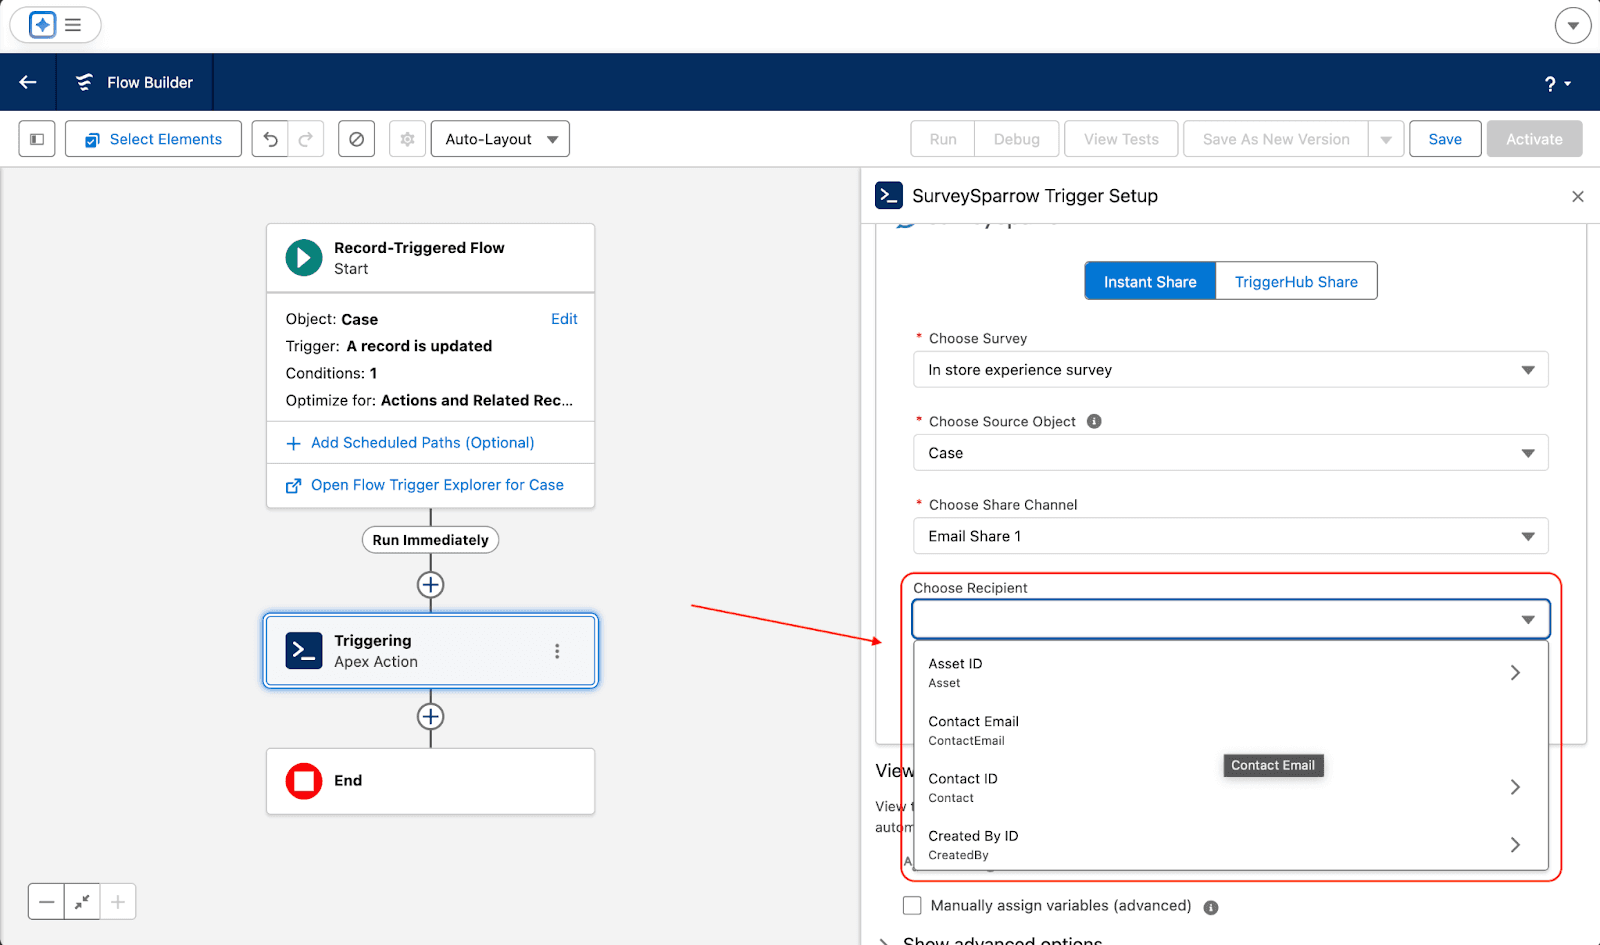
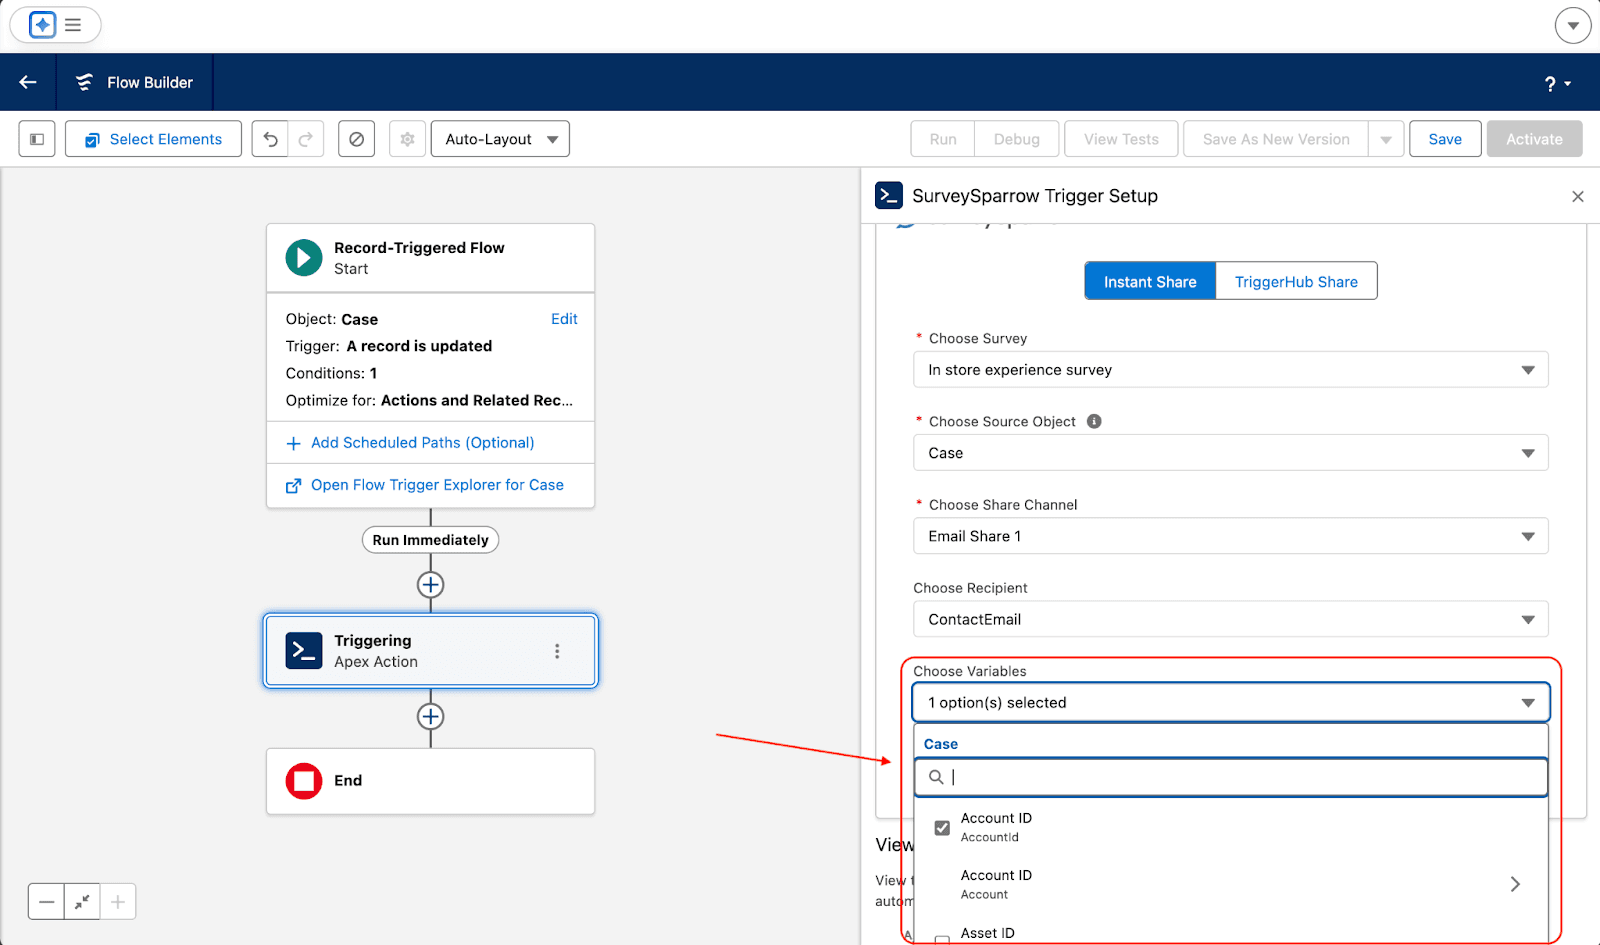
14. You can also add variables to the trigger by clicking on the drop-down under Choose Variables. Variables help you capture additional respondent attributes for deeper analysis and segmentation.
15. After setting up the Trigger Setup element, click on the plus icon below it. Search for and select the SurveySparrow Trigger Execute element.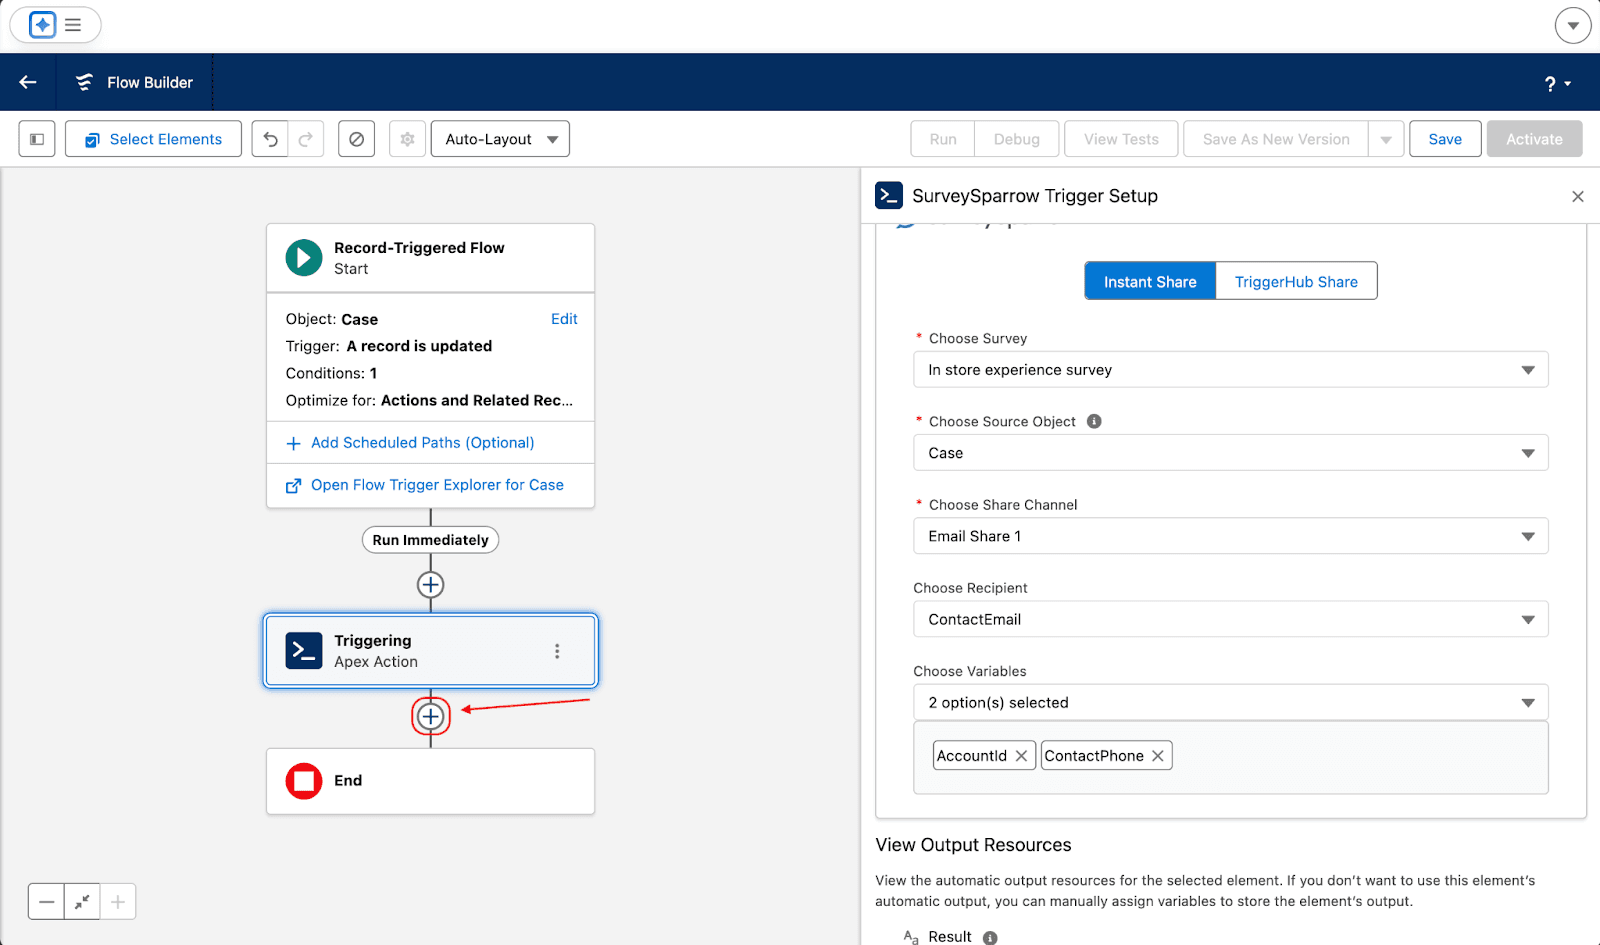
Note: The difference between these two elements (Trigger Setup and Trigger Execute) is that the first element stores the configuration details and passes it to the second to actually carry out the trigger.
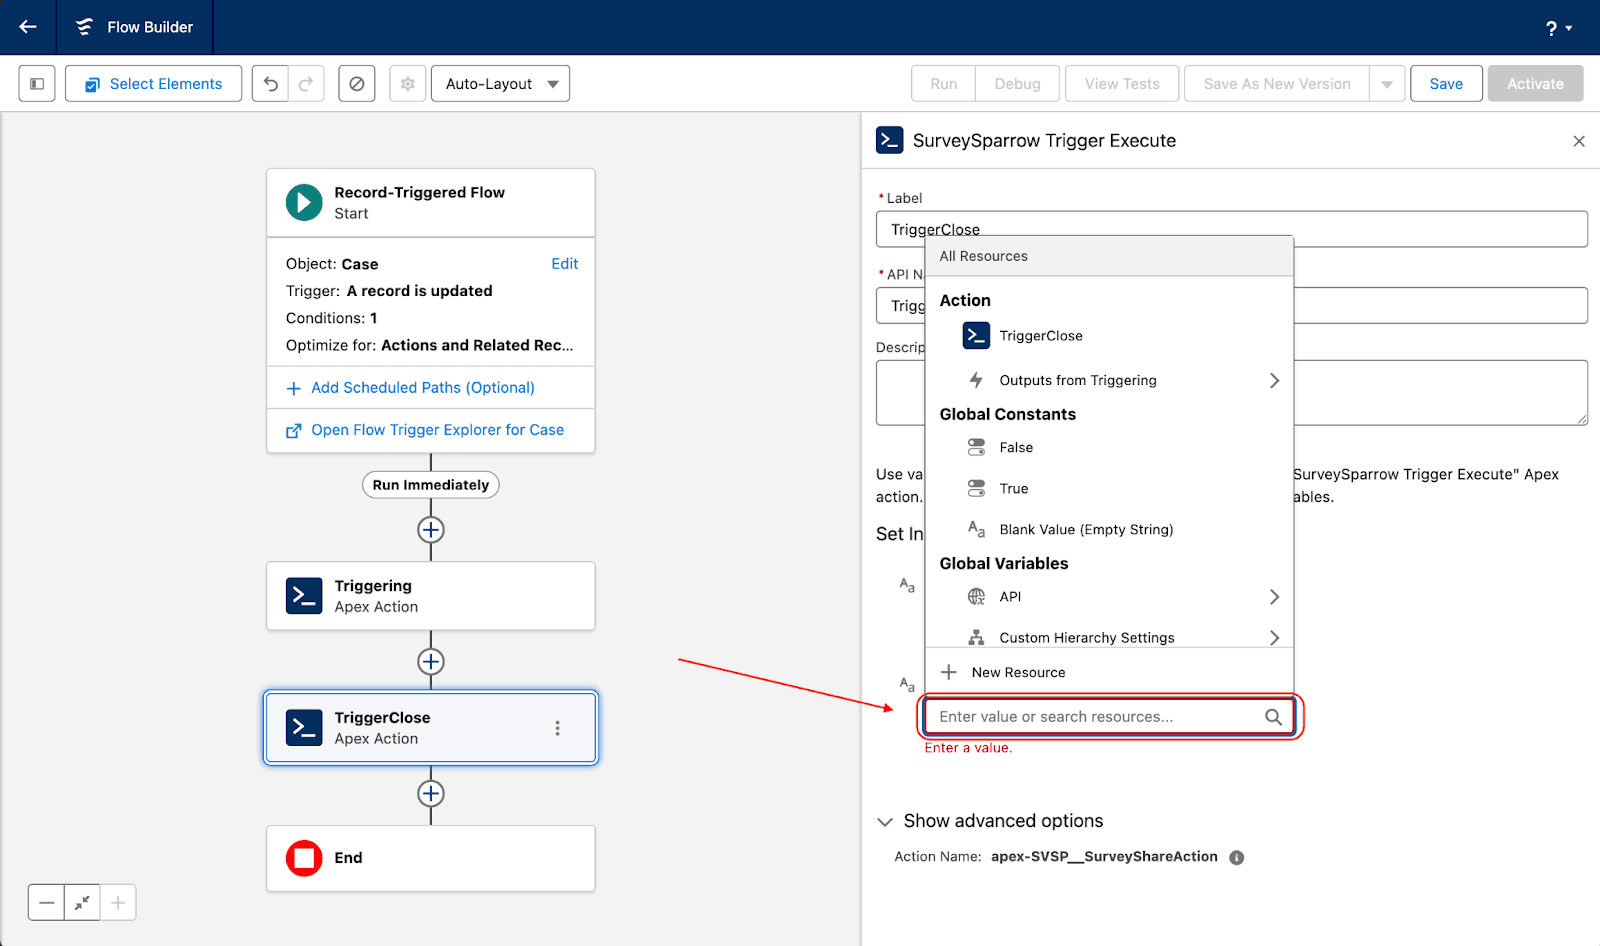
16. Start by entering the Label and API Name.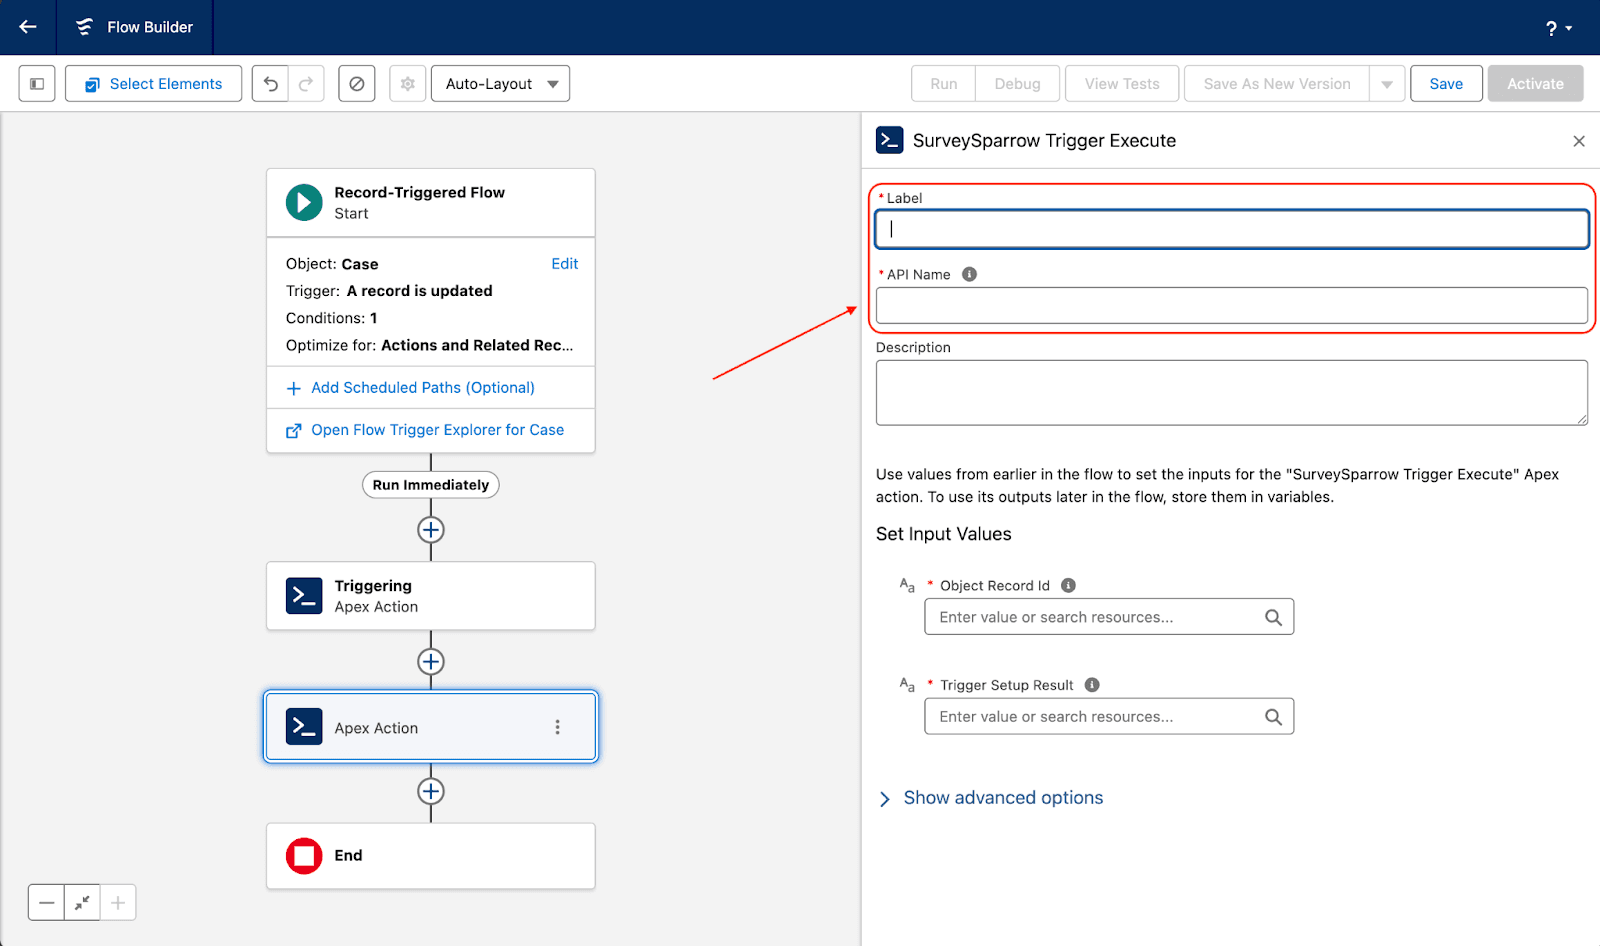
17. Next, you must choose the Object Record ID and Trigger Setup Result from their respective drop-down menus.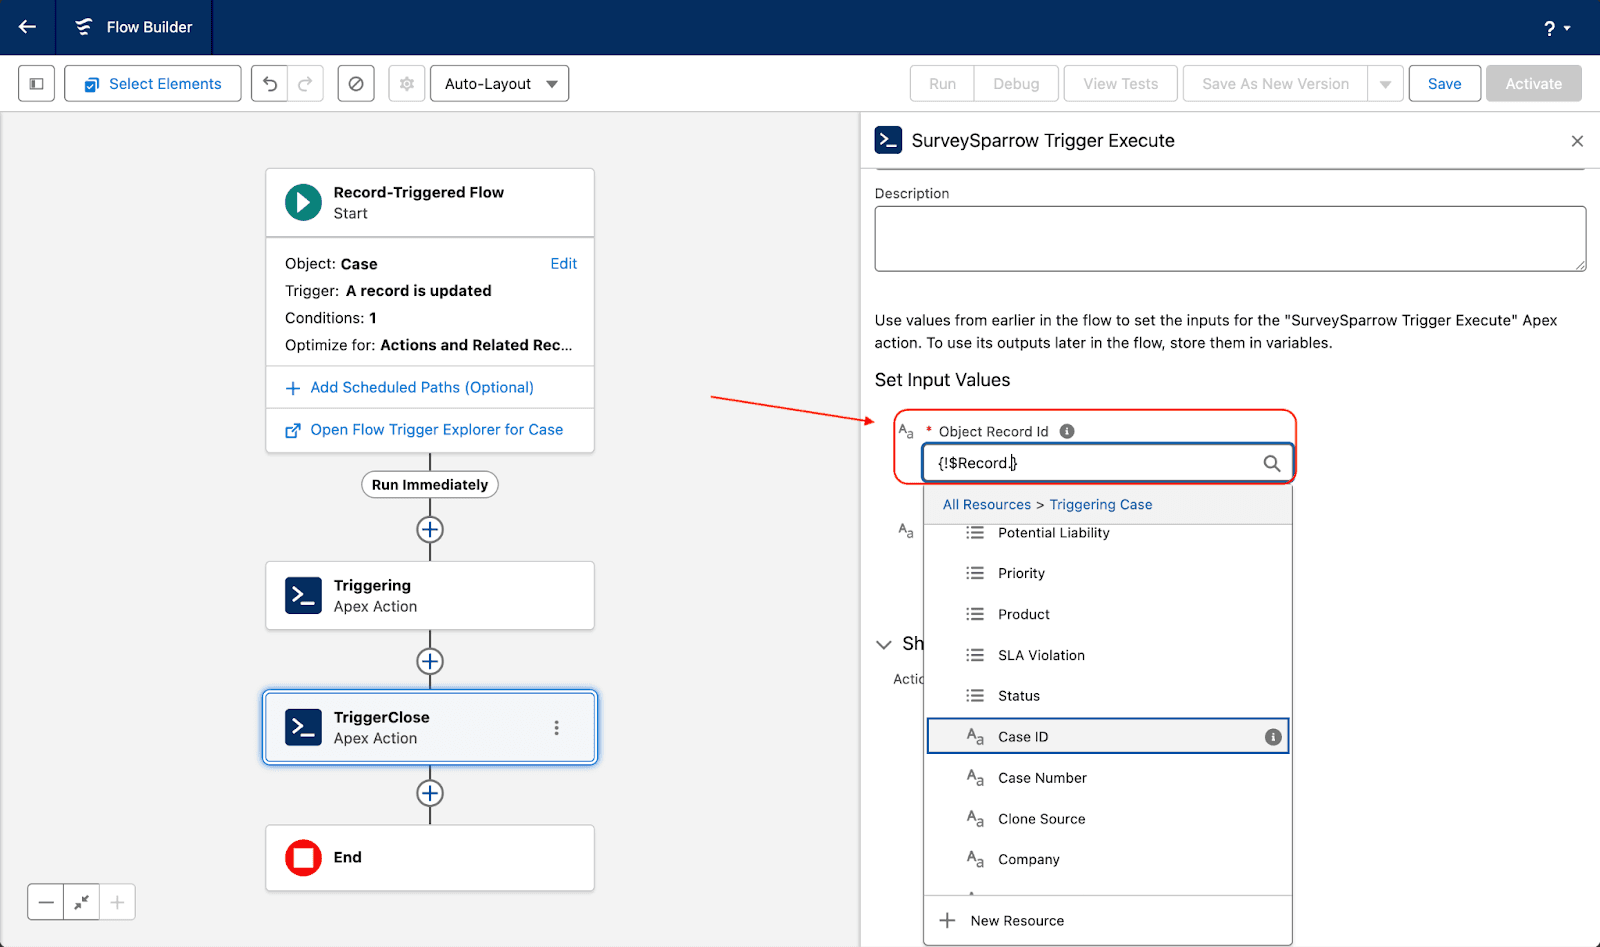
18. Then click on Save.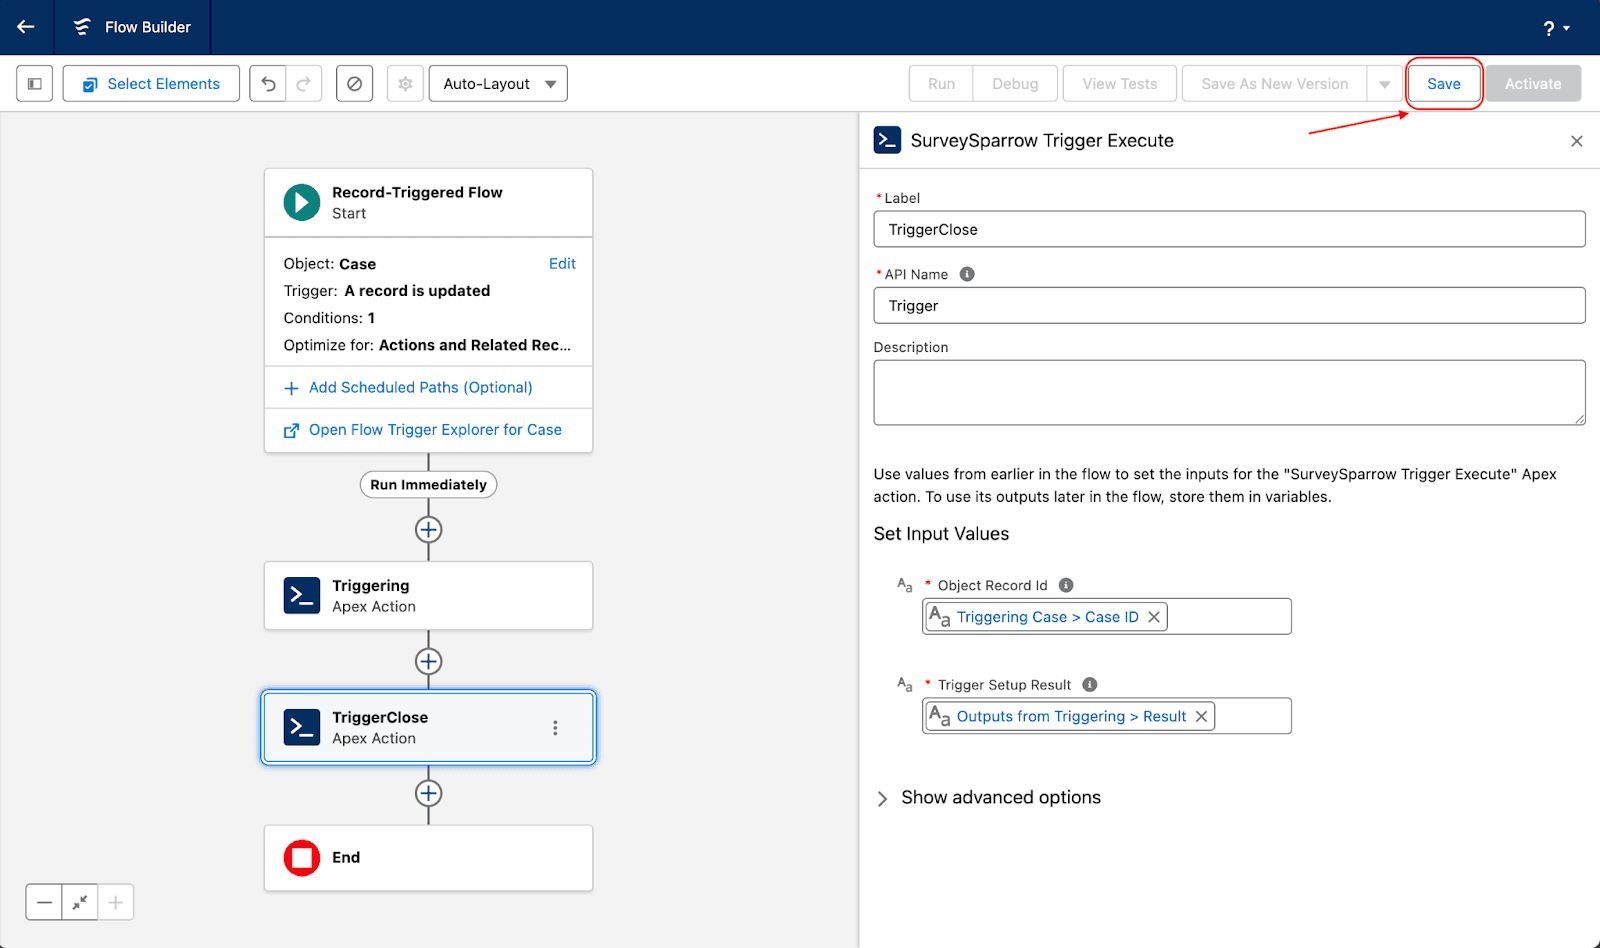
19. To save the flow, provide a Label and API name for the flow. Then click Save.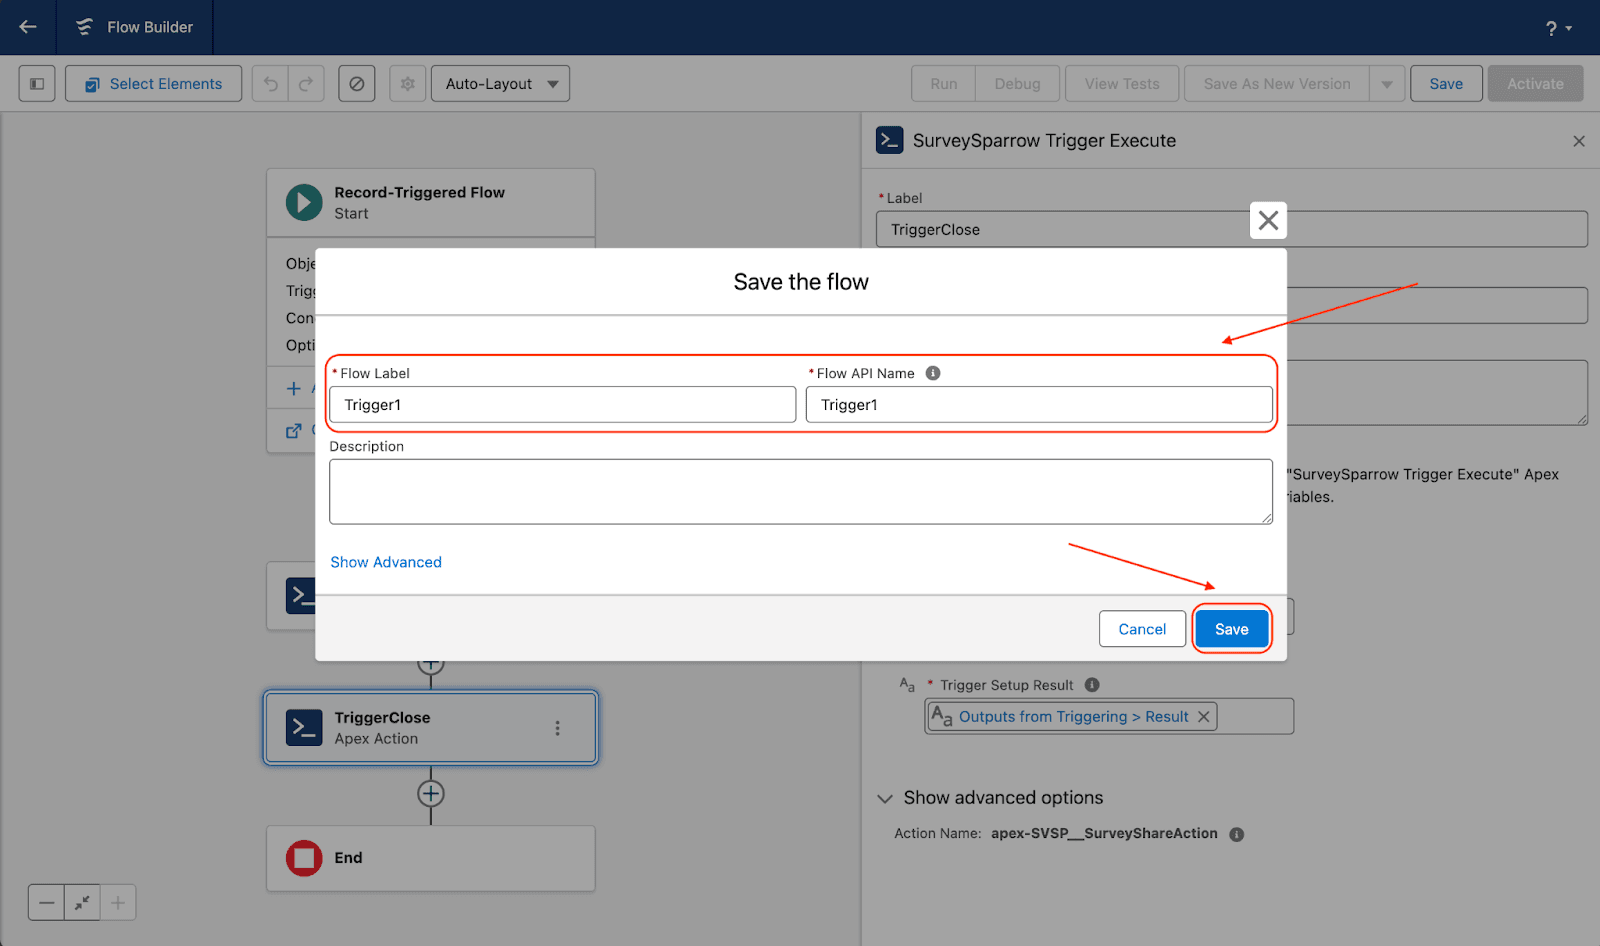
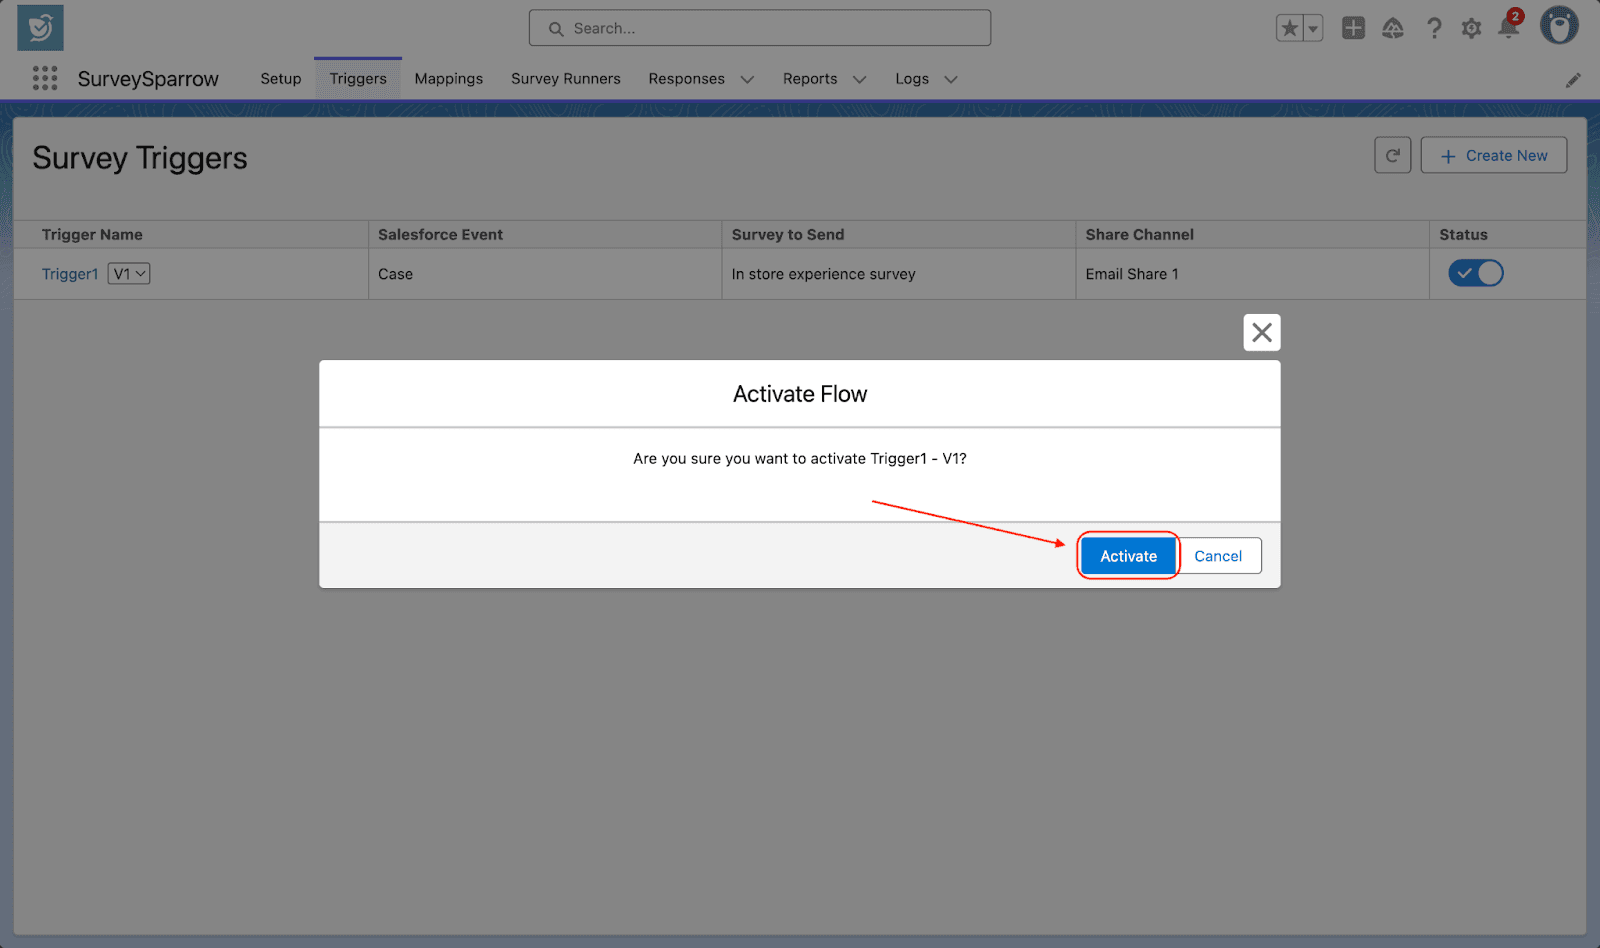
20. Now the trigger is ready, but it isn’t in action. To activate it, click on the Activate button.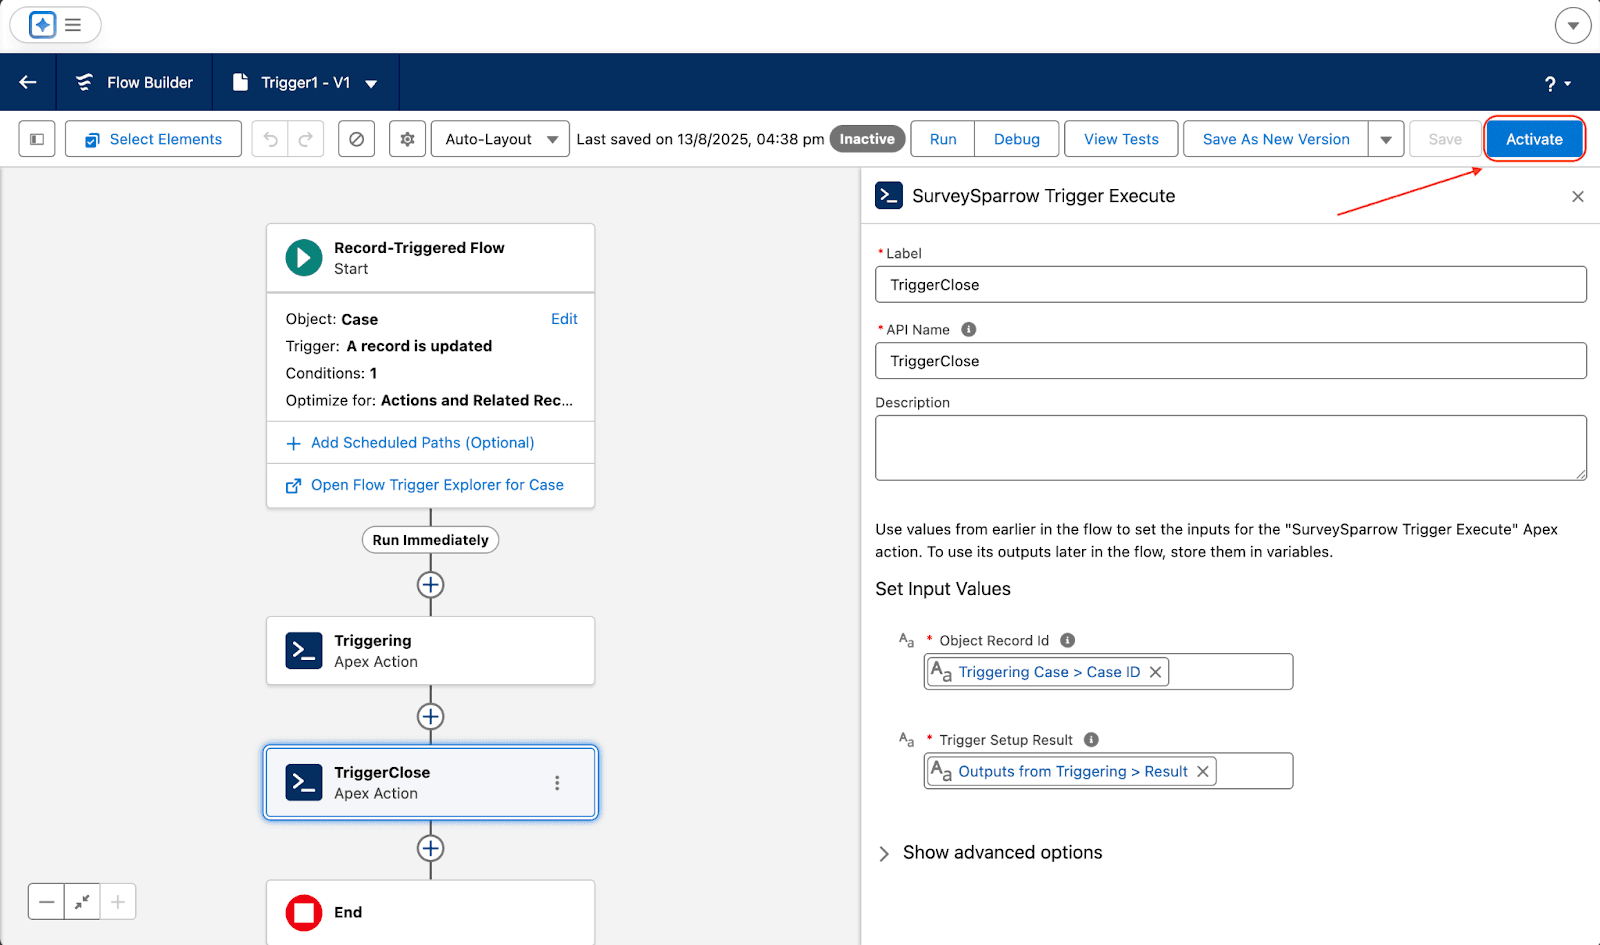
21. To activate the trigger, you can also head to the Triggers section. Then click on the toggle under the Status column.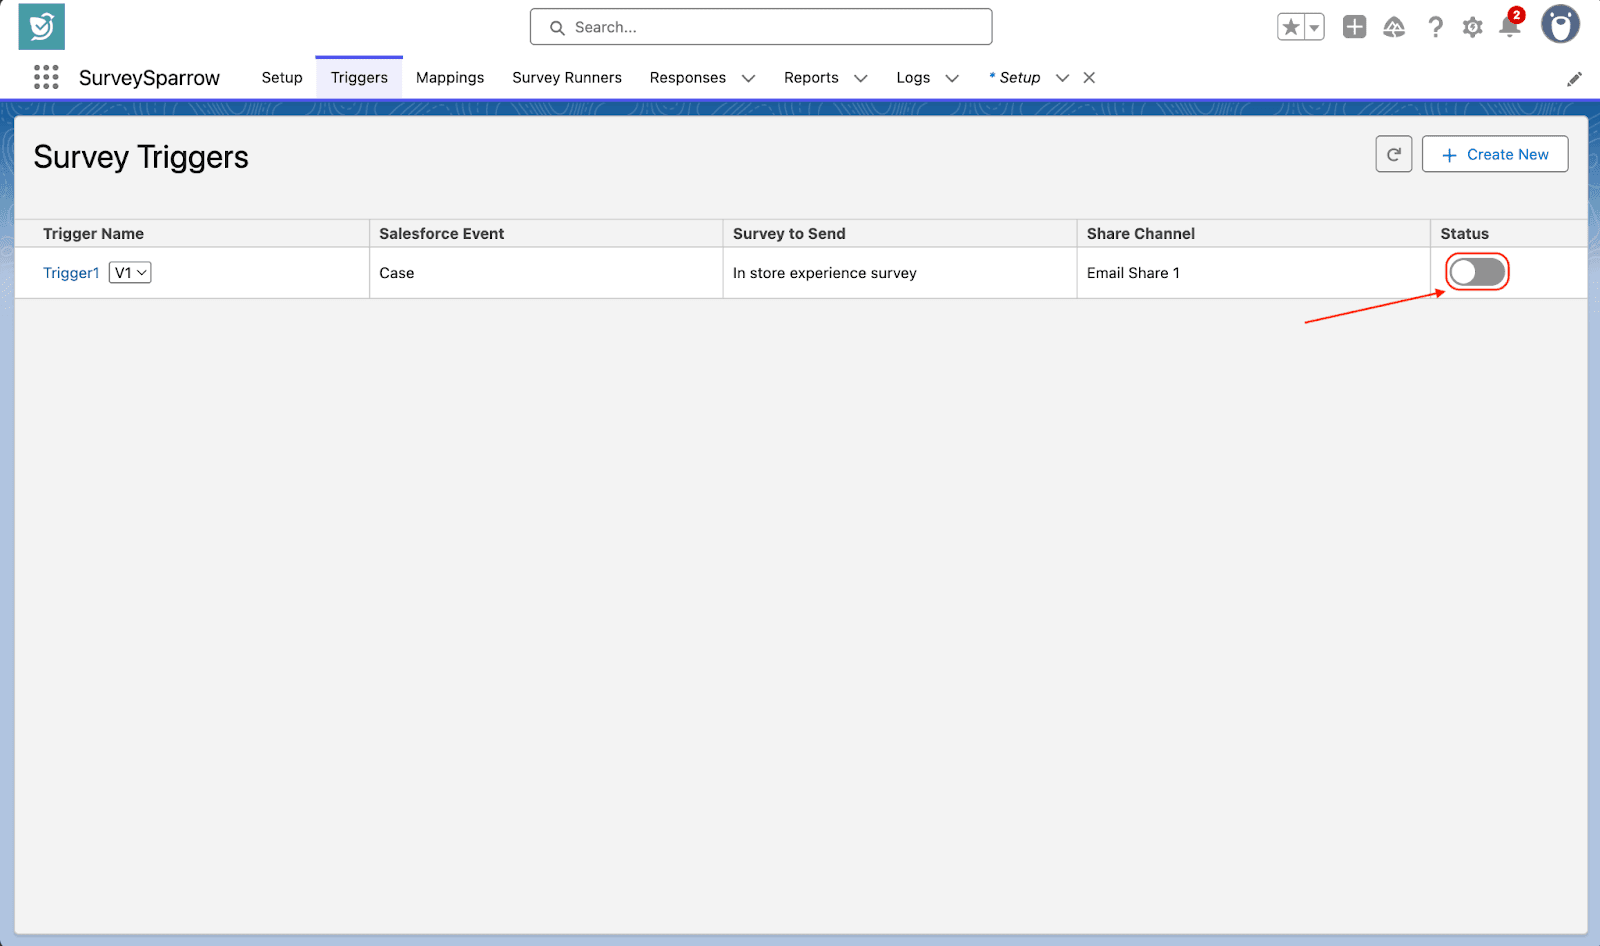
22. Then click on Activate.
The process of response mapping the SurveySparrow App is fairly straightforward. But unlike the triggers feature, there is a long setup process to enable the response mapping feature. It involves setting up a Salesforce site and webhooks. We’ll cover the process end-to-end here.
Note: If you do not set up the Salesforce site and head straight to the Mapping section, you will see this screen.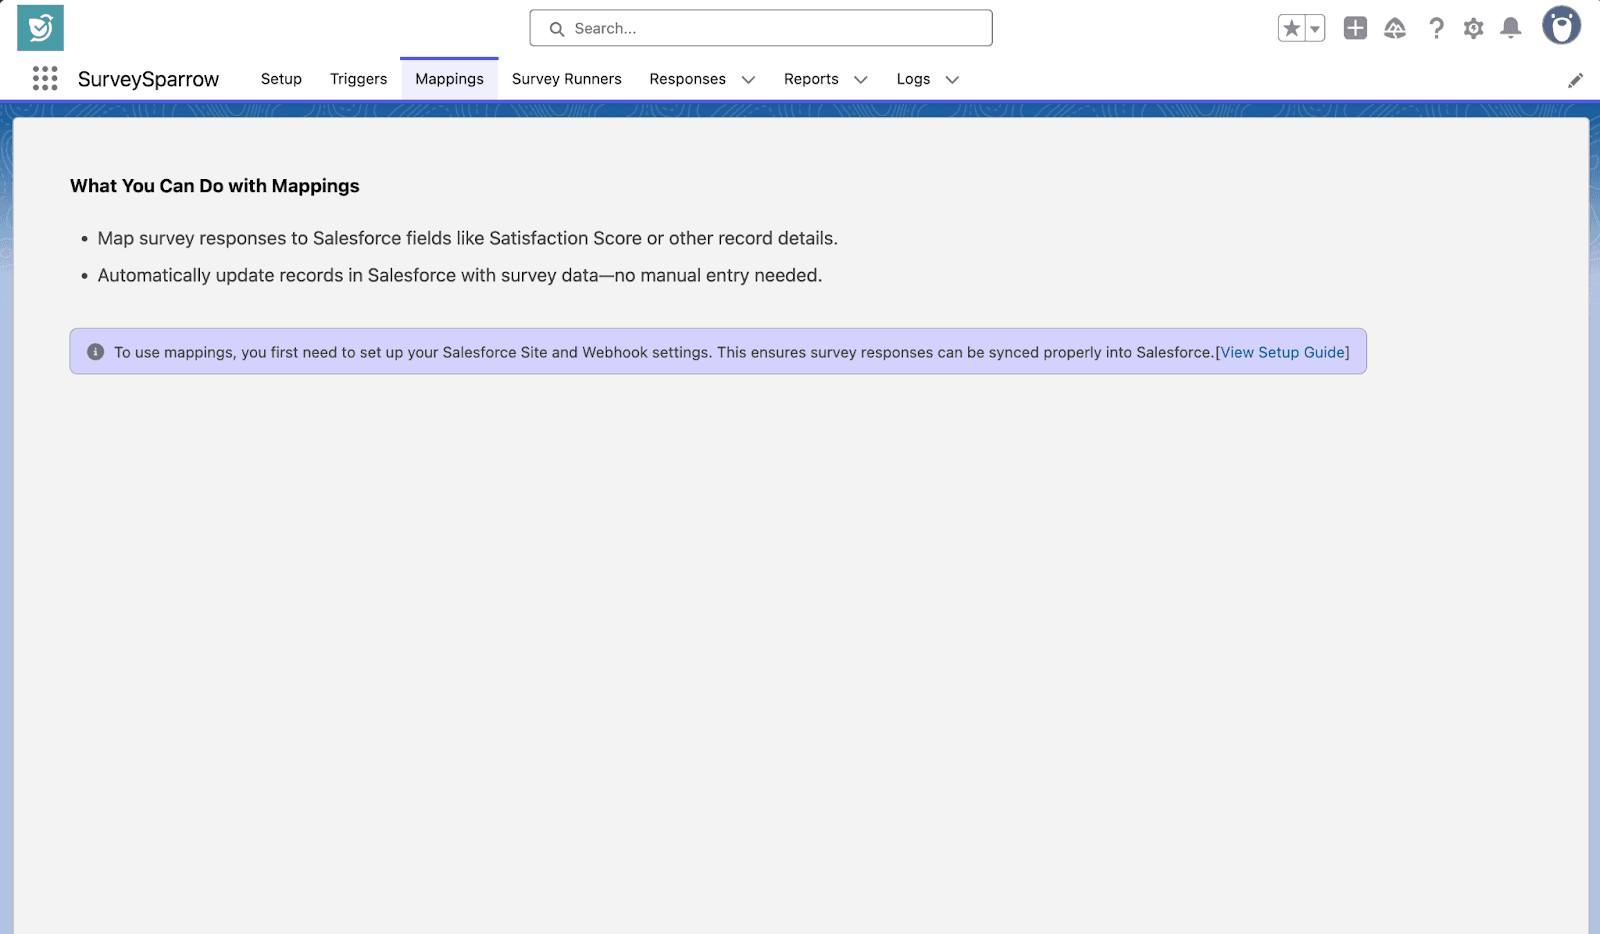
1. In your Salesforce account’s Setup section, click on Sites under Sites and Domains in the left-hand panel.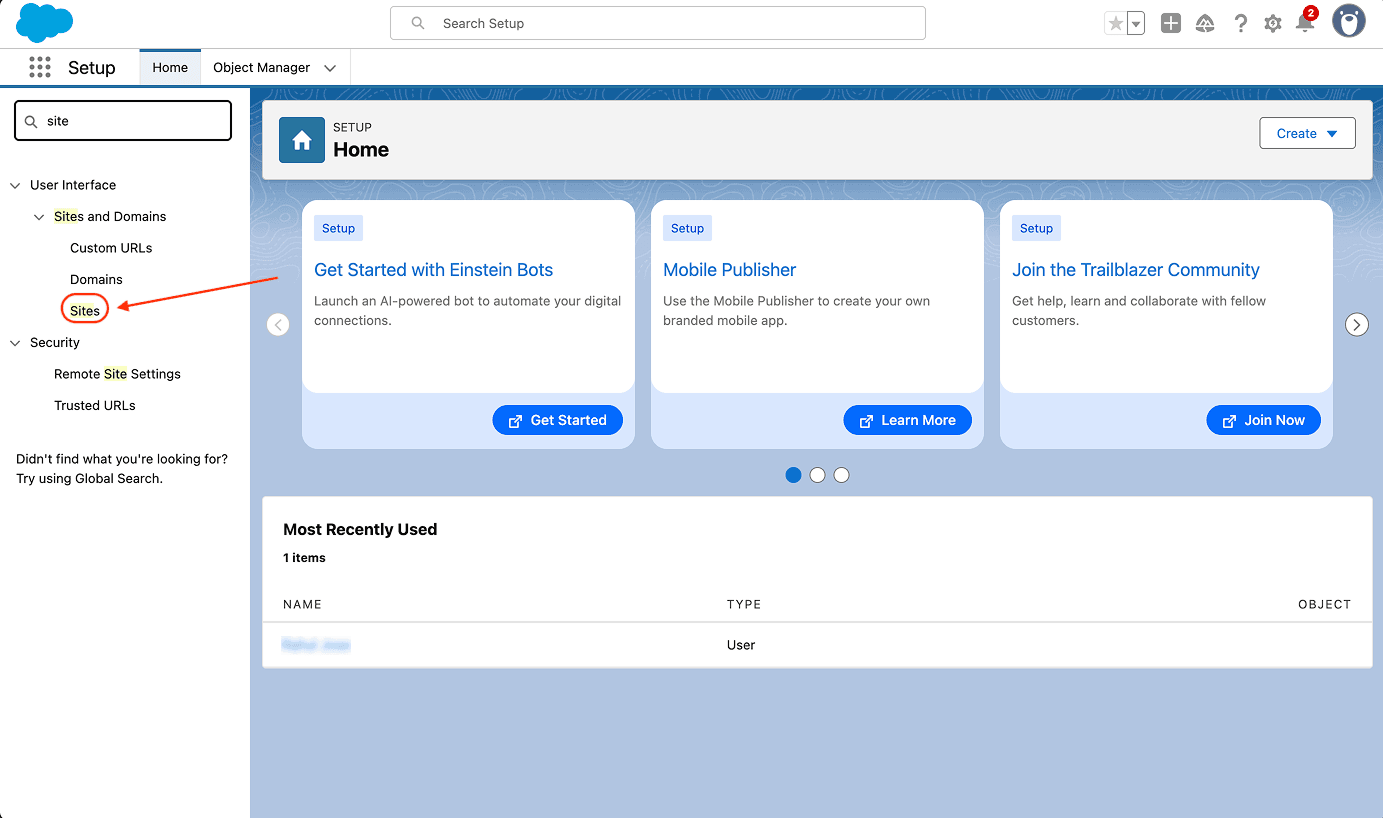
2. Click on the checkbox for Terms of Use and click Register My Salesforce Site Domain.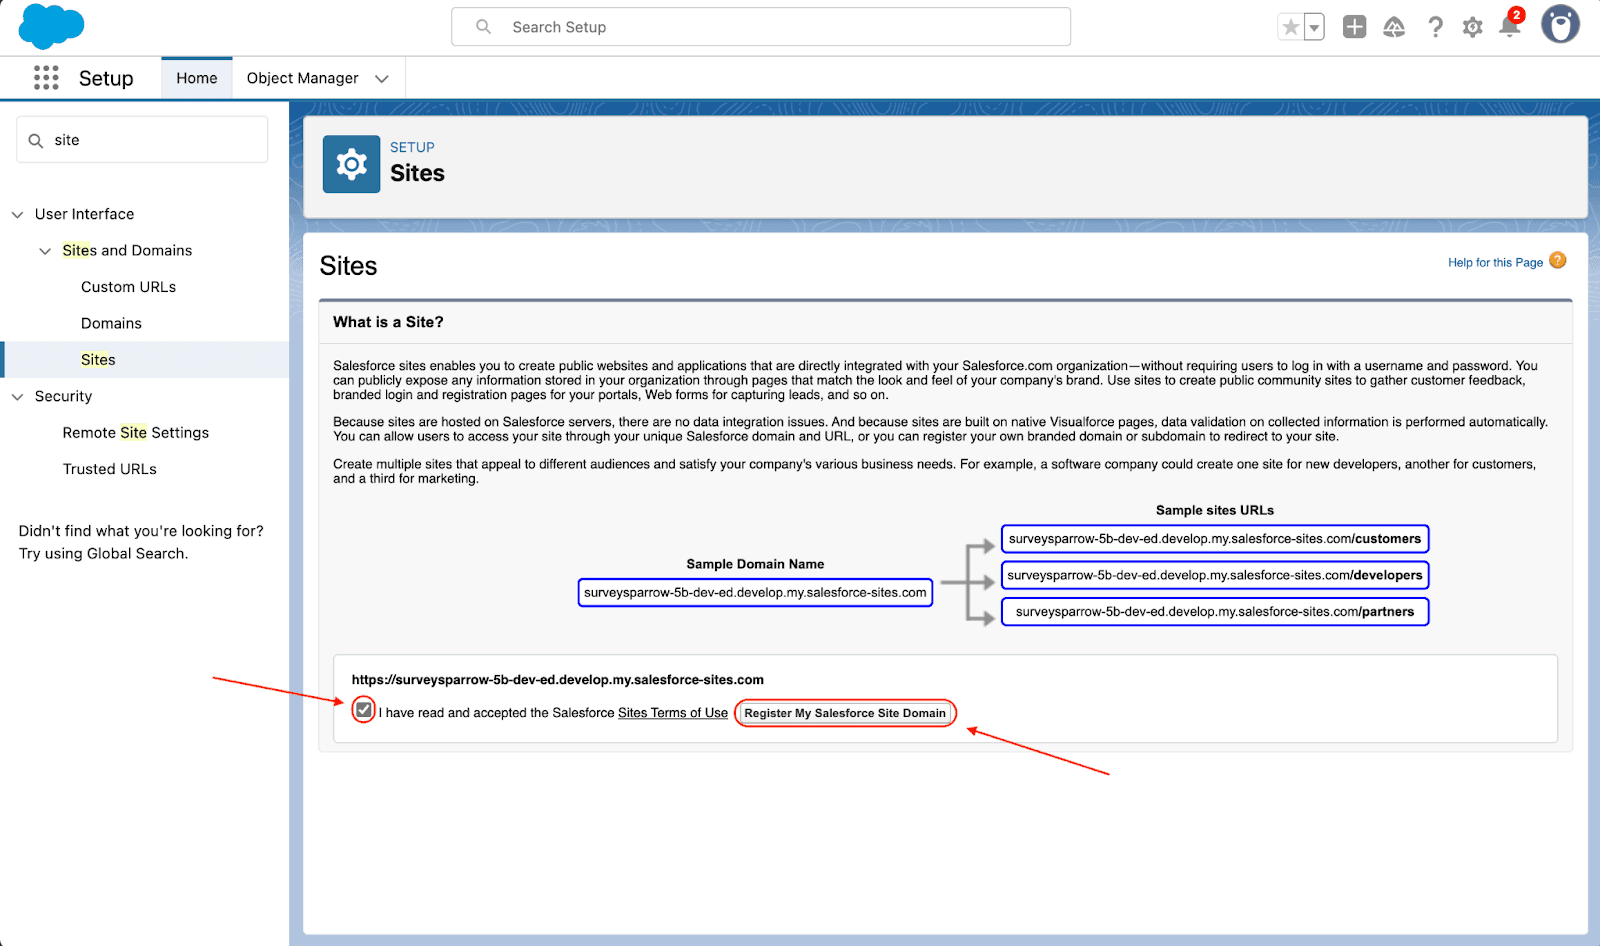
3. A confirmation pop-up appears at the top. Click OK.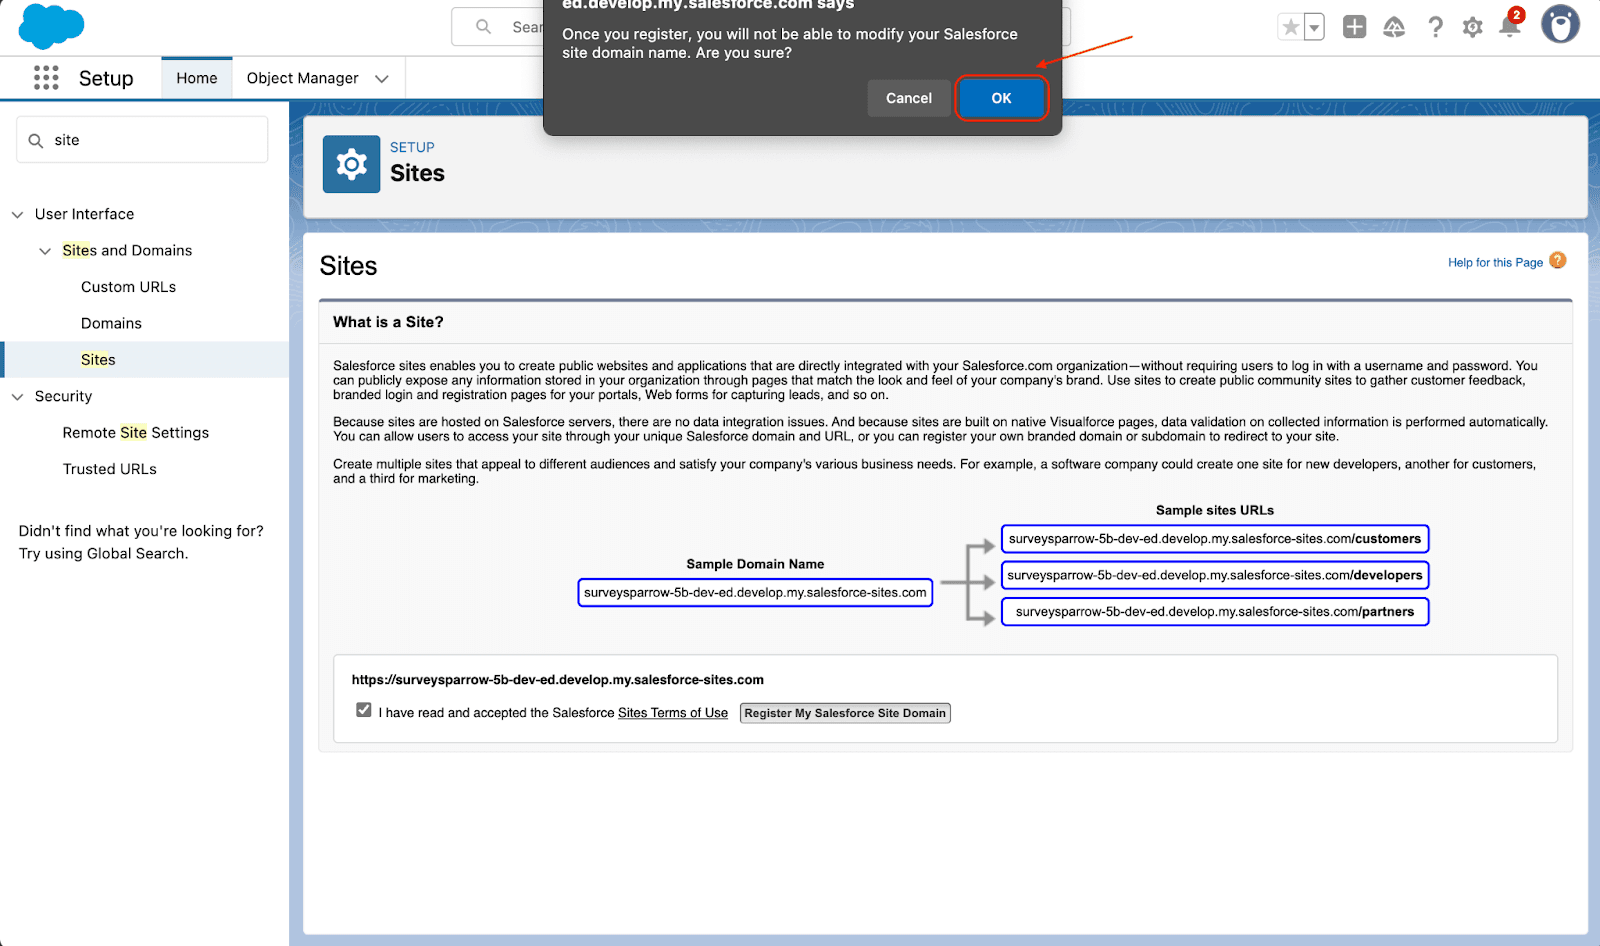
4. Now that the domain is live, you can create a site. Click on New at the bottom of the page.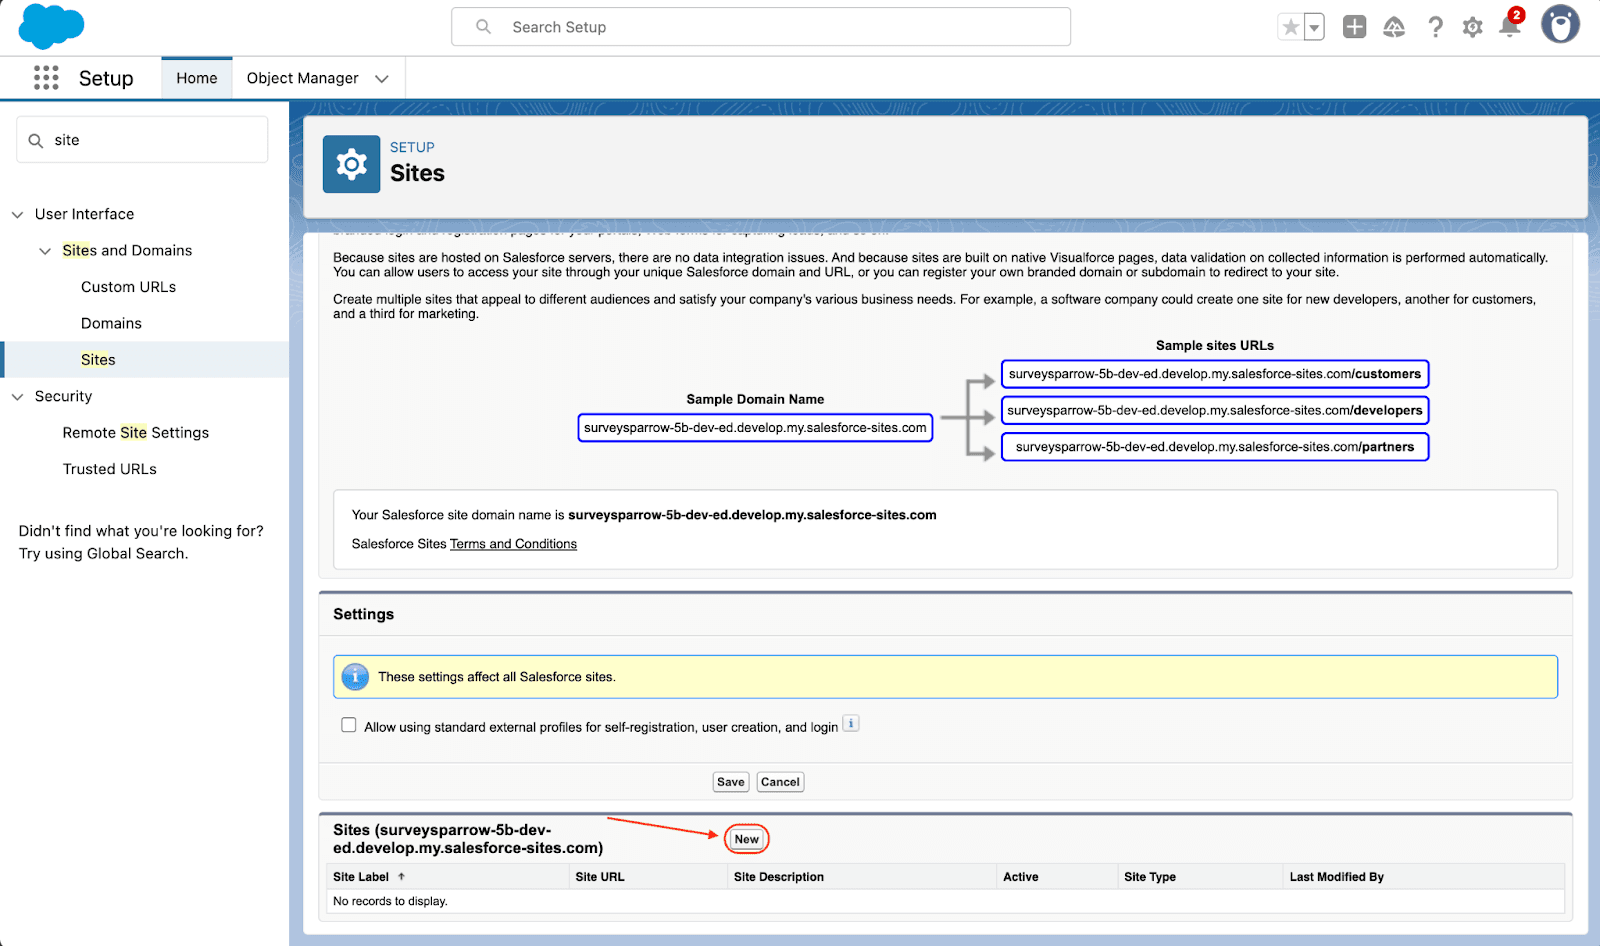
5. Enter a Site Label and Site Name.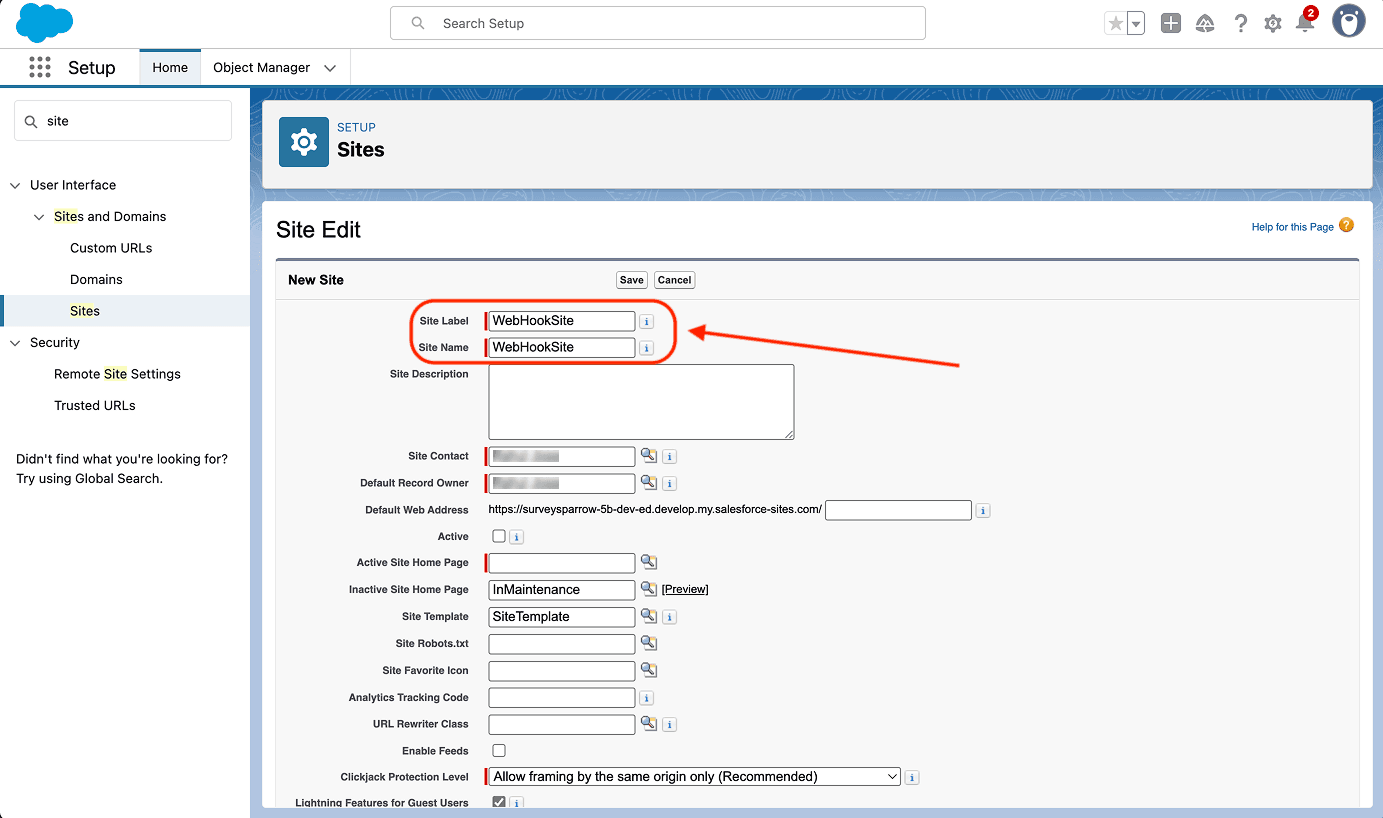
6. Next, click on the magnifying glass icon next to Active Site Home Page.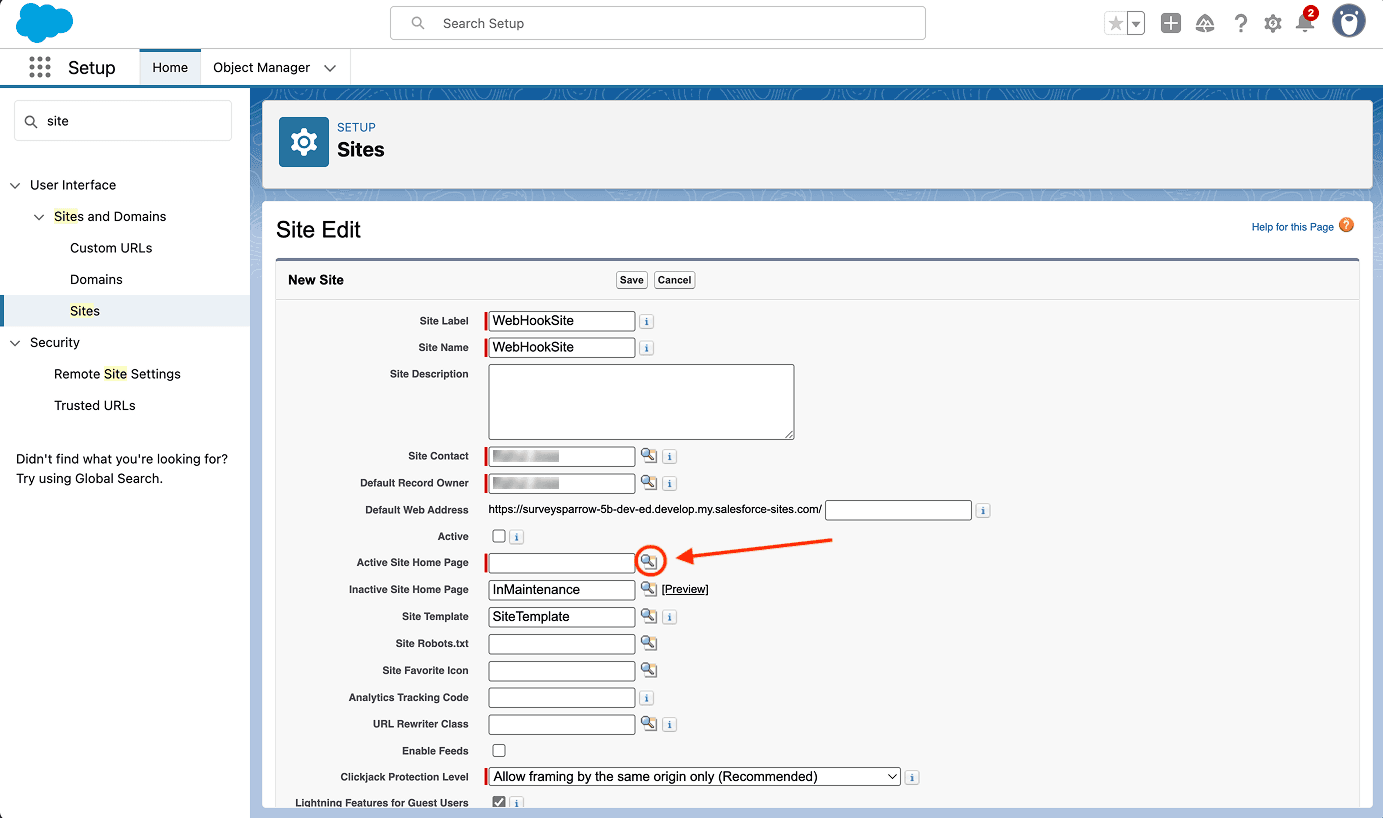
7. Another tab opens with a list of Visualforce pages. Click on any item under the Name column.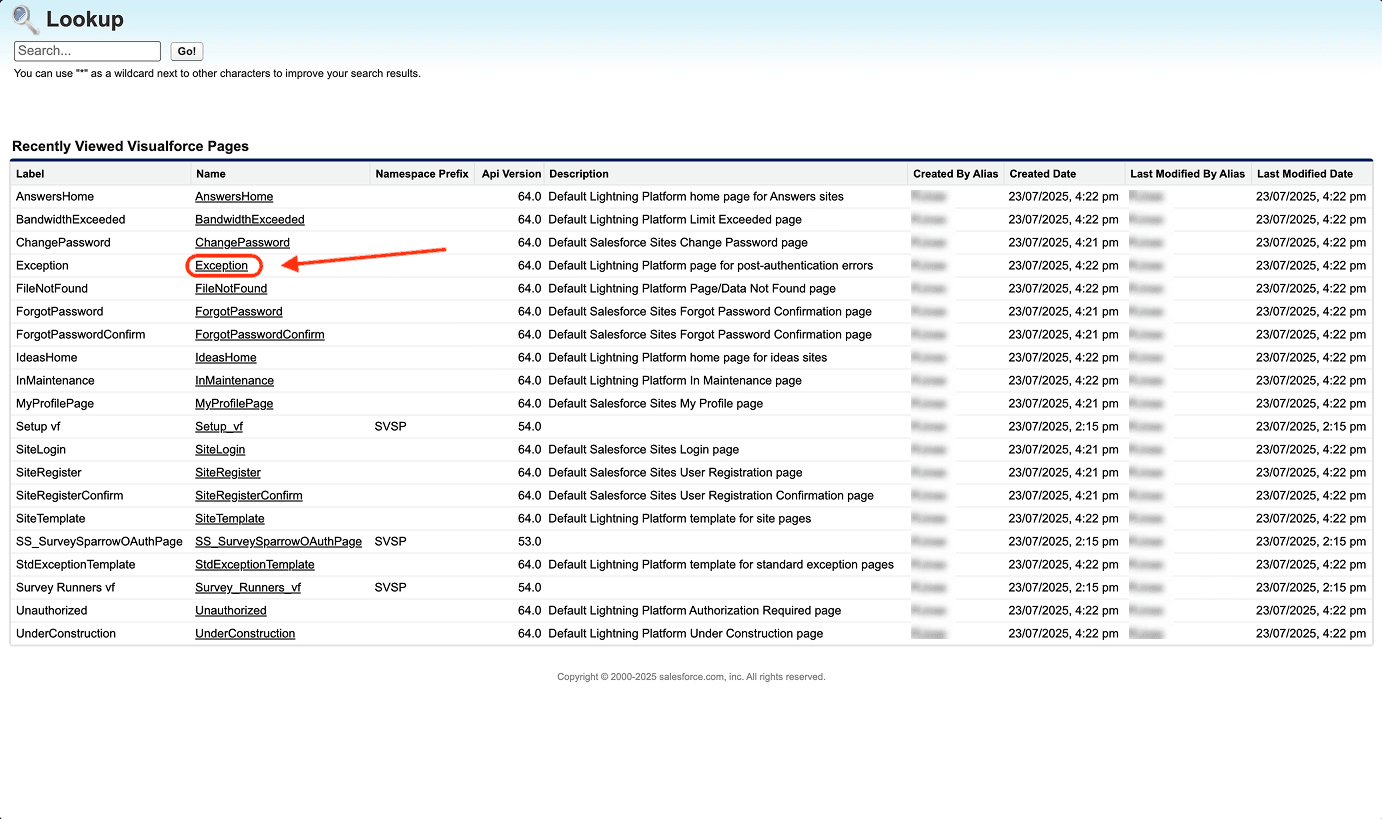
8. You are returned to the original tab. Now, click Save.
9. Head back to the setup section, then navigate to the Sites section. Click on WebHookSite under Site Label.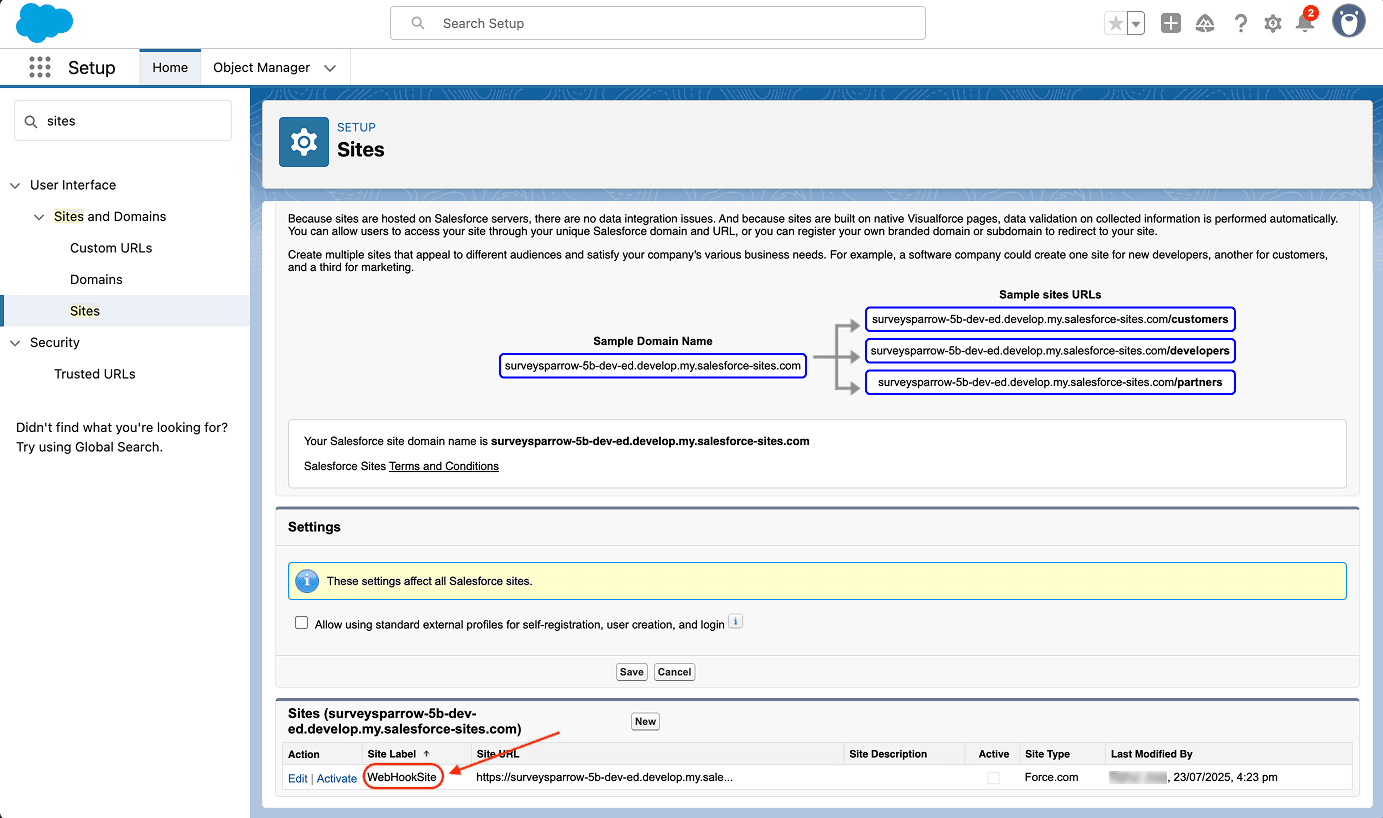
10. Another tab opens. Click on Public Access Settings.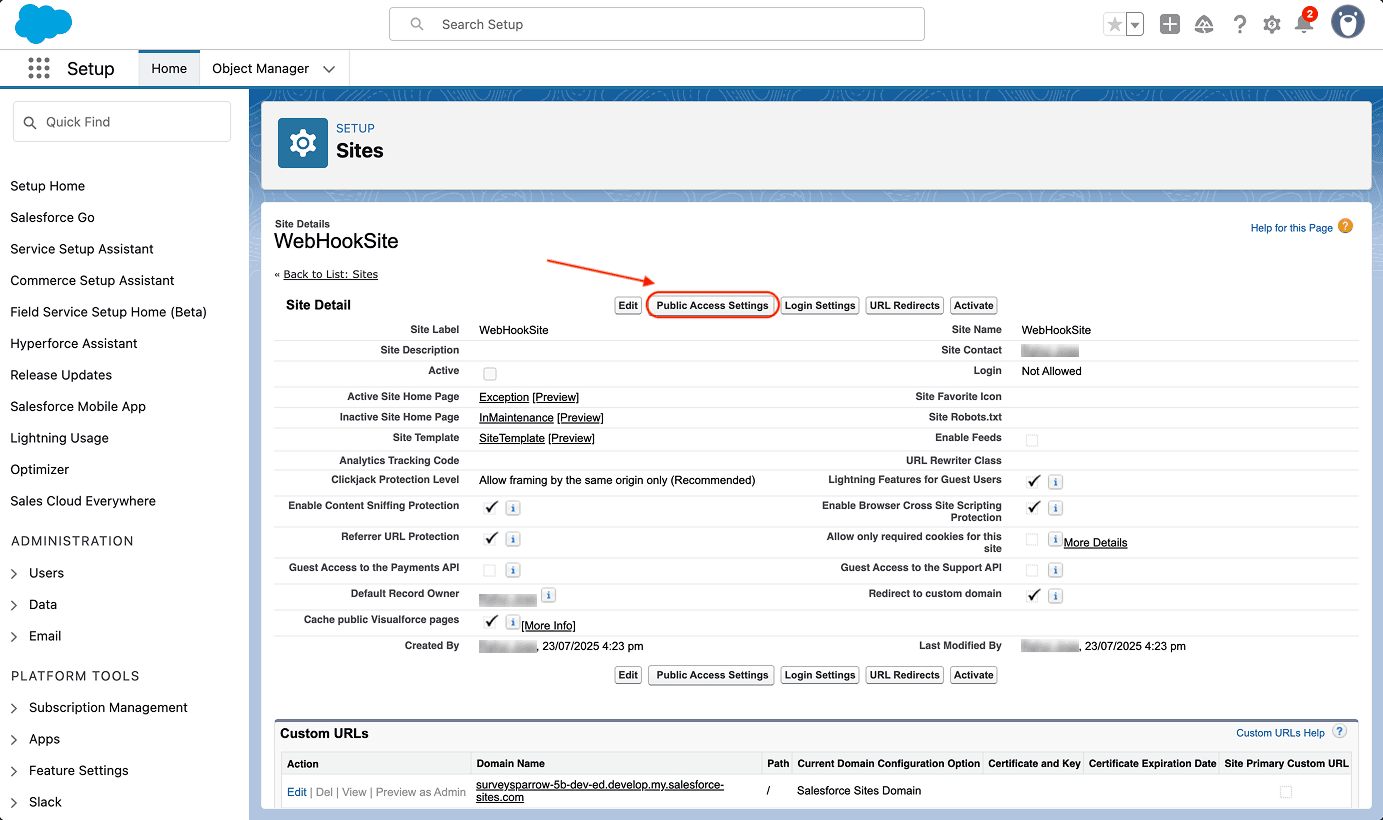
11. Click on Enabled Apex Class Access.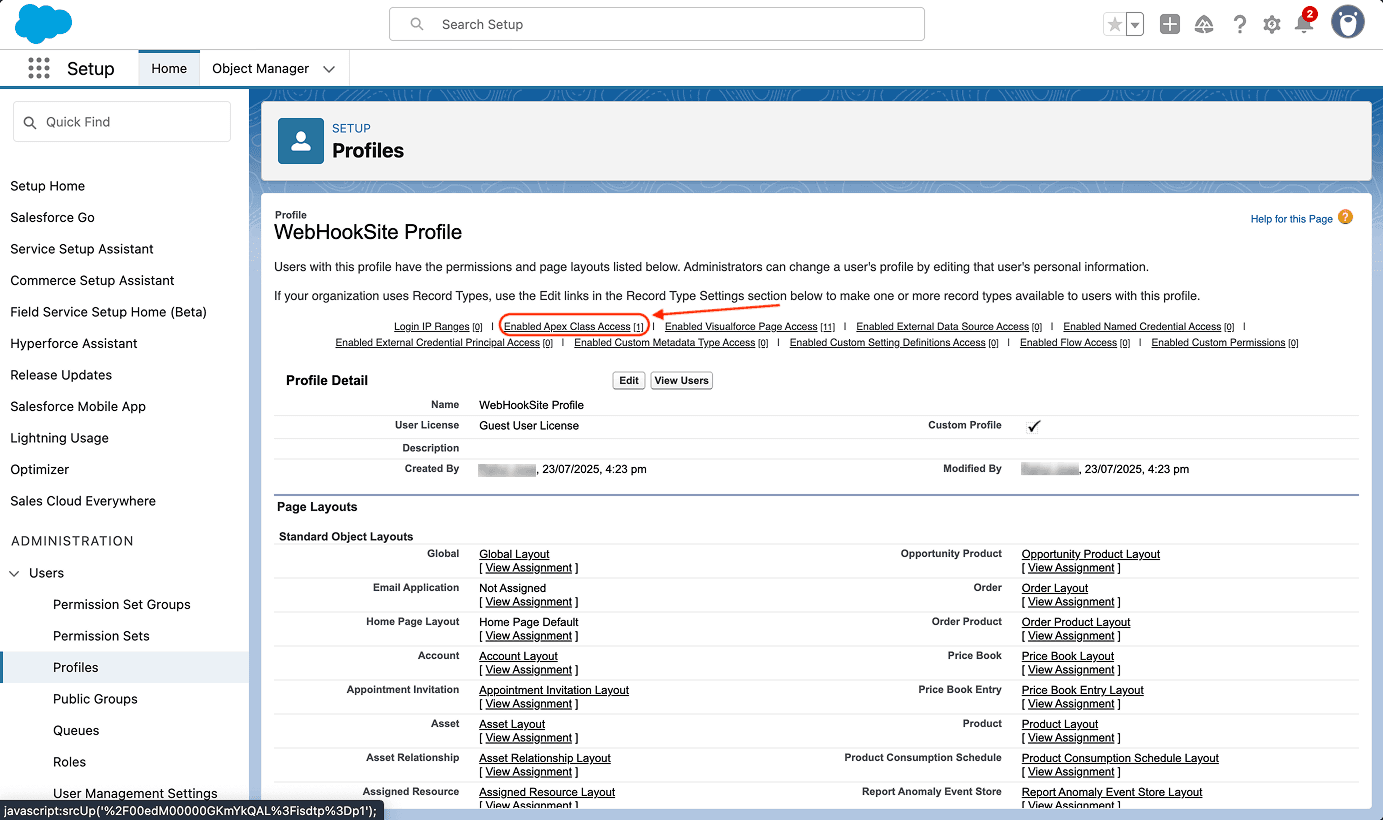
12. You are then taken to the page section for the same. Click Edit.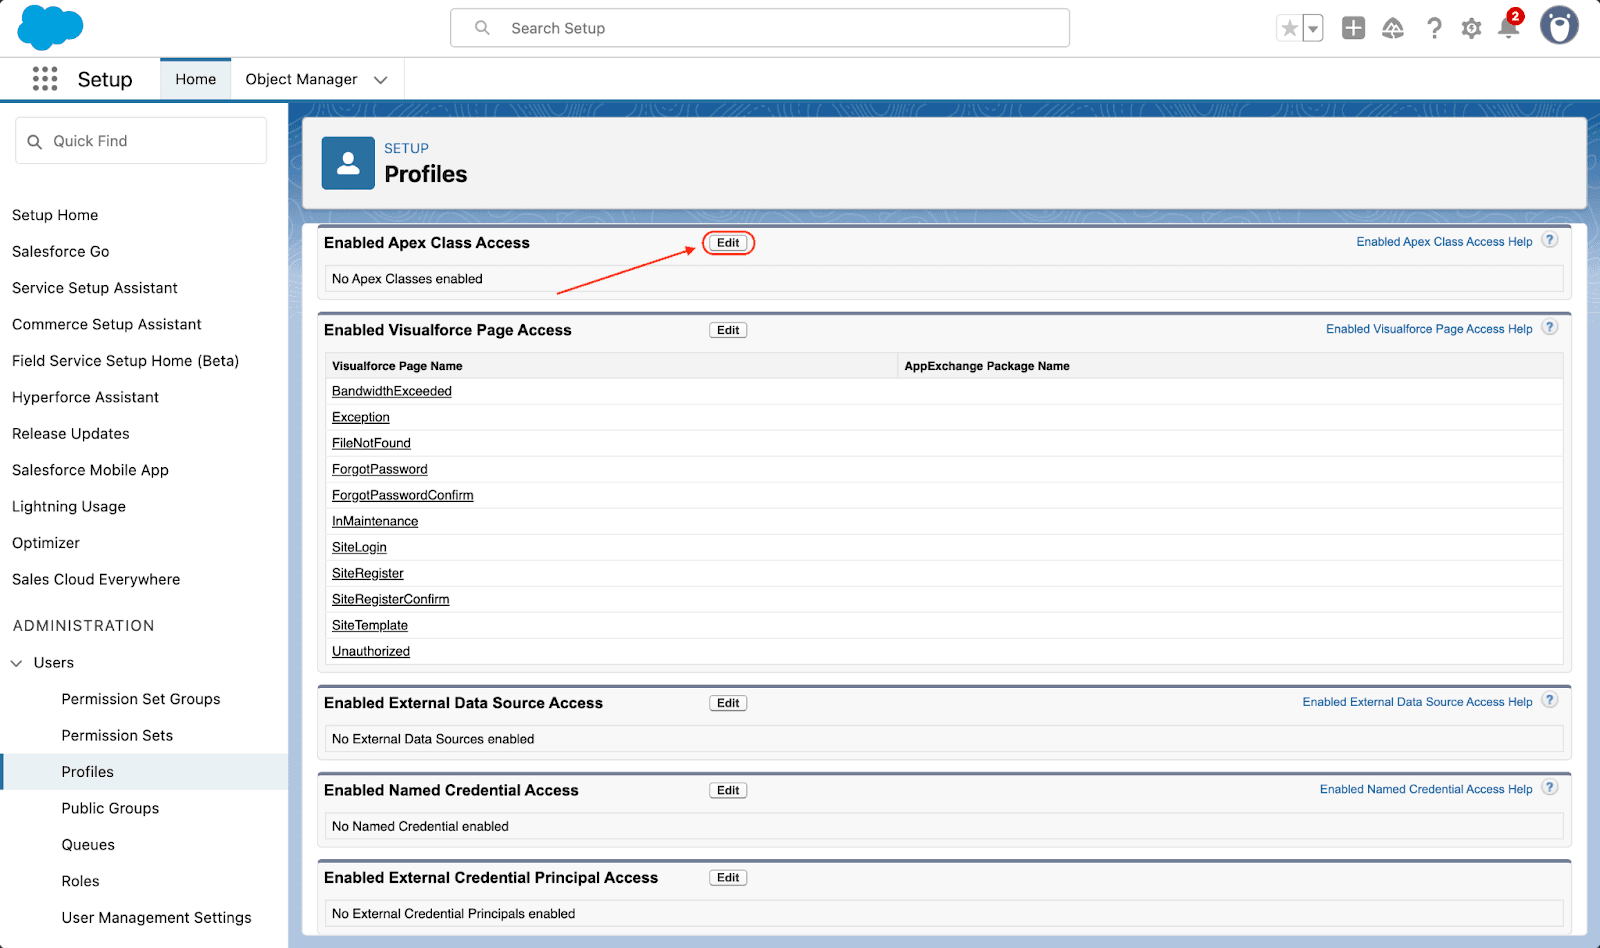
13. Scroll through the list of available Apex classes till you see SVSP.WebhookResponseHandleClass. Select it, then click on the right-pointing arrow under Add.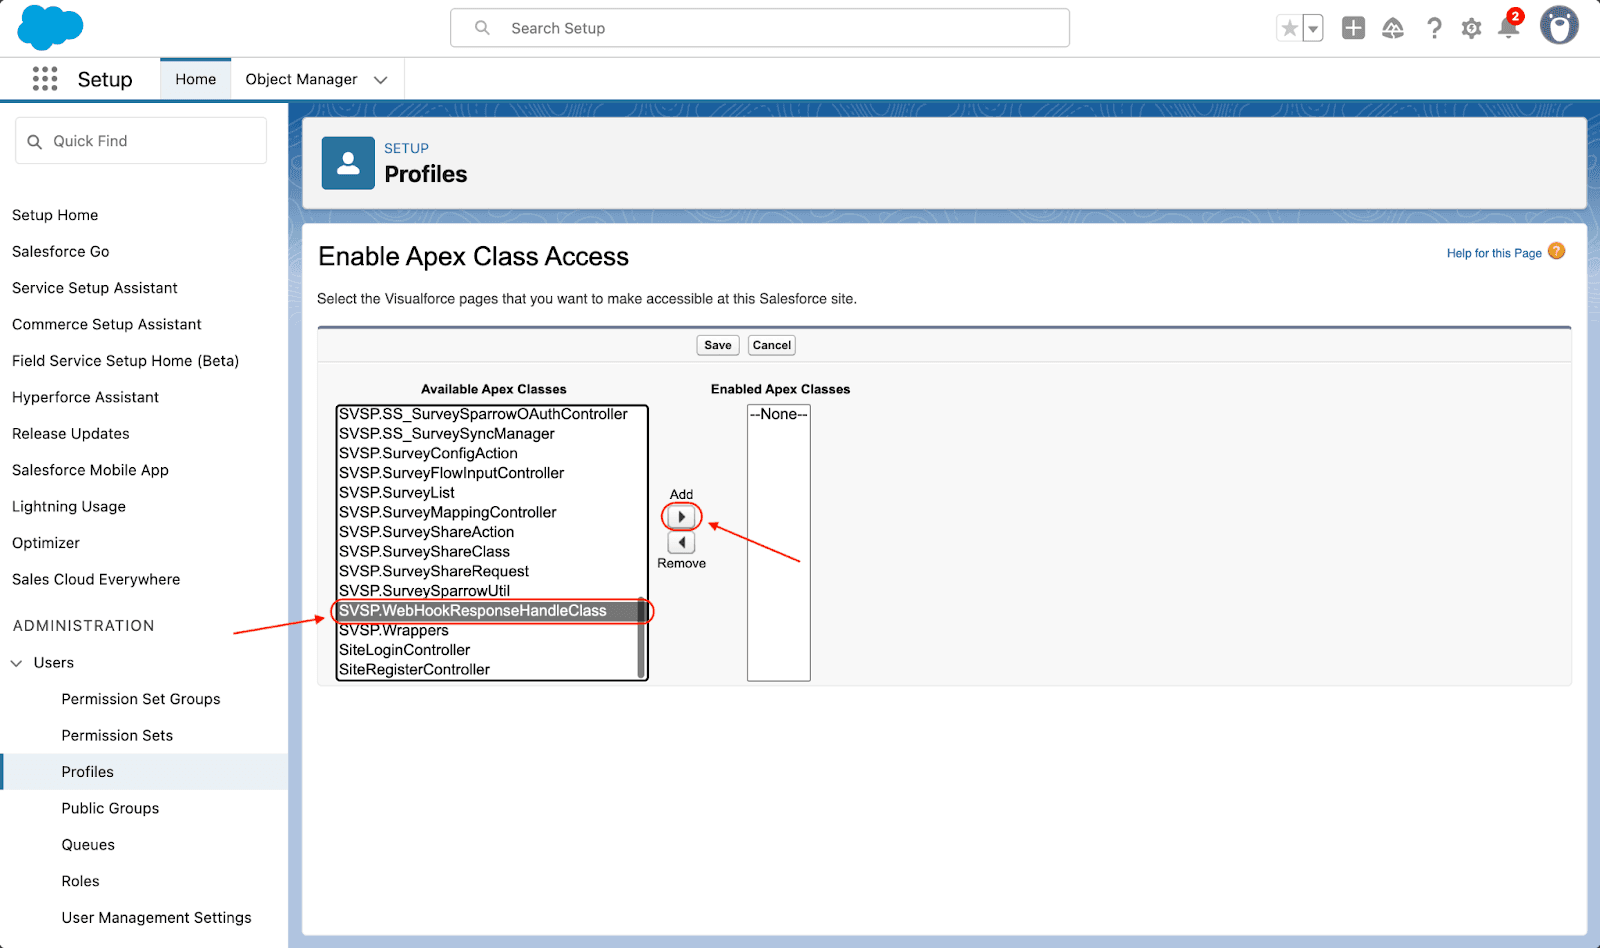
14. Click Save.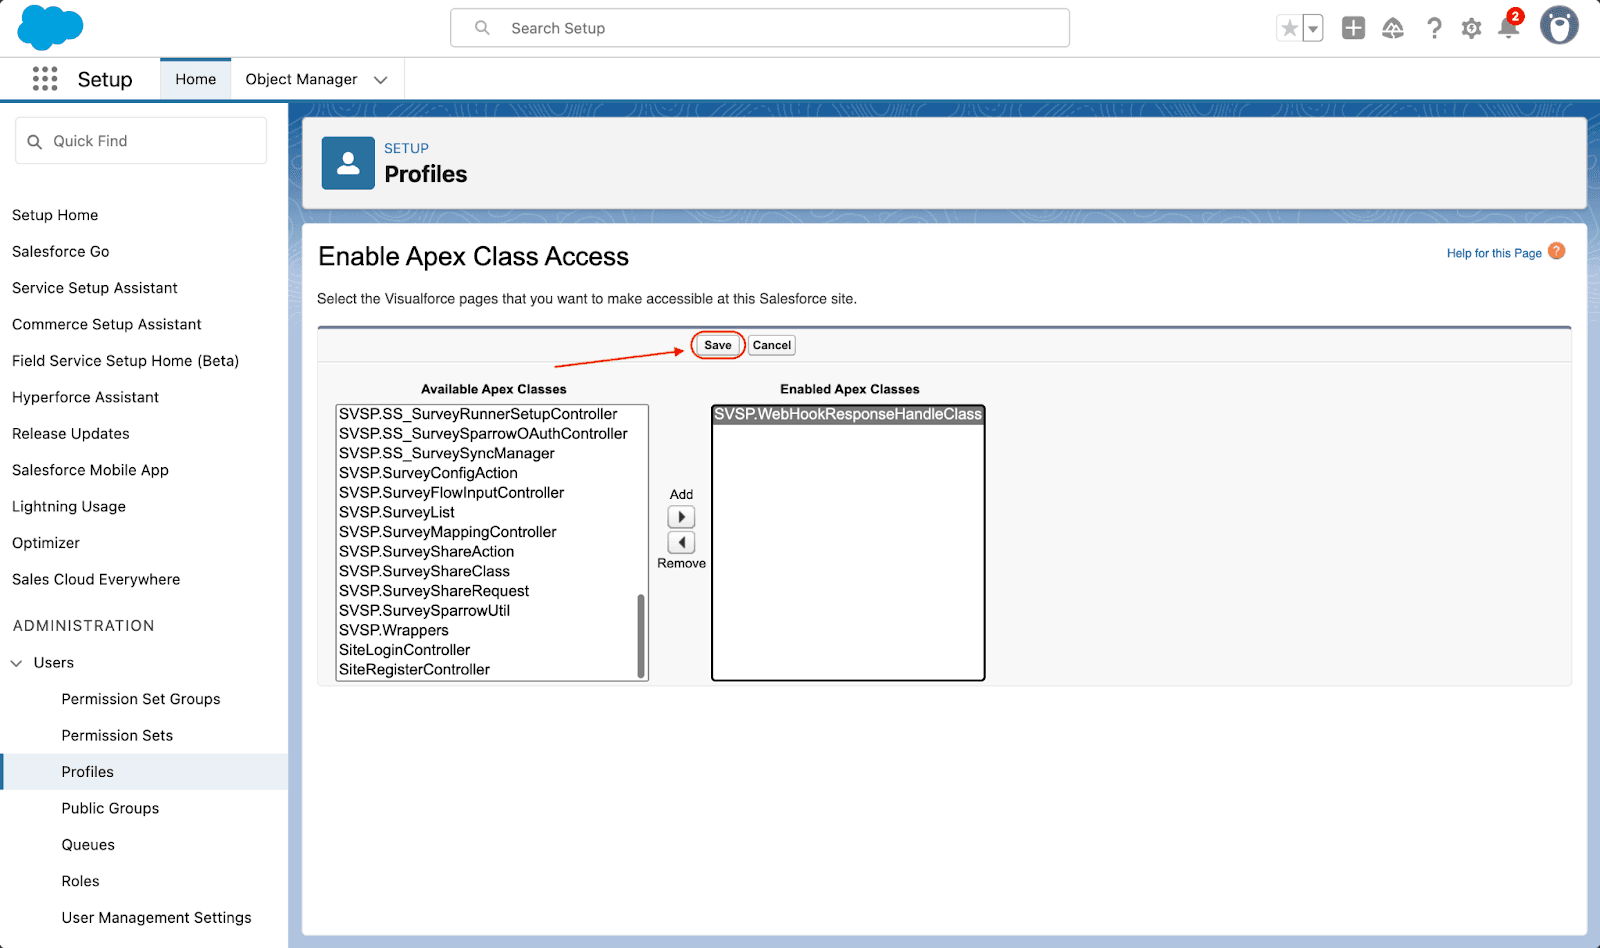
15. You are returned back to the Sites section. Find the Custom Settings option from the left-hand panel and click on it.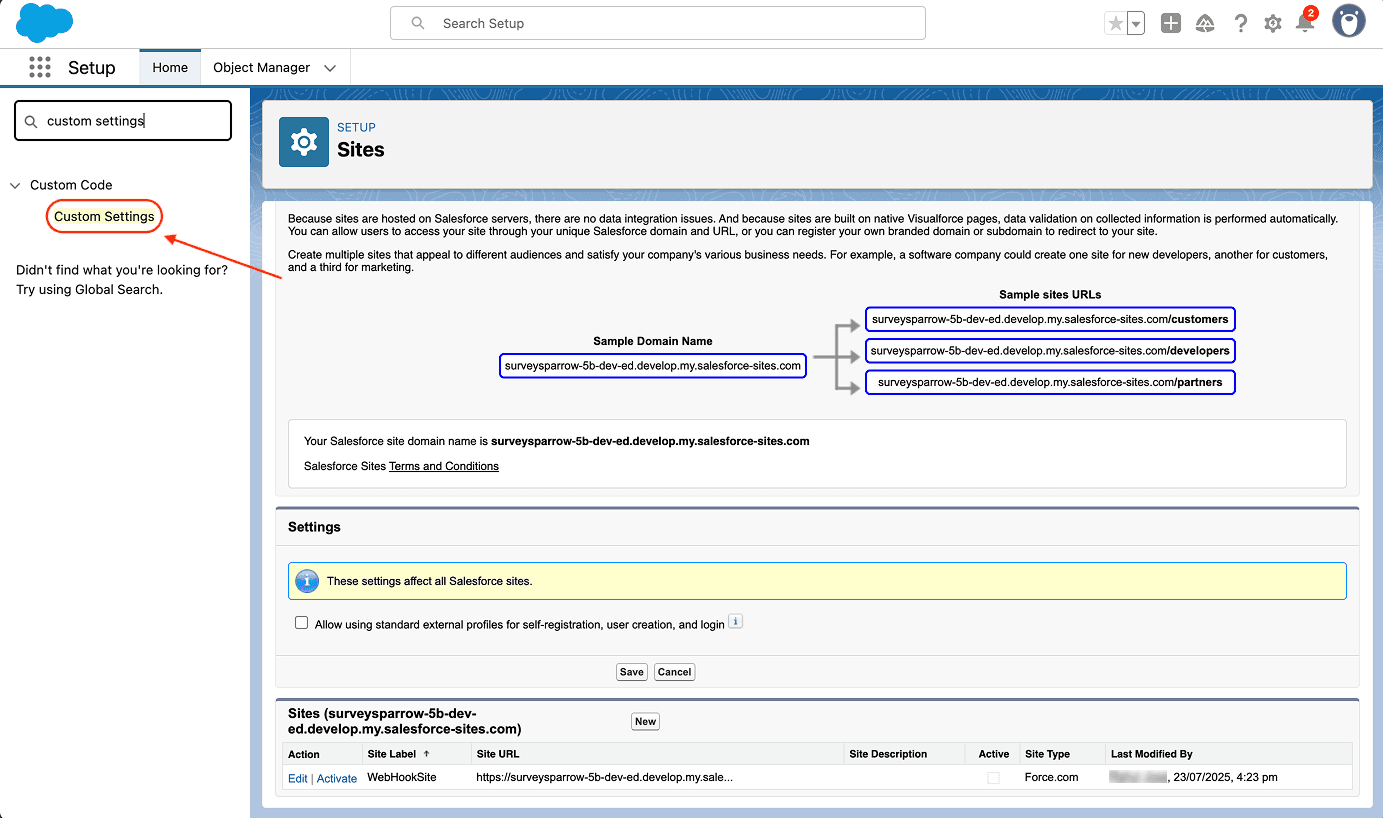
16. Inside the Custom Settings section, click on Manage under the Action column.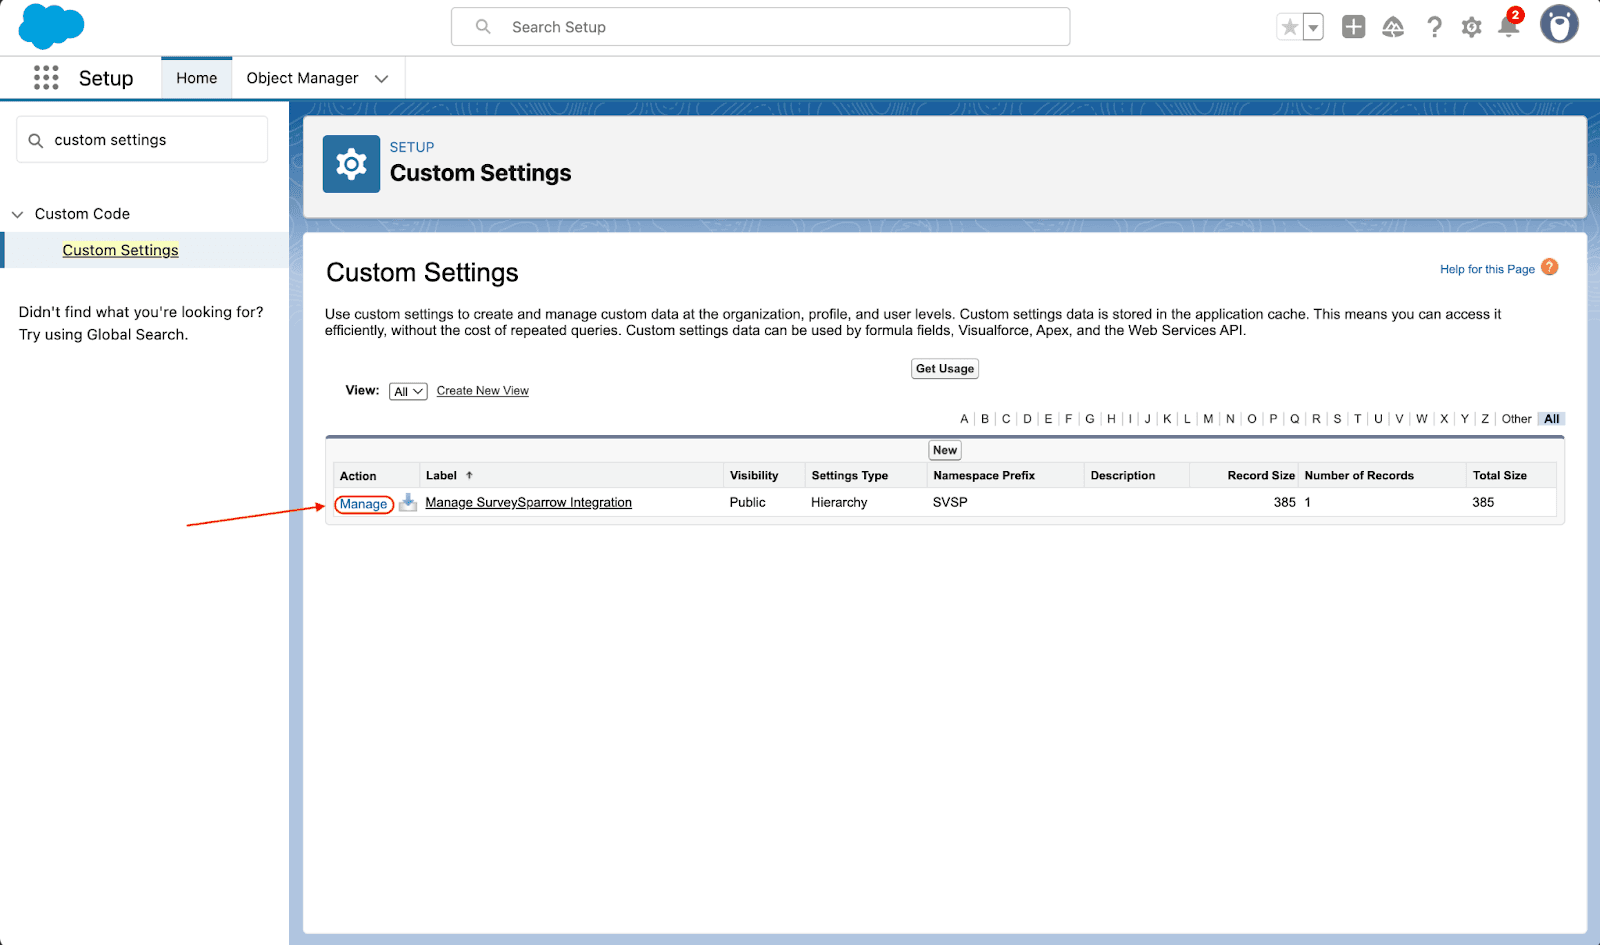
17. Click on Edit.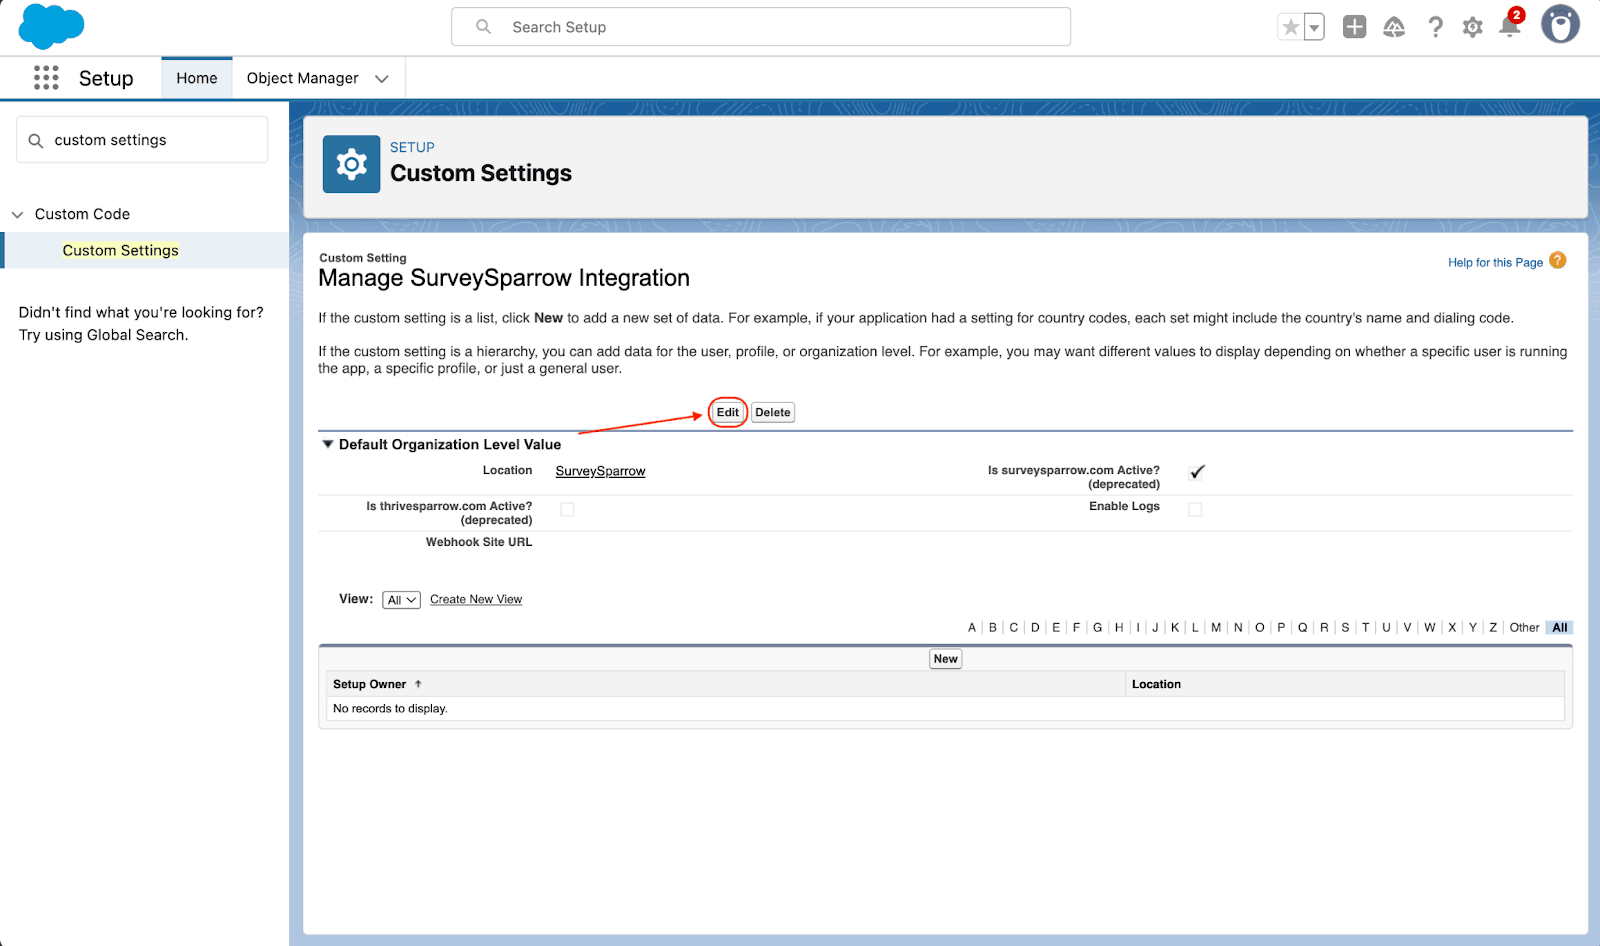
18. Copy the URL of the site you created and paste it in the field for Webhook Site URL. Then click Save.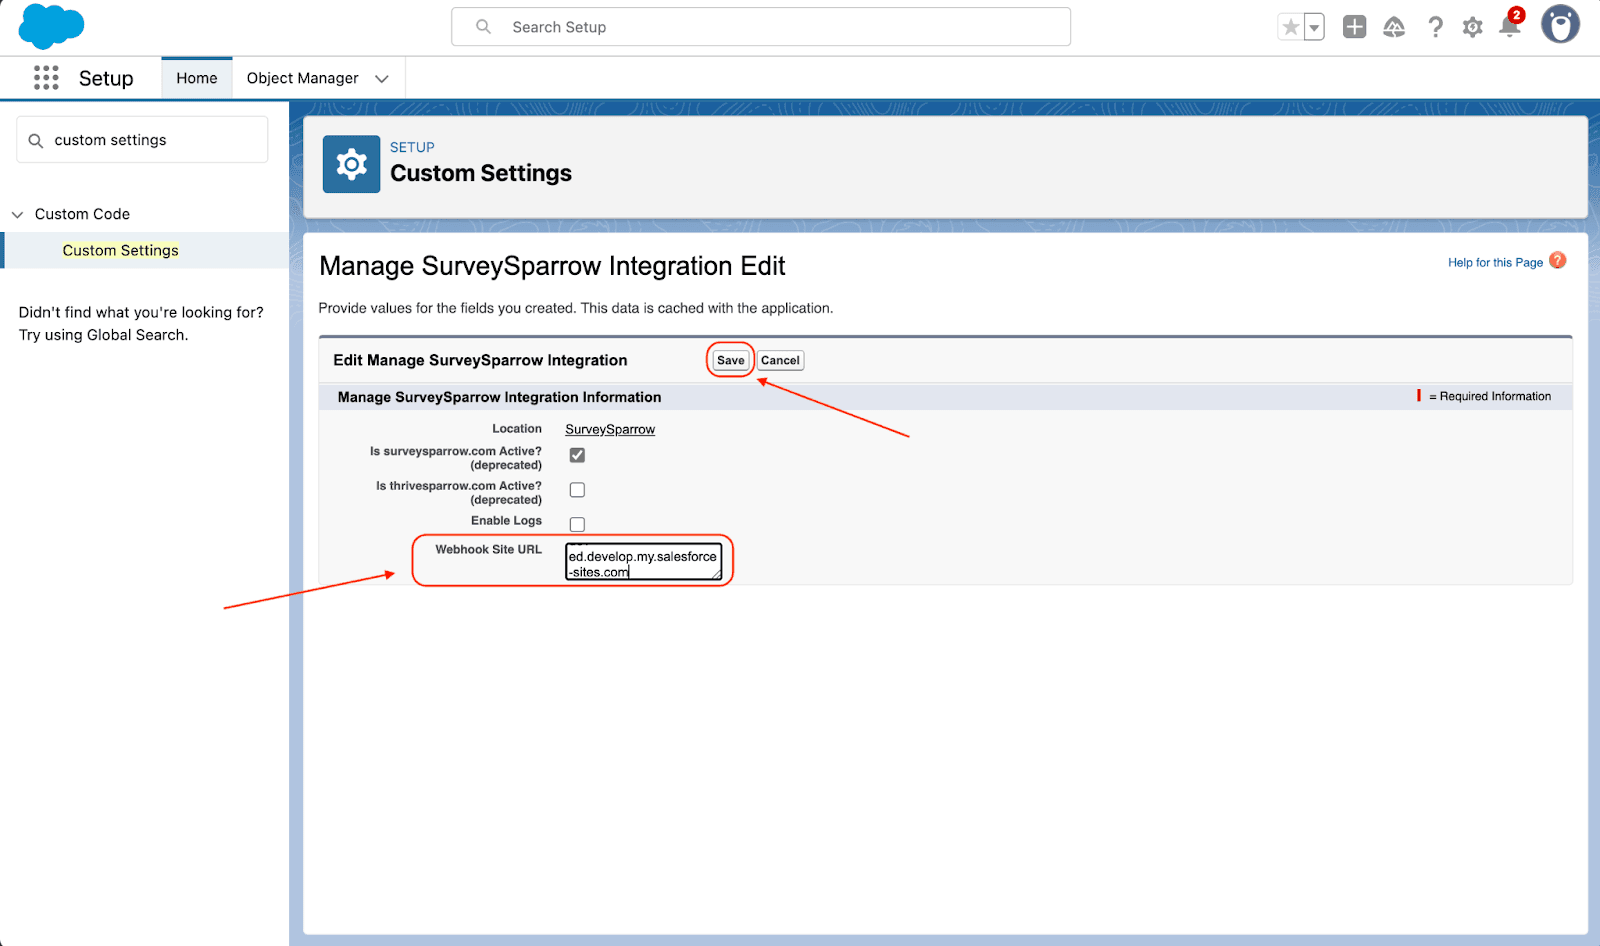
19. Open the SurveySparrow app and head to the Mappings section. Then click Create New.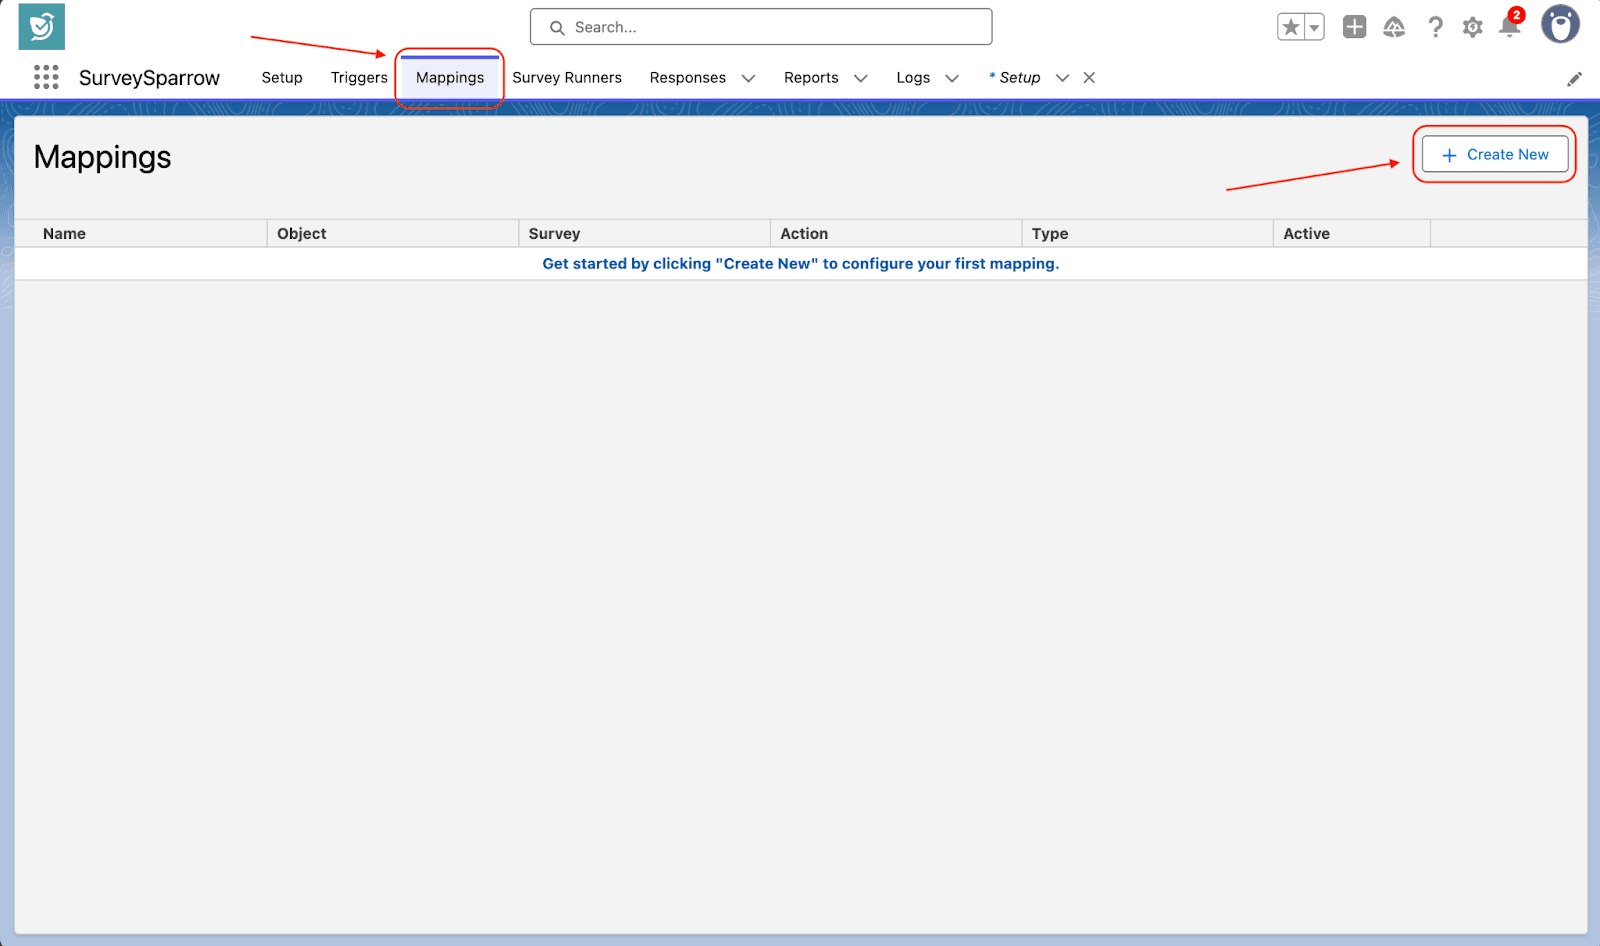
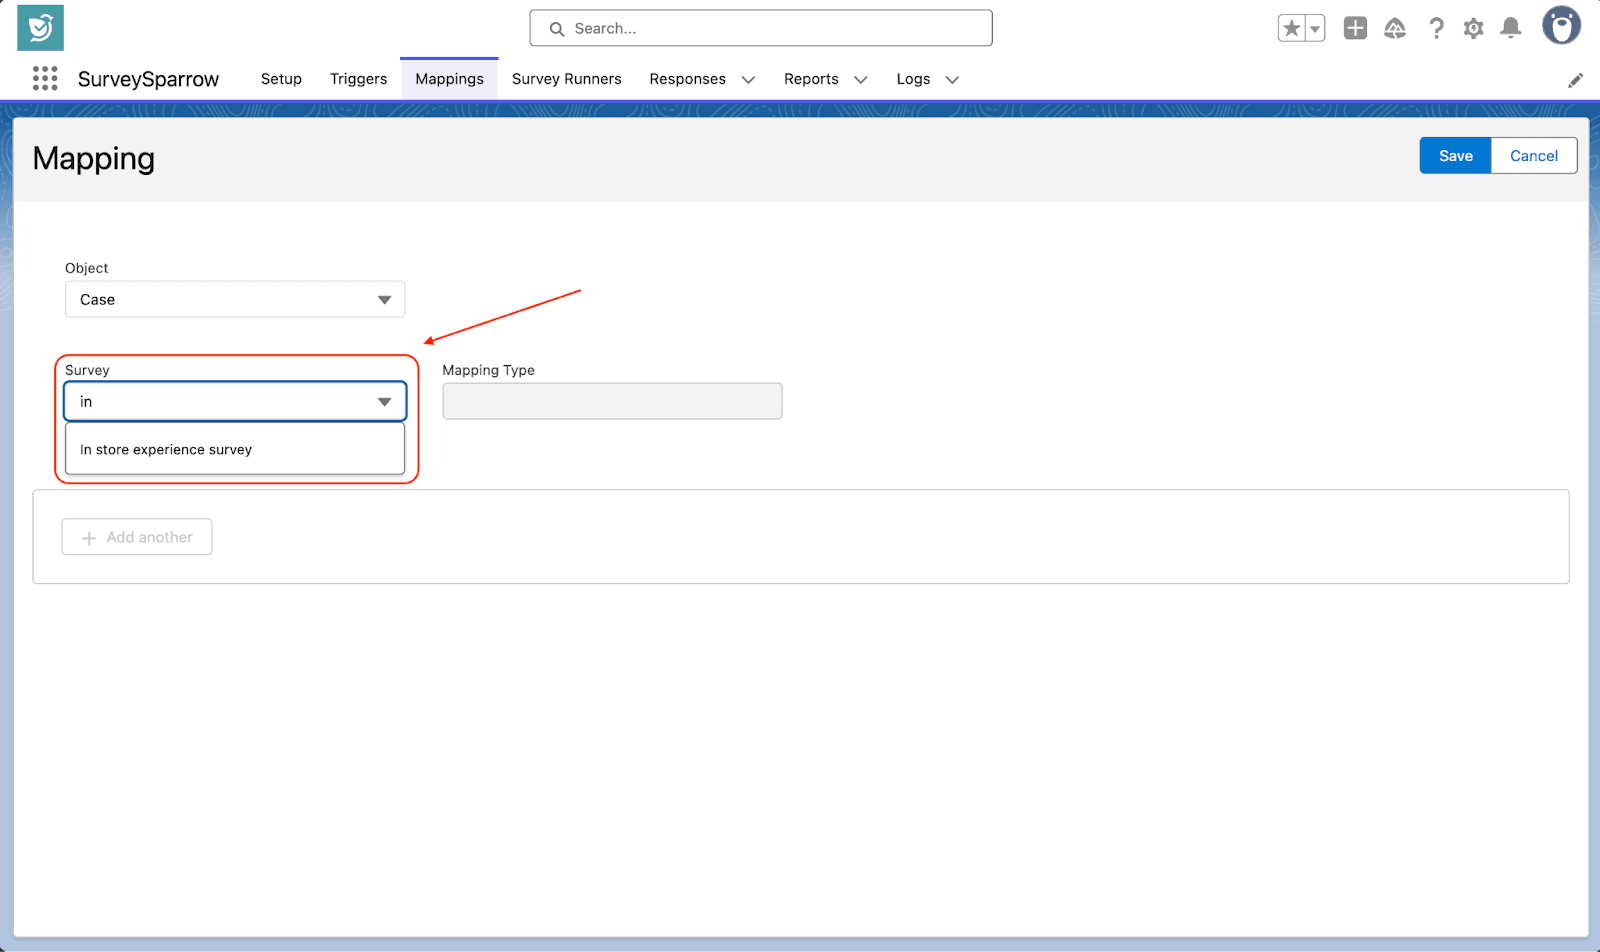
20. Start by selecting the object and survey from which responses must be mapped.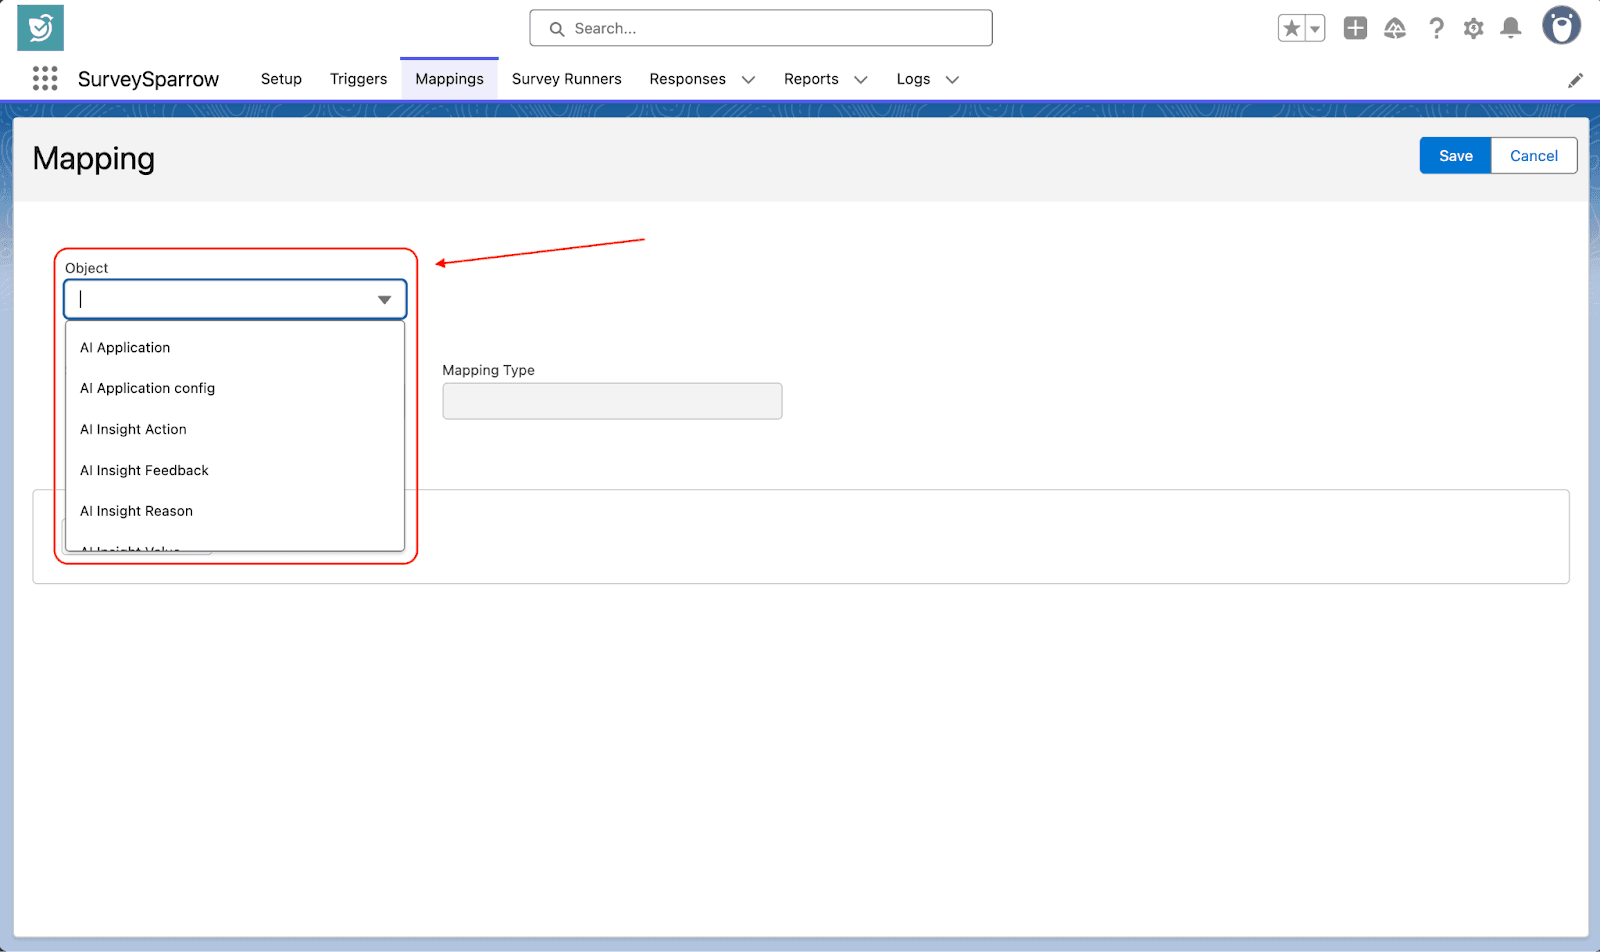
21. Then select the Mapping Type. There are two options: creating a new record or updating the existing record.
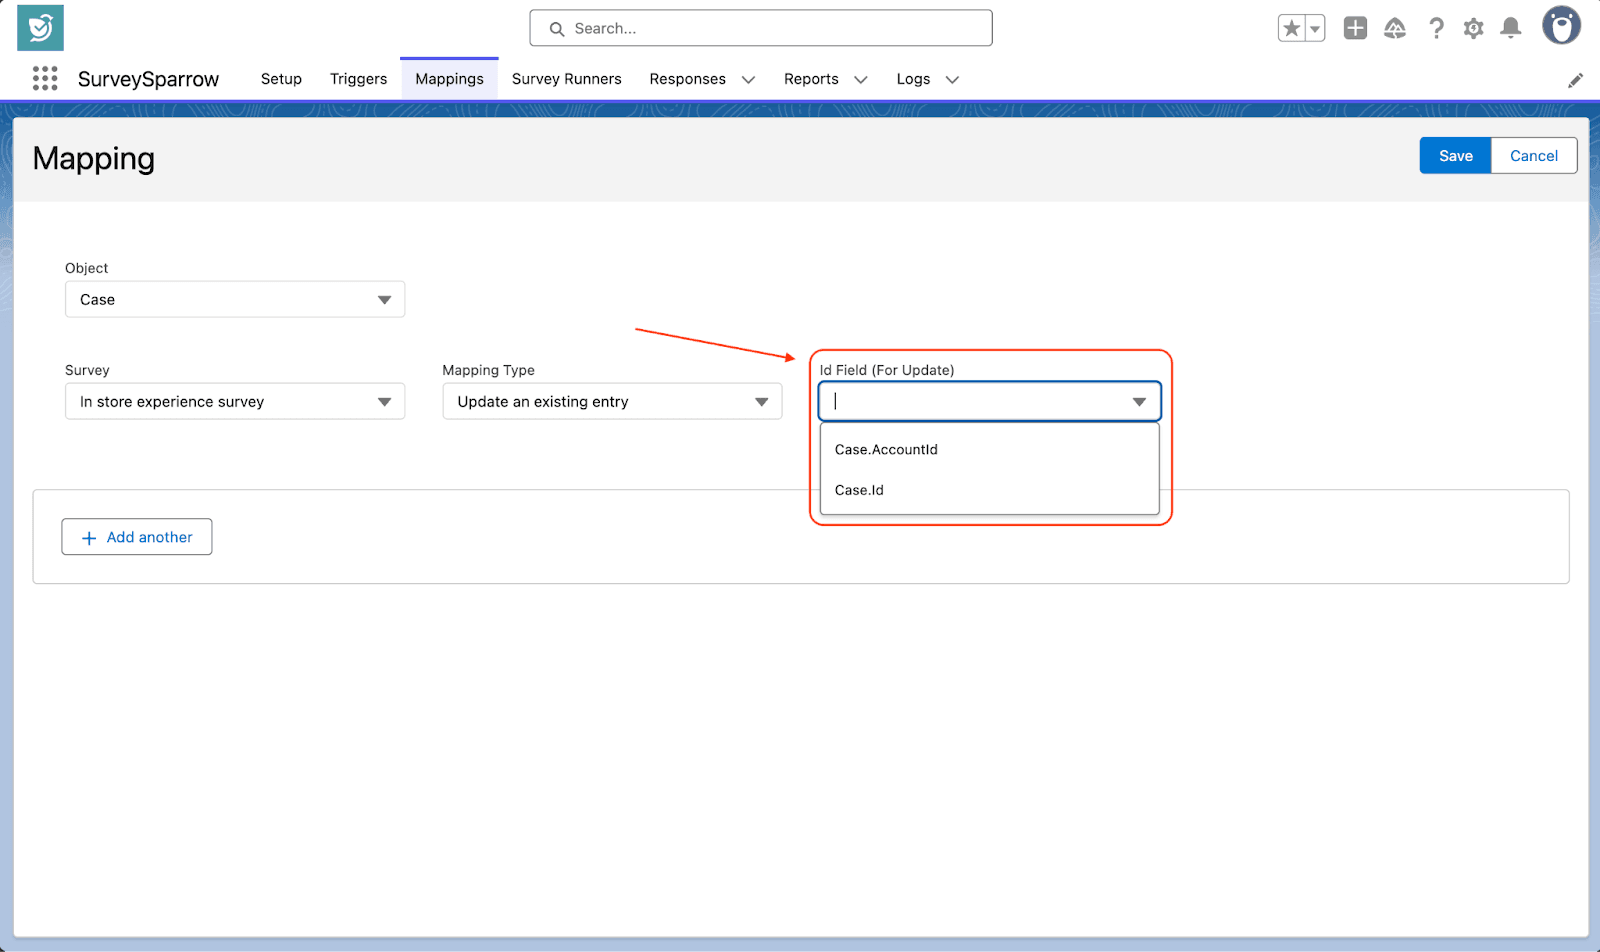
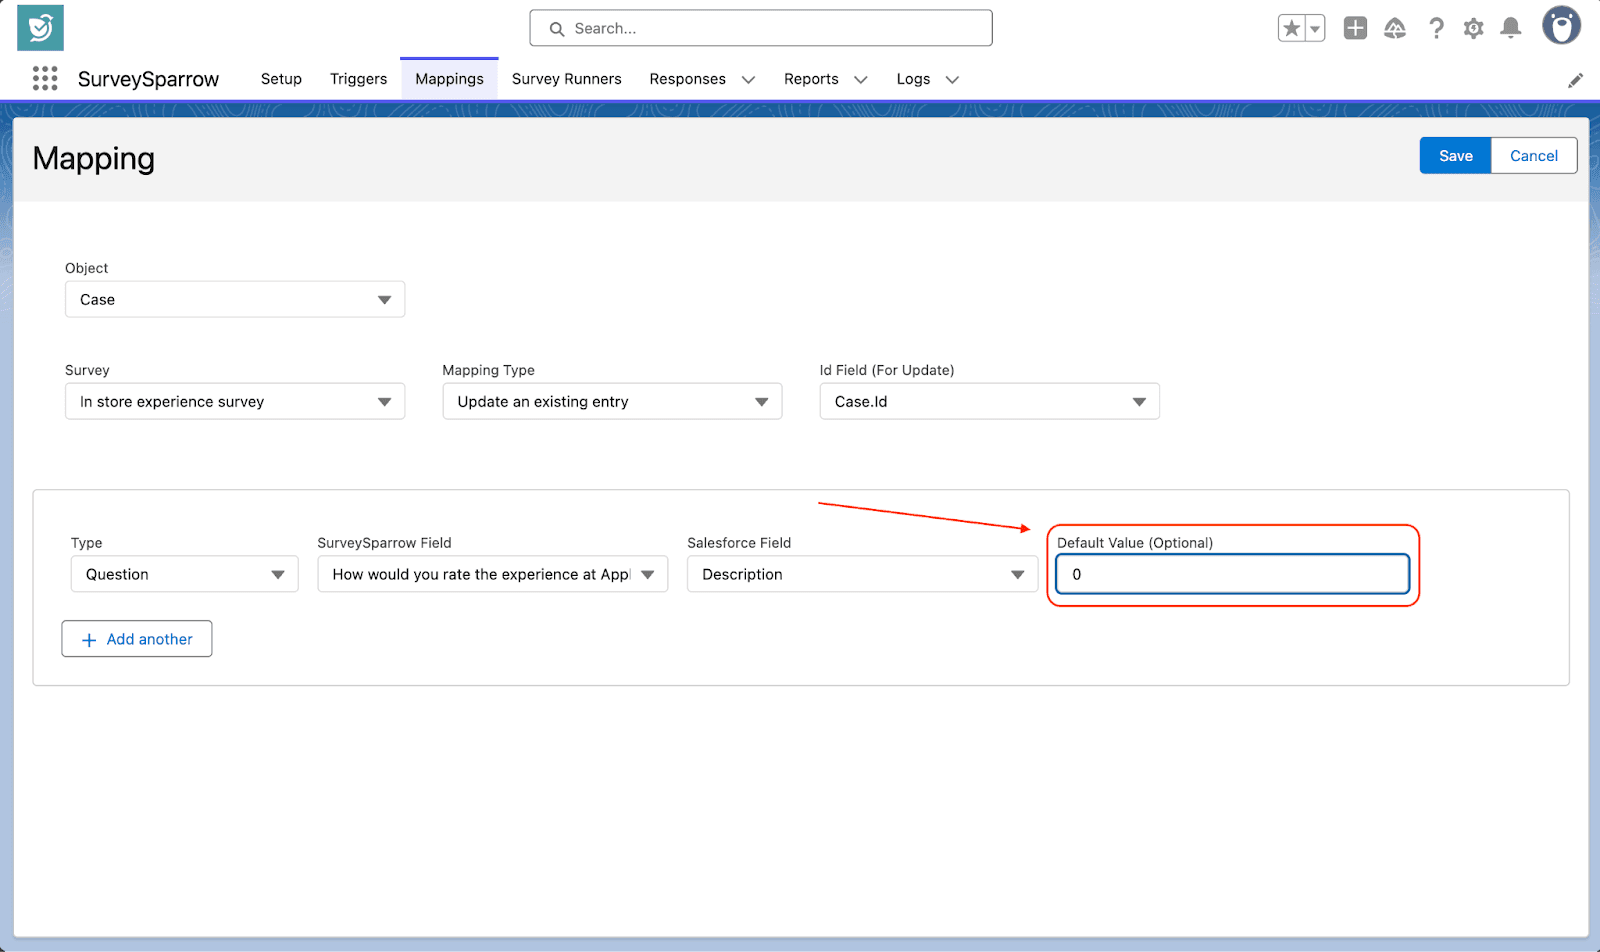
22. Now, after the mapping is defined, you need to choose the survey data types that are mapped. Click on Add another.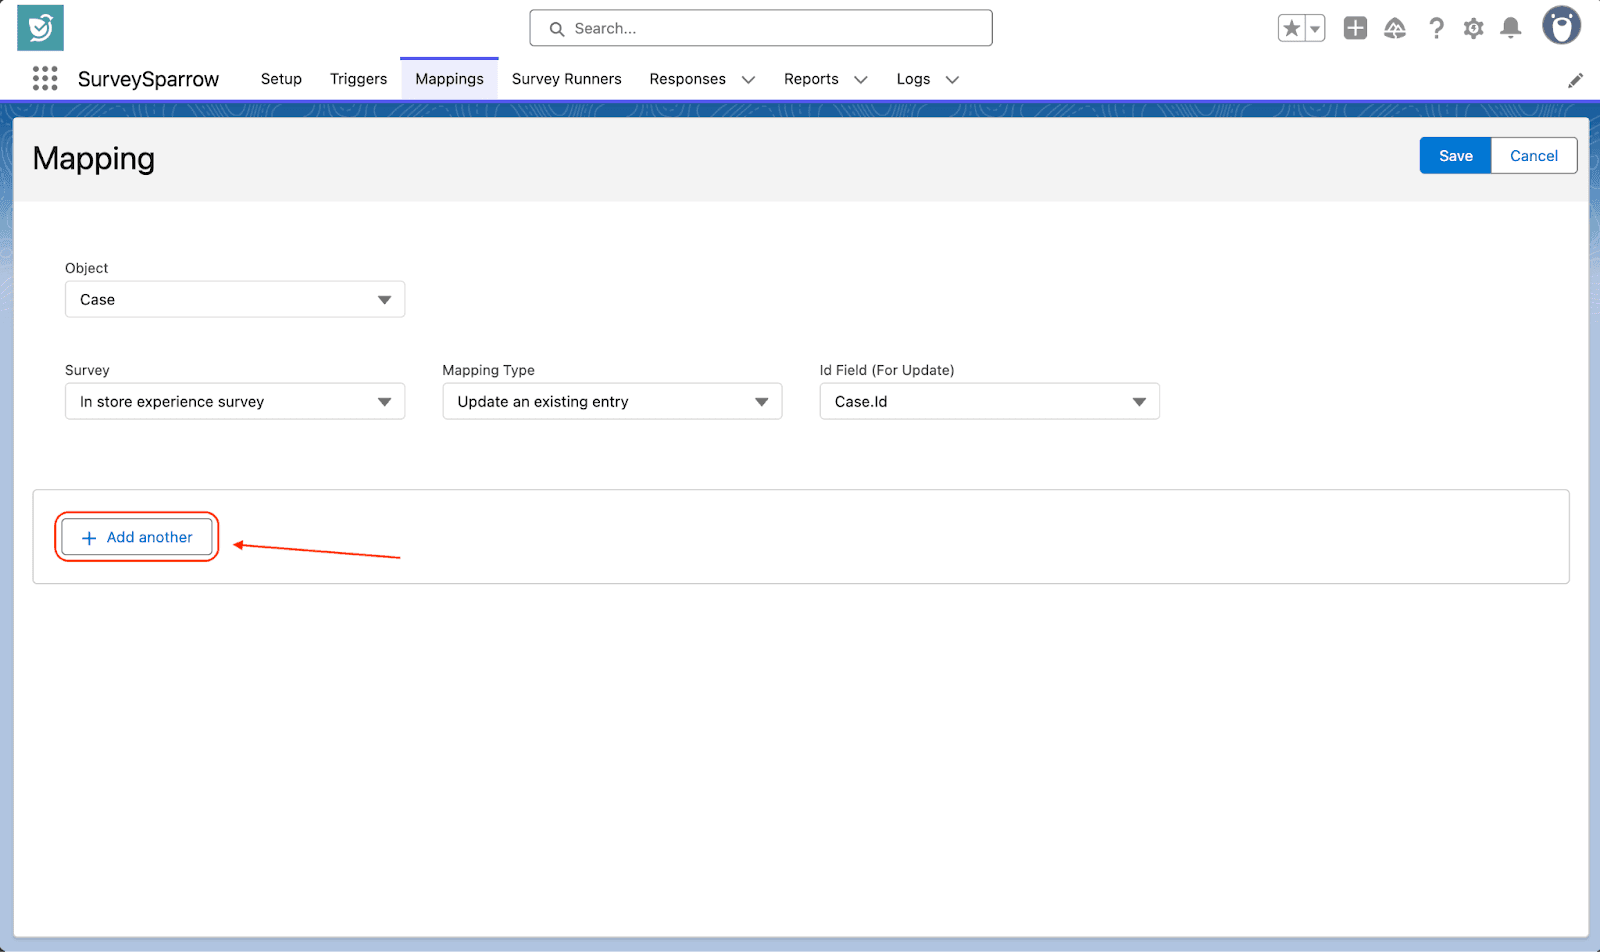
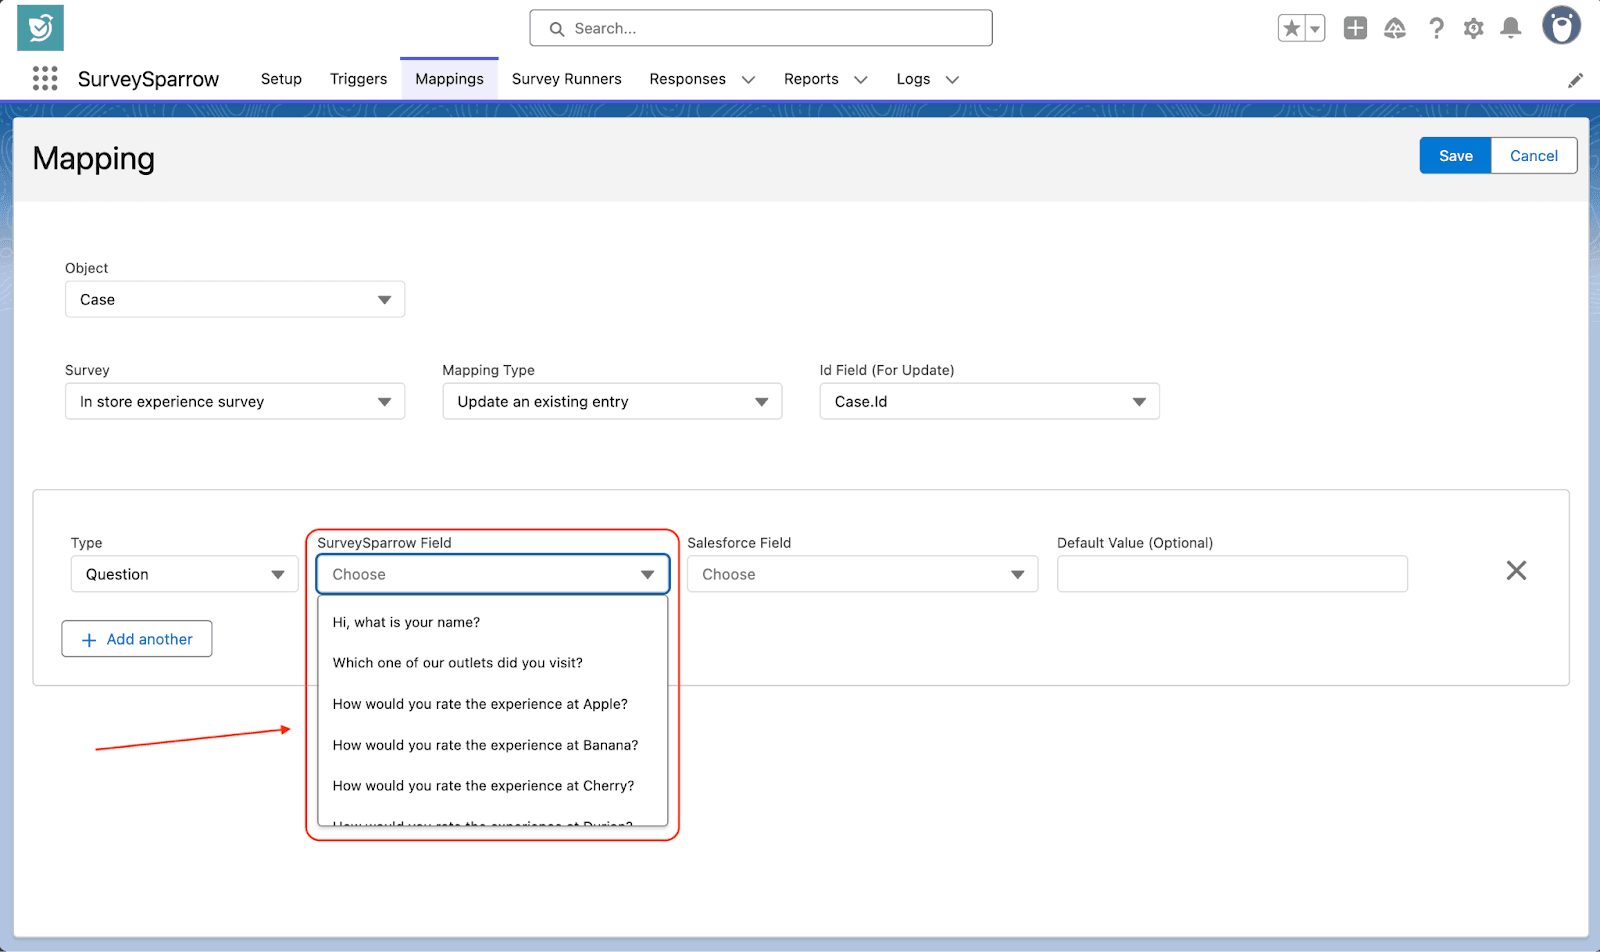
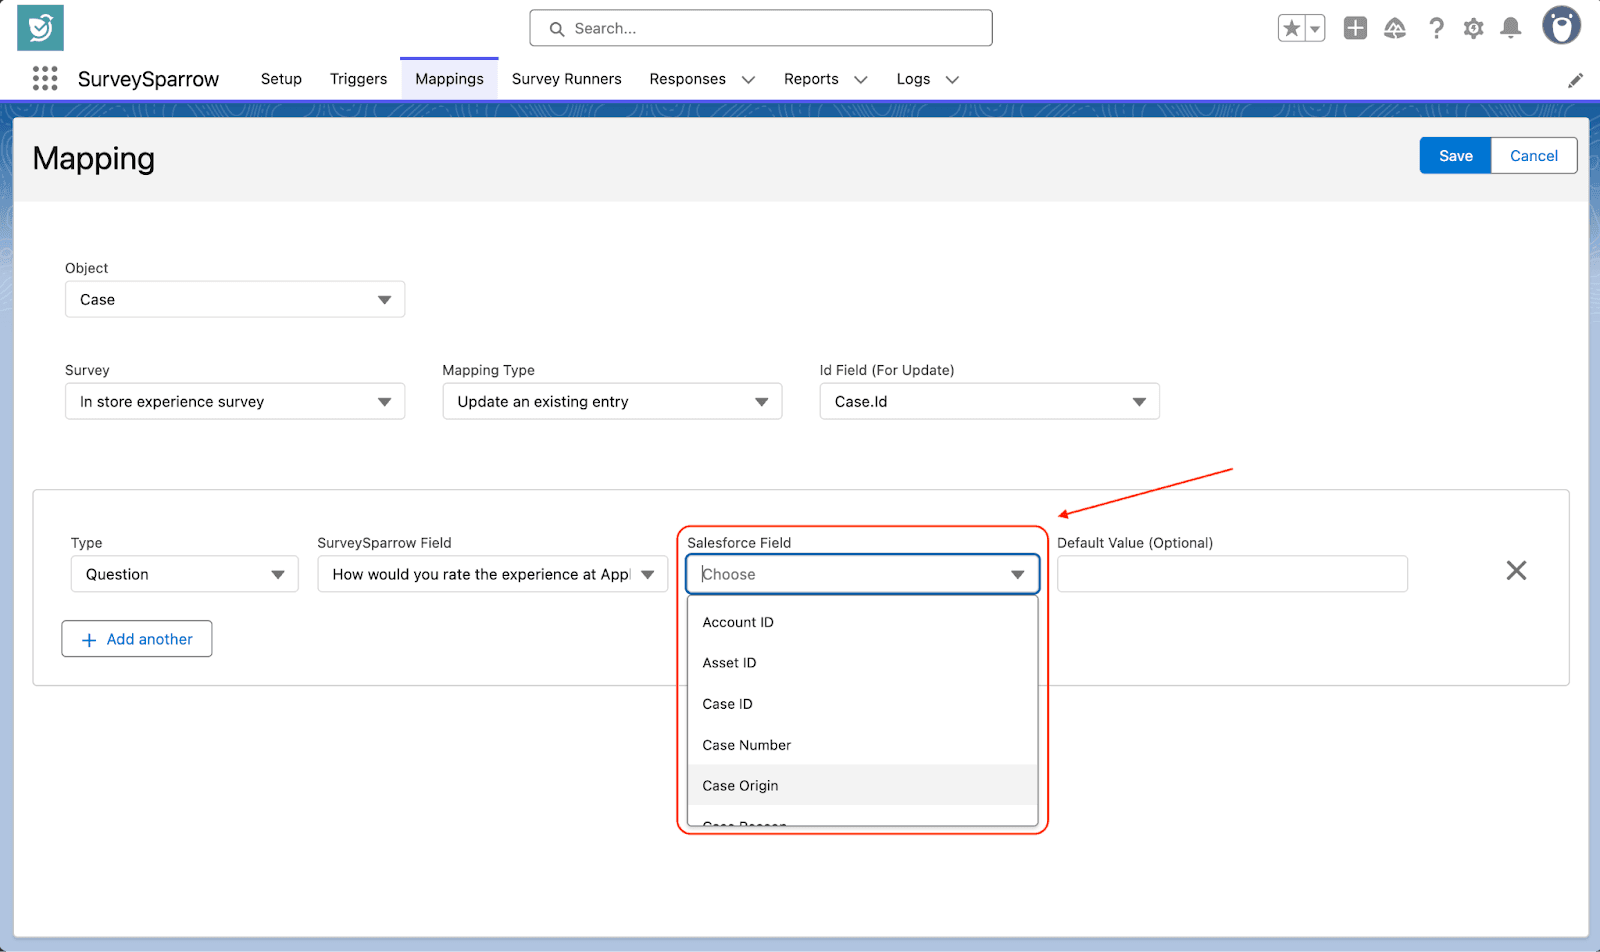
23. You need to select the data type, the SurveySparrow field and the Salesforce field to which it gets mapped. You can also add a default value to populate the mapping in cases of null values.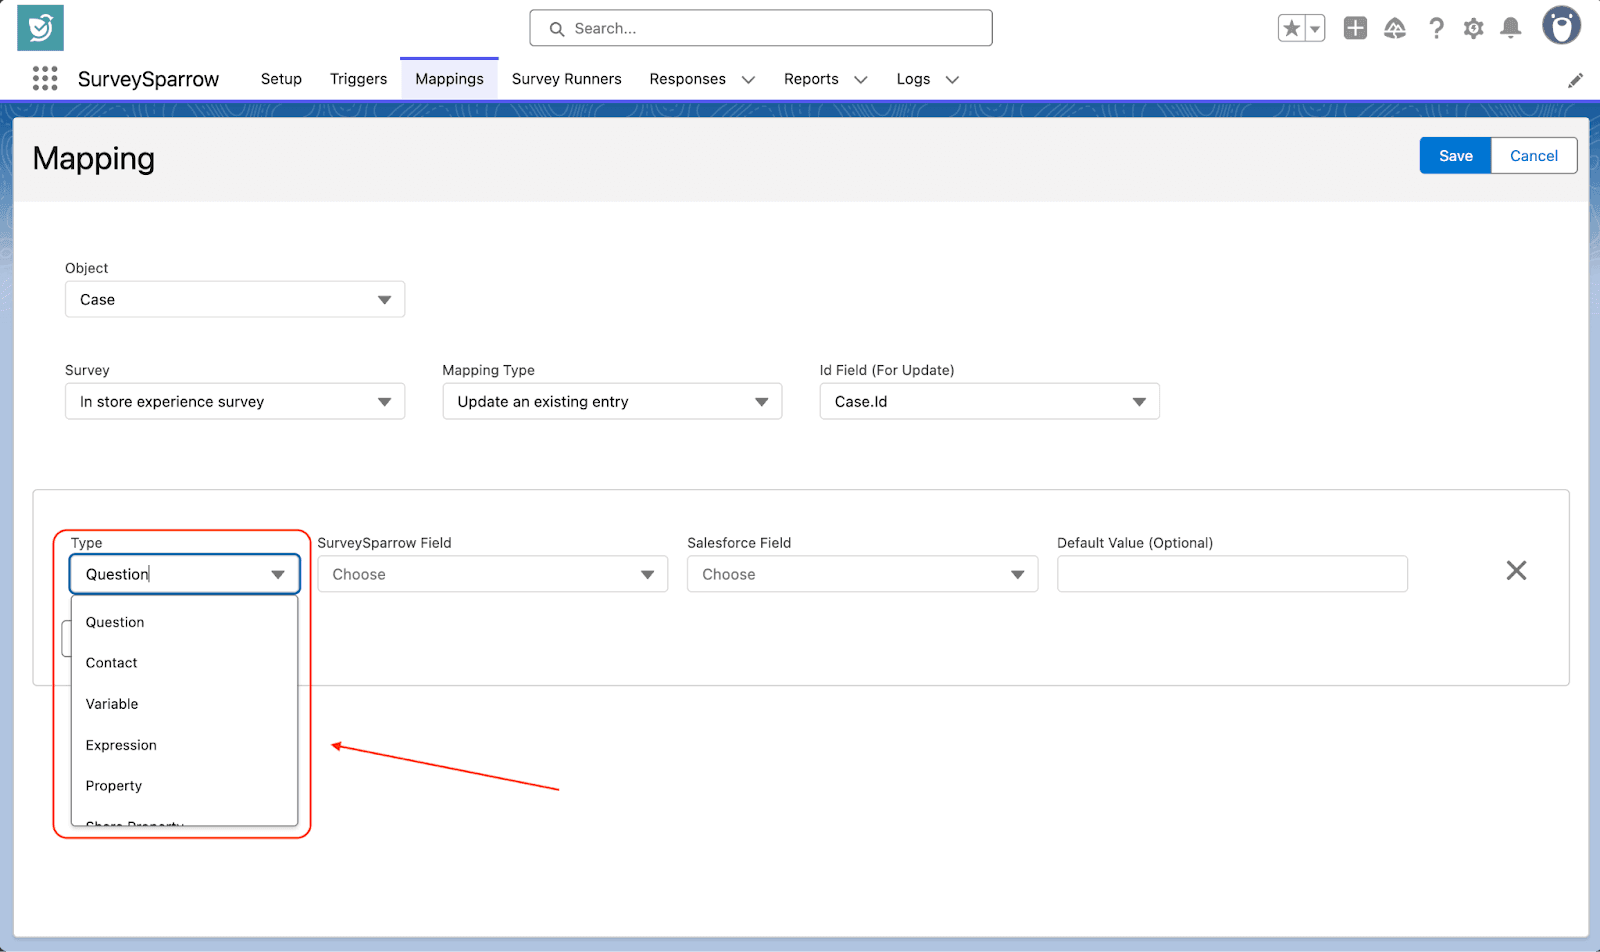
24. After adding the necessary data types, click Save.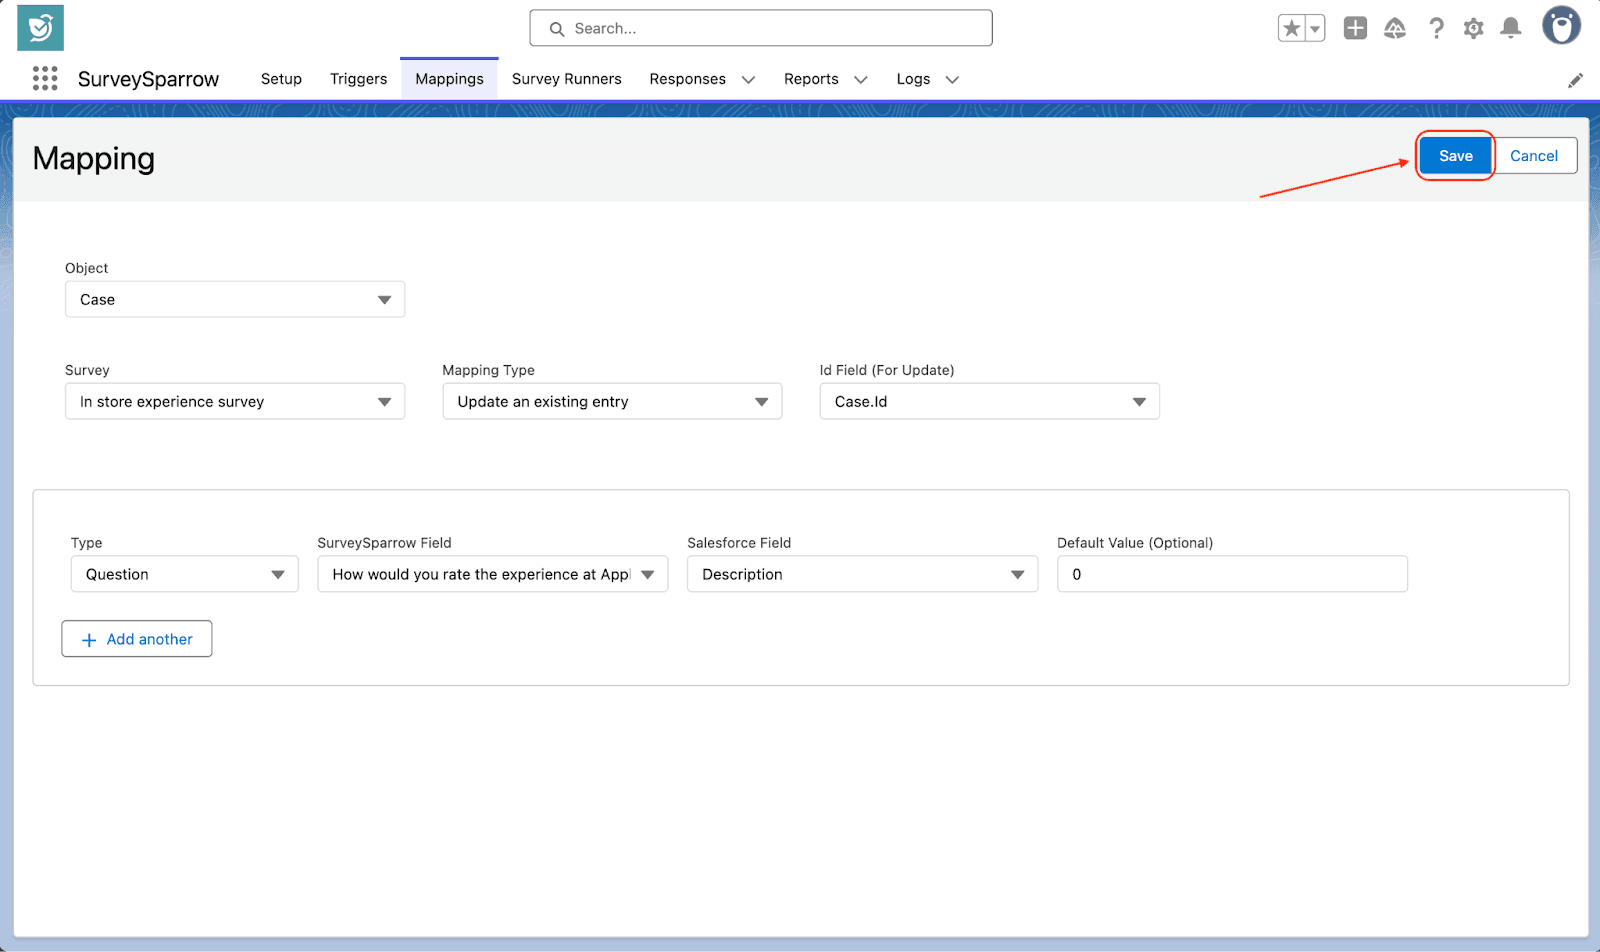
25. Enter a name for the mapping, then click Save.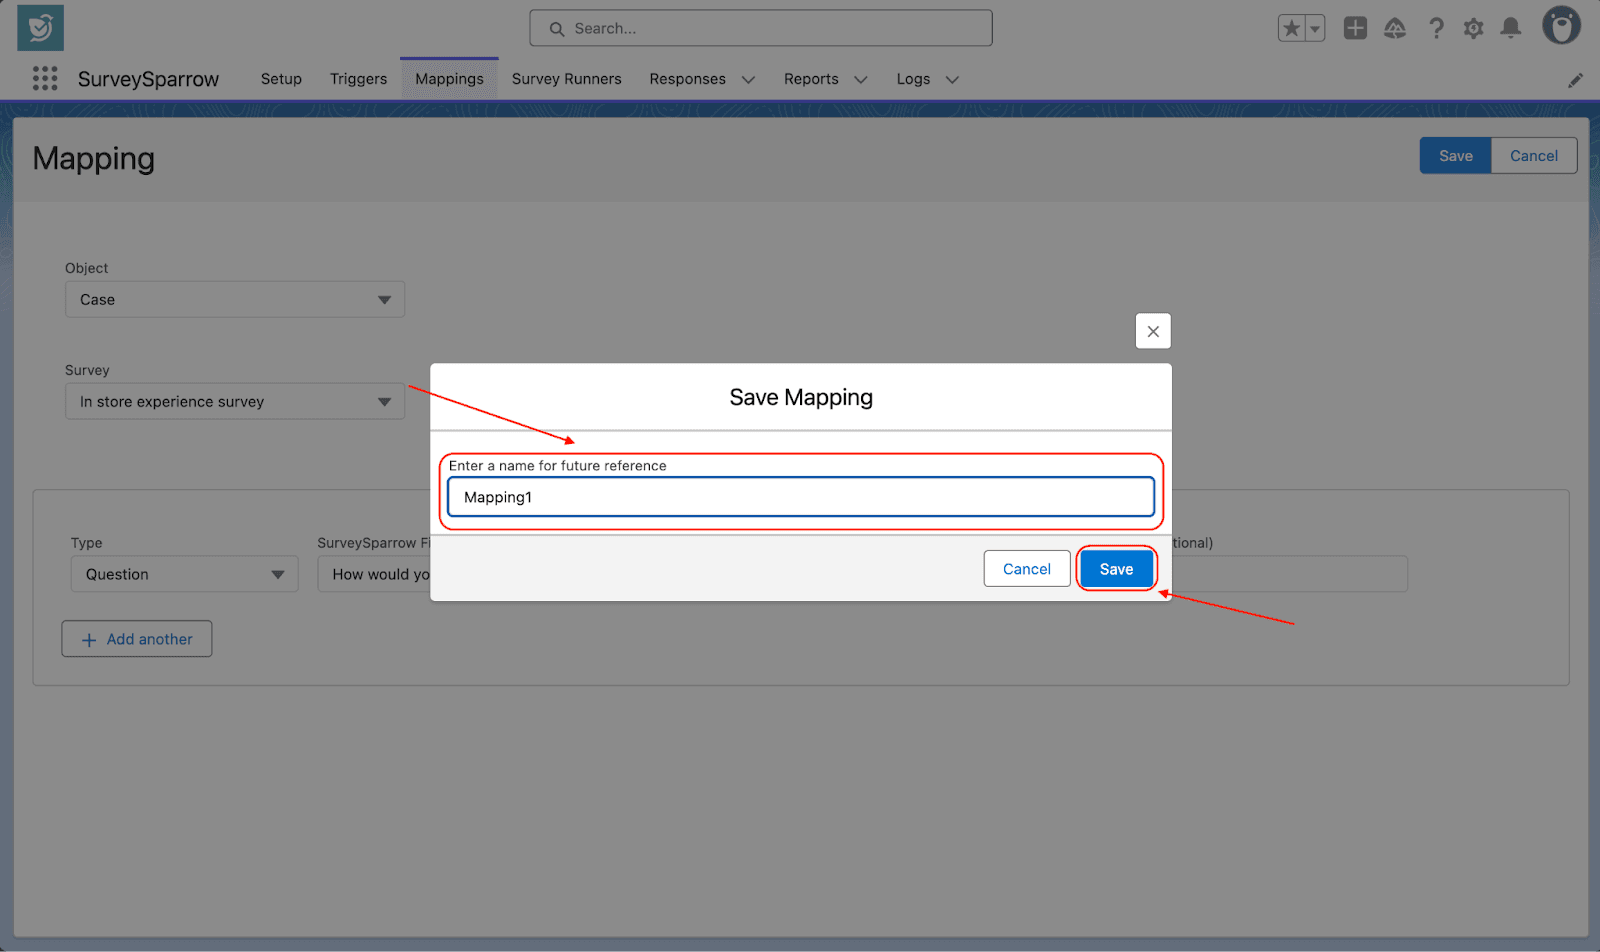
26. You are then taken to the Mappings section, where you can see all the mappings that are created. Here you can edit the mapping, deactivate it, delete it or add another one.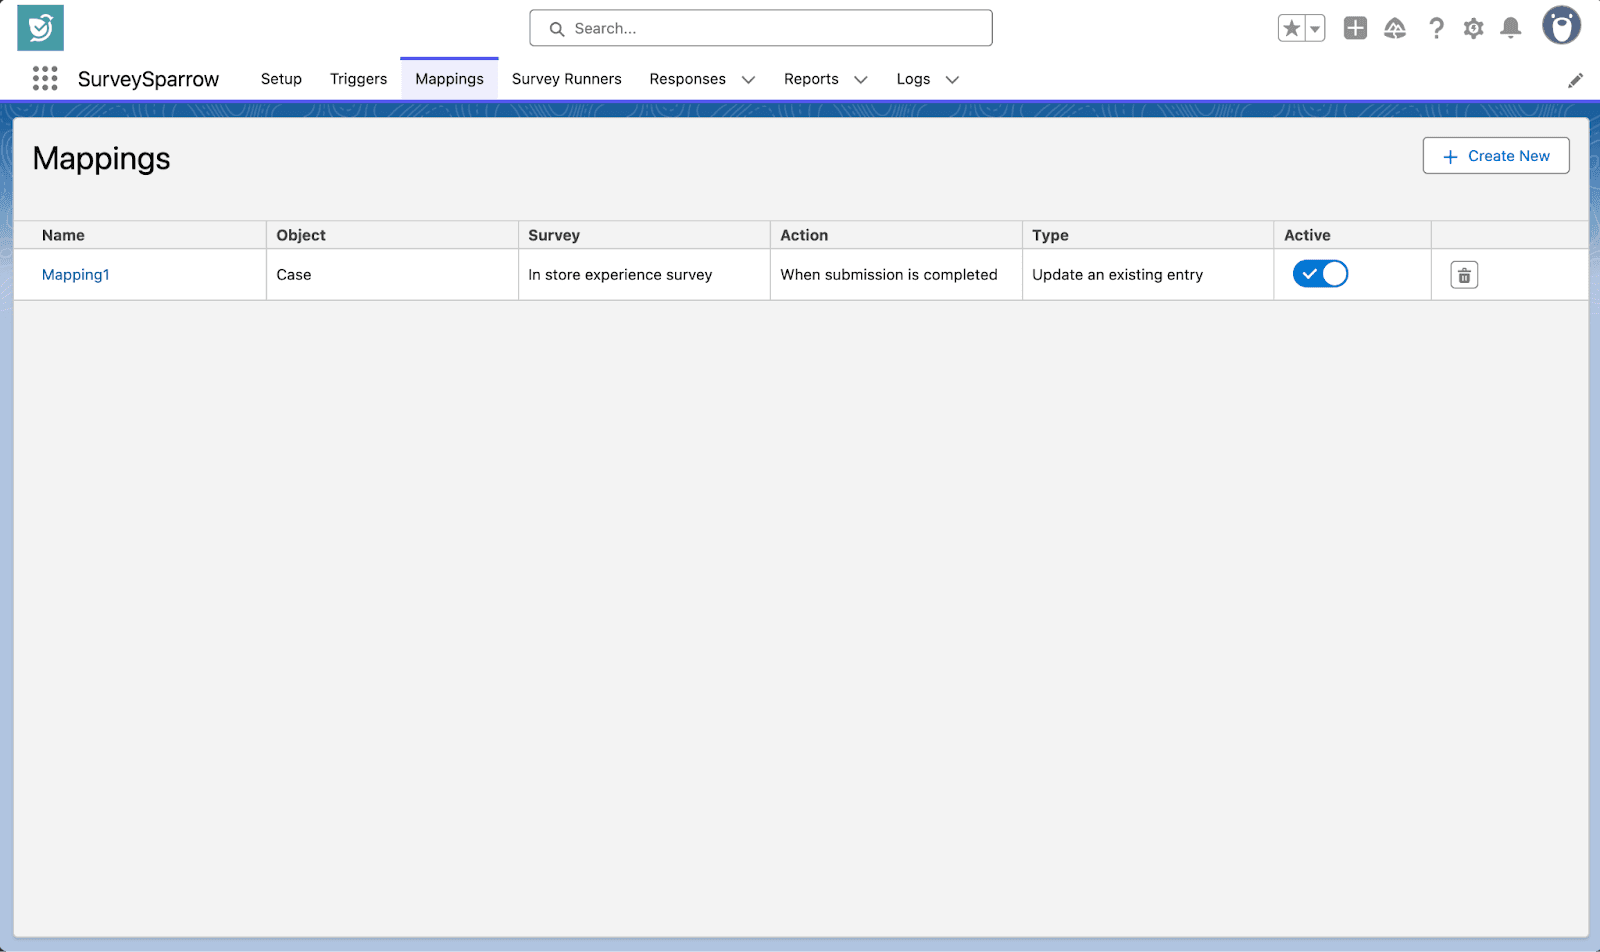
If there are any issues with the SurveySparrow app, you can visit the Logs section to understand the root cause and start debugging. The Logs section captures records of any activities (triggers or mappings) that occur in the app. However, note the following:
Now, let’s go through the process of enabling it.
1. Inside the Salesforce app, open Custom Settings.
2. When you reach the Custom Settings section, click on Manage under Action.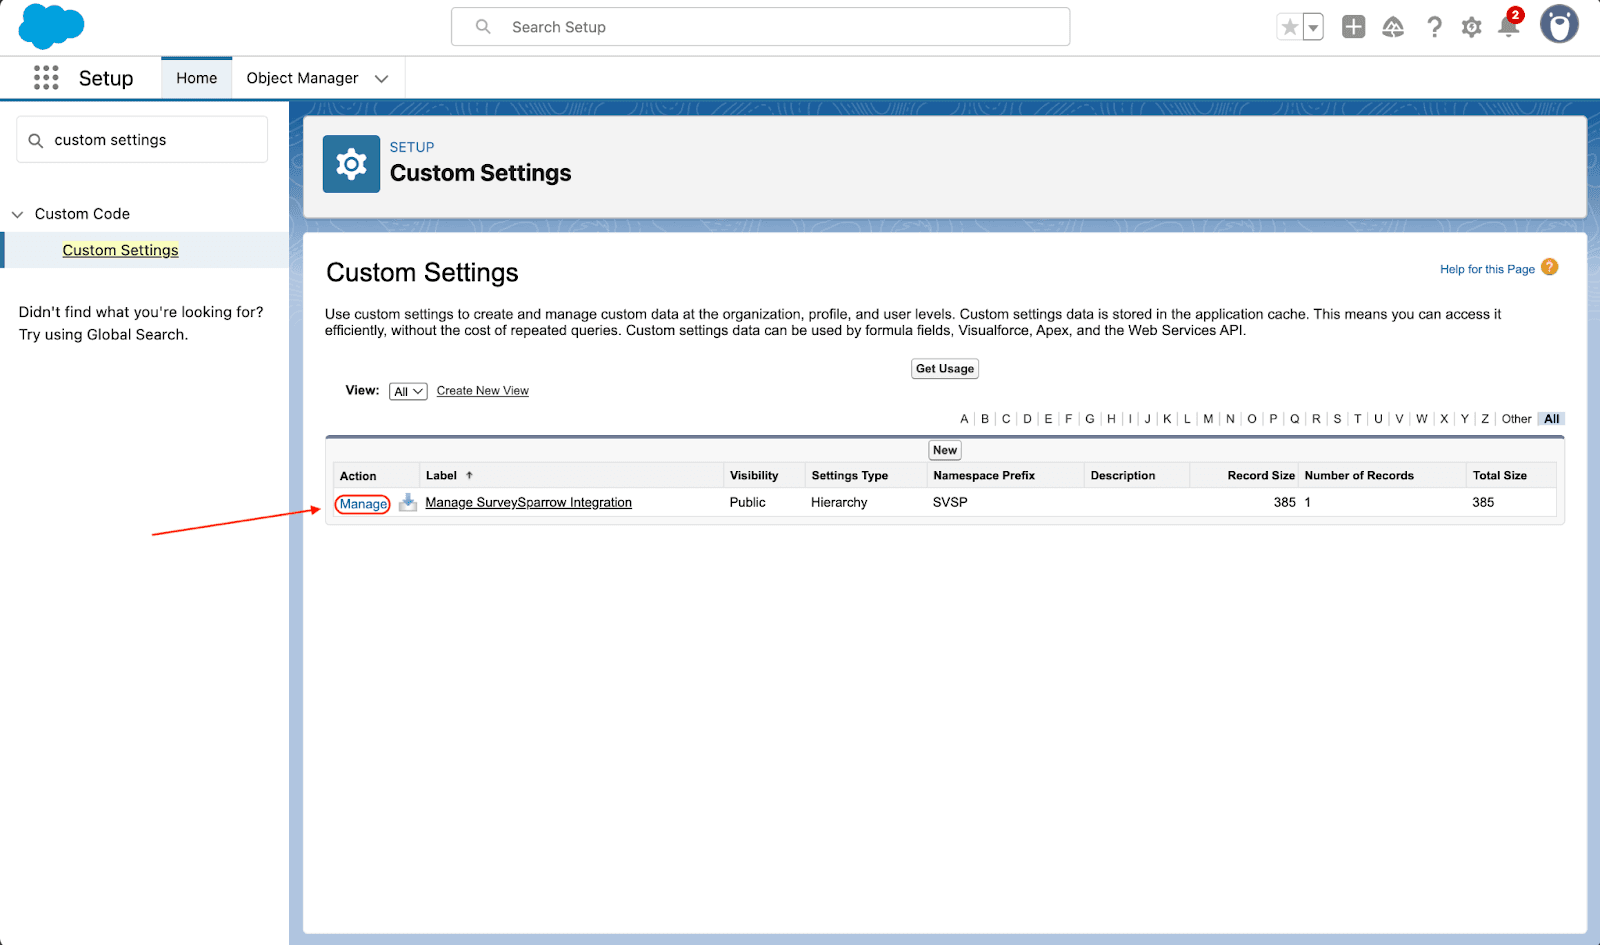
3. Then click on Edit.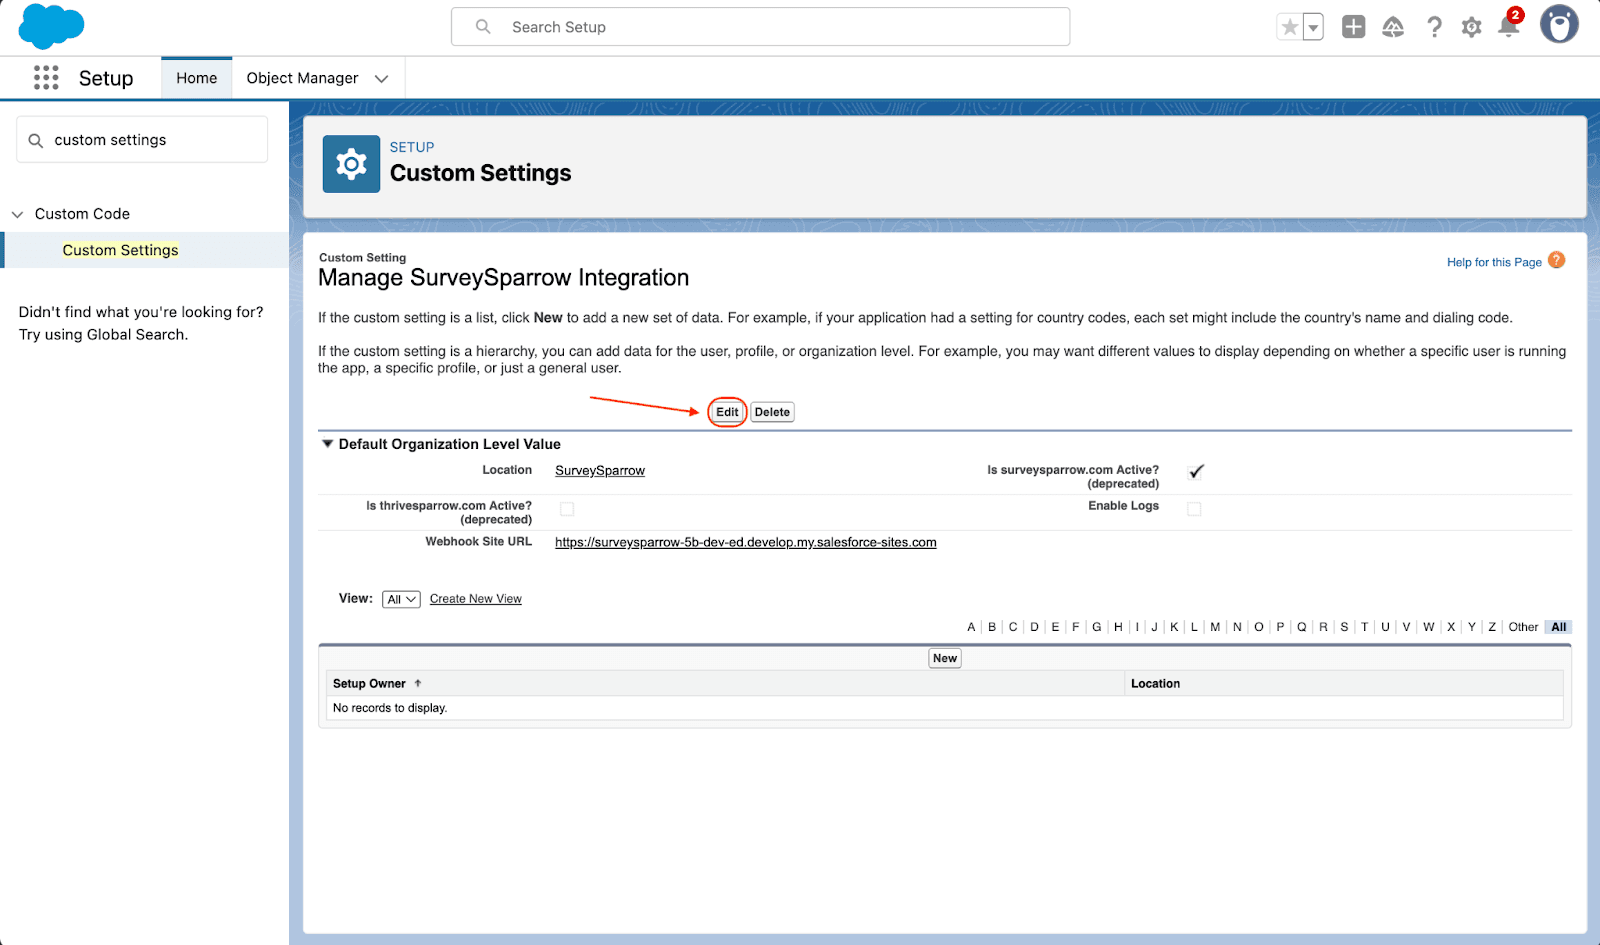
4. Click the check-box next to Enable Logs, then click on Save.
5. Now head to the SurveySparrow app and click on the Logs tab. You’ll see a list of records. If you wish to inspect a record, click on the corresponding entry under the Integration Tracking Name column.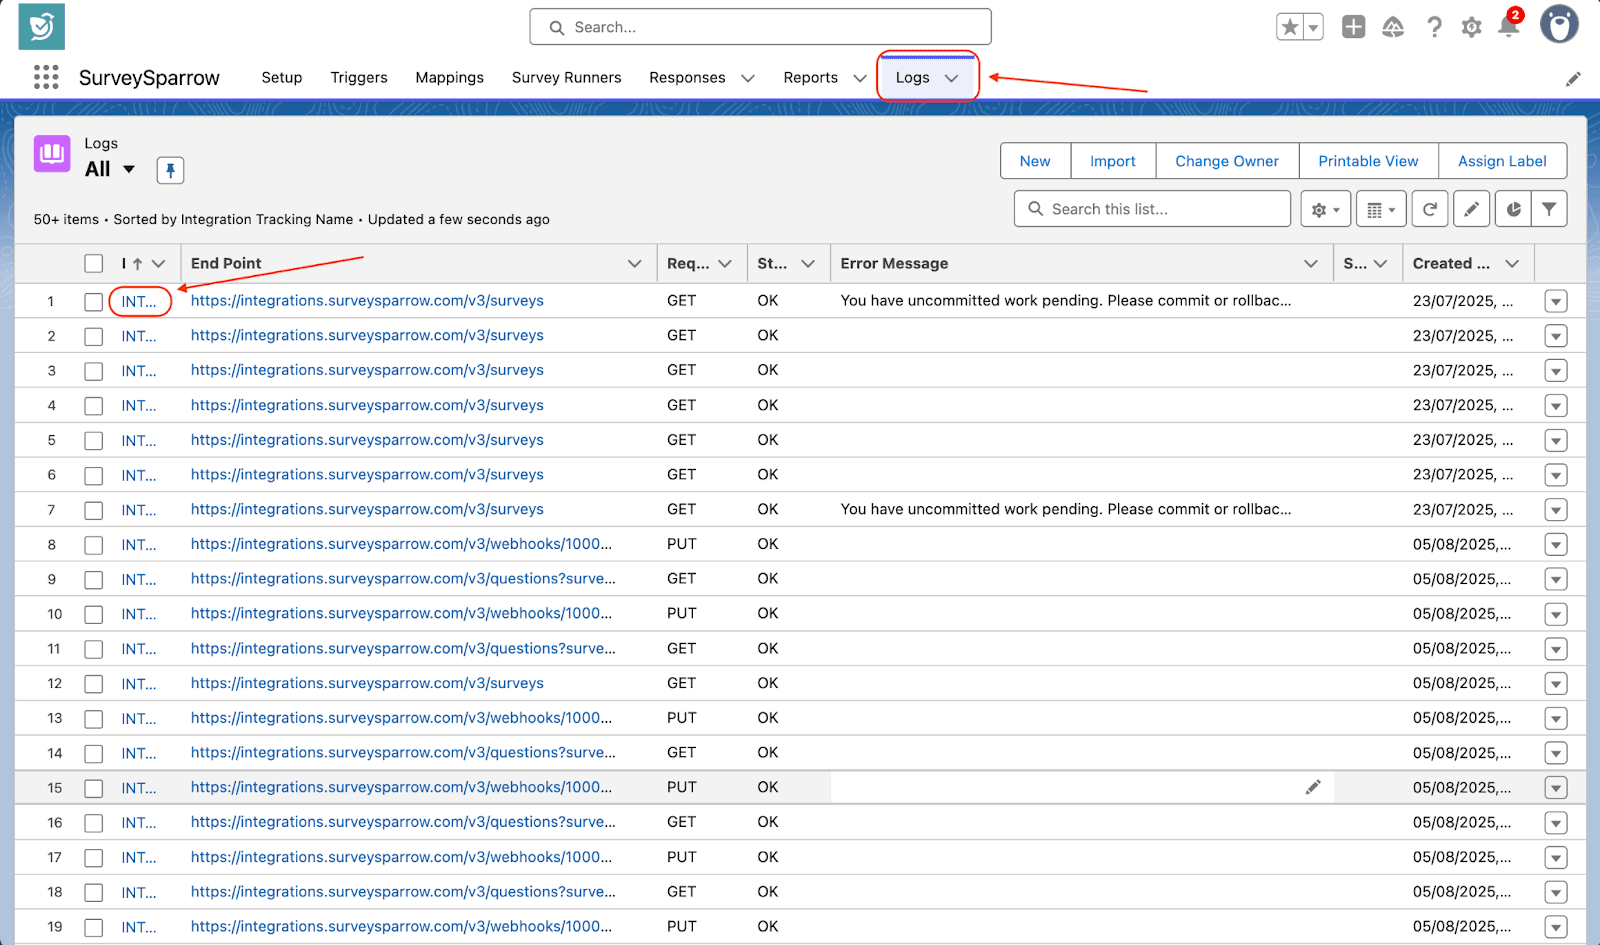
6. Inside, you’ll get to see all the related details, including the error message.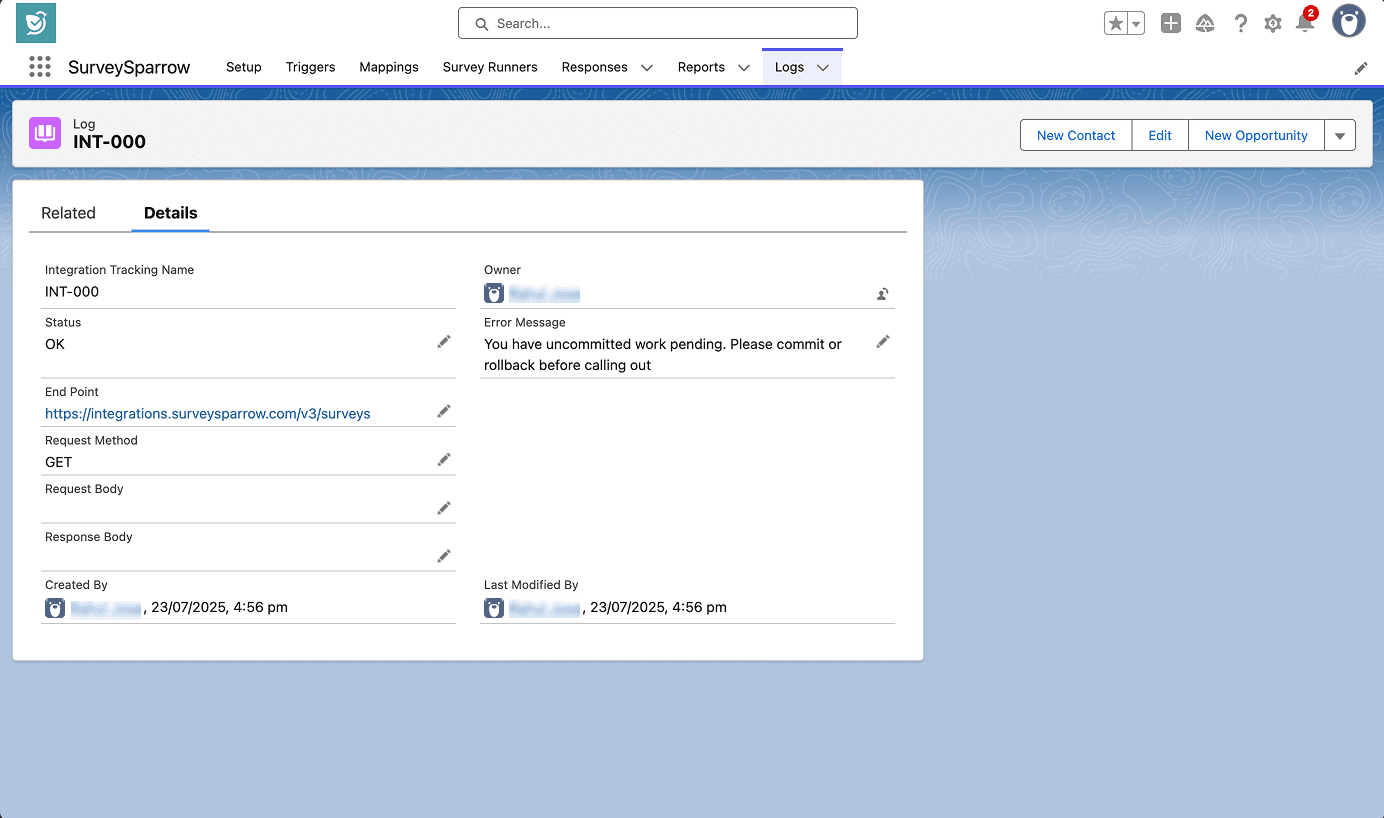
And that’s how you can set up and use the SurveySparrow app to streamline your surveys and feedback in Salesforce. Whether it’s automating survey sends or mapping responses to keep your CRM up to date, it’s now easier than ever to put customer insights into action.
Feel free to reach out to our community, if you have any questions!
1. How many Salesforce orgs can be simultaneously connected to a single SurveySparrow account?
The SurveySparrow app currently allows one production org and one sandbox org to be simultaneously connected to a single SurveySparrow account.
If a user wishes to connect to a different sandbox org, they must first disconnect the SurveySparrow account from the current sandbox org.
2. Why should we use Salesforce Sites in the package? How secure is it?
Salesforce Sites are a simpler solution to implement webhooks in Salesforce as opposed to Connected Apps, which require complex authentication flows and logins (unnecessary for basic data submission).
When using Salesforce Sites, any time a survey response is submitted, the data is sent to Salesforce via a public Site URL. This response is used to:
However, this does not compromise data security, and there are two reasons:
3. Can we use Experience Cloud (Community) sites instead of Salesforce Sites?
Yes, you can use Experience Cloud sites. Just ensure that the URL provided is publicly accessible and does not require login.
4. Why are there two SurveySparrow trigger actions in the Flow builder? Can the trigger support complex use cases?
To create a trigger, there are two Flow actions that must be configured:
Let’s explore some use cases with varying complexity:
Simple: The customer support team at a SaaS firm sends CSAT surveys to the customer's email addresses via SurveySparrow, after a case is resolved. They wish to automate this process, so that the survey is sent right as the agent marks the case as ‘closed’ in Salesforce. Using the SurveySparrow app, they build a trigger in the following manner:
Complex: At a commercial real estate firm, the sales manager handles high-value property sales. Every time a deal is closed, he sends a post-purchase survey to each key stakeholder involved: investors, legal, property managers, etc. He wants to automate this process, such that the survey is deployed to all the stakeholders as soon as the Opportunity Stage is changed to Closed Won. Using the SurveySparrow, he builds a trigger in the following manner :
As you can see, both actions support multi-level field selection and are compatible with different kinds of flows - making them apt for extensive and complex use cases.
5. Can we use the SurveySparrow Trigger Setup and Execute actions multiple times in a single Flow?
Yes, you can, if the flow is a record-triggered flow or a non-scheduled path. But in scheduled-triggered flows, only one Trigger Setup and Trigger Execute pair is allowed, due to Salesforce governor limits.
6. After upgrading the SurveySparrow app, the new tabs/flow actions are missing. Why did it happen and how do I fix it?
When the app is upgraded, new tabs/flow actions might not appear due to browser/session caching. To fix this, follow these steps:
7. Why am I unable to connect to my SurveySparrow account after upgrading the app?
After an upgrade, the Remote Site URLs may have been removed. To resolve this:
Powered By SparrowDesk